Have you ever wondered what the technical term for wood burning is? It’s a reasonable question, especially if you’ve ever found yourself staring at charmingly intricate designs etched onto a wooden surface and wondered, “How on earth do they do that?” Well, you’re in for a treat because today, we’re diving into this fascinating subject.

What is Pyrography?
So, here’s the scoop: the technical term for wood burning is “pyrography.” I know, it sounds like something a dragon might do in its spare time. The word “pyrography” comes from the Greek words “pyro,” meaning fire, and “graphos,” meaning writing. So, in essence, it’s writing with fire. Romantic, right?
Pyrography is an art form that has been around for centuries, even millennia. Different cultures have used it for decoration, storytelling, or simply to pass the time. From ancient China to medieval Europe, the ability to scorch designs into wood has always held a certain allure.
Brief History of Pyrography
Let’s hop into a time machine for a second. Picture ancient civilizations using heated metal rods to burn images into wood, leather, and even gourds. Fast forward a few centuries, and the Victorians turned pyrography into a sophisticated pastime, complete with specialized tools and elaborate designs. In more recent times, the craft has seen a resurgence, particularly with the advent of electric pyrography pens.
Would you believe that in the early 20th century, people used actual hot pokers from the fire to create designs? I’d rather not risk third-degree burns, thank you very much.
The Evolution
Now, why did wood burning evolve from simple tools to electric pens? It’s all about precision and convenience. Imagine trying to draw a detailed picture with a branding iron. Exactly. With electric pens, you get a consistent heat source, different pen tips for various effects, and less chance of lighting your house on fire. Win-win.
Tools of the Trade
Before we get too gooey-eyed about the art itself, let’s talk about the tools you’ll need. Like any good artist, a pyrographer’s toolbox is incredibly important.
The Basic Kit
Here’s a little table for clarity:
| Tool | Description | Use |
|---|---|---|
| Pyrography Pen | Electric, variable temperature | The main tool for burning designs |
| Different Tips | Variety of shapes and sizes | For detailing, shading, and texturing |
| Sandpaper | Fine grit | Prepares the wood surface |
| Transfer Paper | Special carbon paper | Transfers designs onto wood |
| Wood | Basswood, birch, or poplar | The canvas |
Each of these tools has its unique purpose and mastering them can make a significant difference in your work.
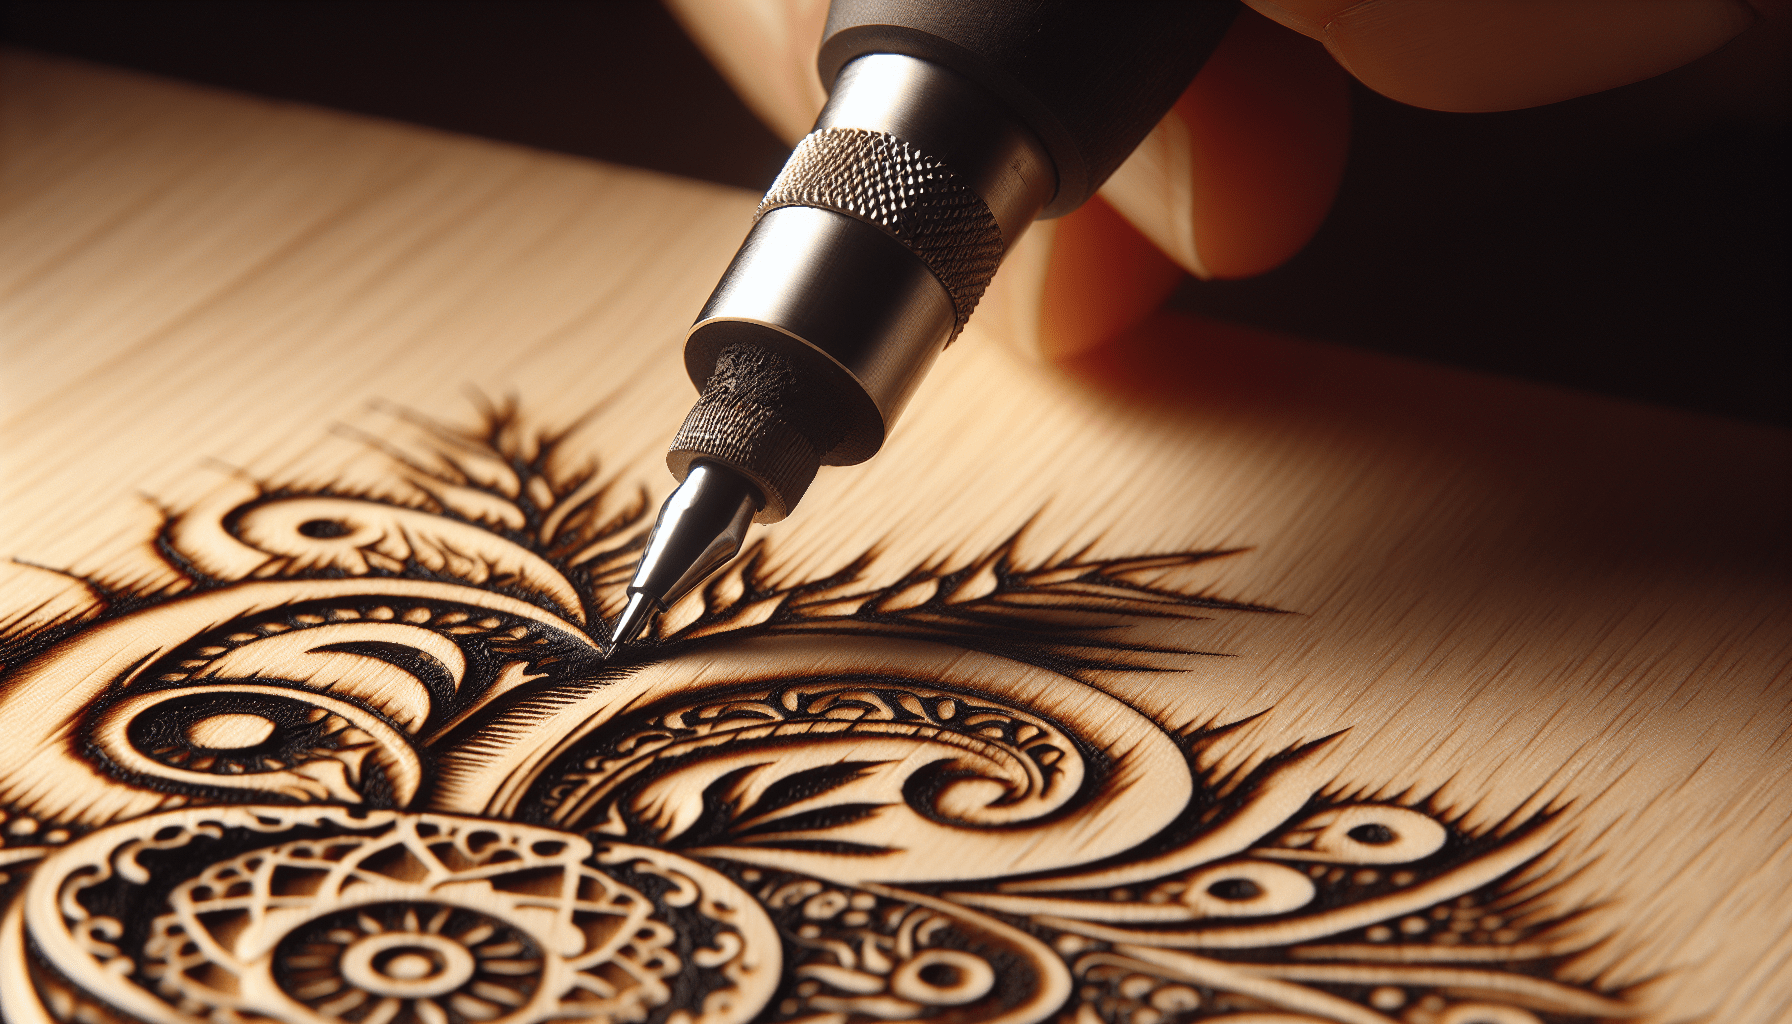
Pyrography Pen
First up, the pyrography pen. This isn’t your average pen. Most models come with adjustable temperatures, allowing you to control the intensity of the burn. Lower temperatures are great for lighter, subtle designs, while higher settings let you go bold and dark. The pen itself is usually ergonomically designed, so your hand won’t cramp up after a long session—believe me, you’ll thank the designers for that.
Tips and Tricks
The tips of the pyrography pen are interchangeable, and each one brings something unique to the table. Think of them as the brushes in a painter’s toolkit. There are universal tips, shading tips, calligraphy tips, and even specialty tips for textured finishes. You may feel like a master swordsman swapping out different blades for various tactics, and in a way, you are!
Prep Work
Before you even think about burning anything, you need to prep your wood. Sandpaper helps smooth out any rough spots, creating a clean surface for your art. The smoother the wood, the cleaner your design will be. Trust me on this one; a rough surface can make your lines look like a seismograph reading during an earthquake.
Getting Started
Alright, now that you’re all geared up, where do you even start? It can be pretty daunting staring at a blank slab of wood, your pyrography pen in hand, and absolutely zero ideas in your brain. Don’t worry; I’ve been there.
Choosing the Right Wood
Not all wood is created equal when it comes to pyrography. Some woods burn more cleanly and take designs better. Here are a few good starters:
| Type of Wood | Characteristics | Why It’s Good |
|---|---|---|
| Basswood | Light, soft, even grain | Ideal for beginners |
| Birch | Smooth surface, minimal grain | Good for detailed work |
| Poplar | Affordable, readily available | Great for practice projects |
Wood like pine can be tricky. Its resinous nature makes it prone to burn inconsistently, and you’ll likely spend more time battling the wood than creating your masterpiece.
Transferring Your Design
You’ve picked your wood, now what? It’s design time! If you’re an overachiever, you might freehand directly onto the wood. But for the rest of us mere mortals, transfer paper is a lifesaver. Print out a design, place the transfer paper between the printout and your wood, and trace over the lines. Voila, you have a guideline to follow.
Starting Small
Beginning with small, manageable projects can help you get the hang of the tool. Maybe a coaster, a name plate, or even a simple ornament. Once you get a feel for how the pen moves and how the wood responds, you can move on to bigger and bolder pieces.
Techniques
Like any other art form, pyrography involves a variety of techniques that can take years to master. But hey, we all have to start somewhere, right?
Basic Line Work
Straight lines, curves, and circles might seem elementary, but they lay the foundation for more complex designs. Practice controlling the pressure and speed of your pen to achieve consistent, clean lines. Variations in speed can result in different shades and textures, so experimenting here is crucial.
Shading
Shading can transform a flat design into a 3D spectacle. Use lower temperatures and light pressure to build up depth gradually. Circular motions and hatching can create gradients, giving your piece more life and dimension.
Texture
Want to add some flair to your work? Experiment with textures. By changing pen tips or altering your pressure and speed, you can create a variety of textures, from rough and rustic to smooth and refined.
Safety First
I can’t stress enough how important safety is in pyrography. You’re dealing with high heat, after all. Keep a fire extinguisher nearby, work in a well-ventilated area, and take breaks to avoid overheating your pen. Also, wear a mask if you’re working with treated wood or wood that releases harmful fumes.

Advanced Techniques
Once you’ve got the basics down, you can start exploring more advanced techniques. This is where the real fun begins, as you can start to develop your unique style.
Layering
One technique that many advanced pyrographers use is layering. By burning lighter shades first and then building up darker tones, you can create incredibly detailed and realistic images. This is especially handy for creating portraits or detailed landscapes.
Color Additions
Who says you have to stick to shades of brown? Adding color can give your work an extra pop. Watercolors, colored pencils, and even acrylic paints can be used to add vibrant hues to your designs. Just make sure to test your materials on scrap wood first to see how they interact with the burned surface.
Specialized Tips
Investing in a set of specialized tips can take your work to the next level. There are tips specifically designed for fine lines, broad strokes, and even texturing that can mimic the look of fur or feathers. By combining these tips with different pressure and speed techniques, you can create incredibly intricate designs.
Inspiration and Ideas
Stuck in an artistic rut? It happens to the best of us. Sometimes, all you need is a little inspiration to get those creative juices flowing.
Nature Themes
Nature is a great source of inspiration for pyrography. Leaves, trees, animals, and flowers can all be translated into stunning wood-burned designs. Take a walk outside and see what catches your eye. Maybe it’s the intricate veins of a leaf or the delicate wings of a butterfly.
Geometric Patterns
If you’re more inclined towards order and symmetry, geometric patterns might be your thing. Triangles, hexagons, and mandalas can make for stunning, eye-catching designs. Plus, they’re super satisfying to create.
Personal Projects
One of the most rewarding aspects of pyrography is the ability to create personalized gifts. From customized nameplates to portraiture, there’s something incredibly special about giving someone a piece of art that’s tailored just for them.
Troubleshooting
Even seasoned pyrographers encounter issues from time to time. Here’s a quick troubleshooting guide to help you overcome some common challenges.
Uneven Burns
Inconsistent burns can be a real headache. This usually happens due to uneven pressure or incorrect temperature settings. Make sure your pen is heated to the right temperature and that you’re applying consistent pressure as you work.
Overburning
Ever started shading, only to realize you’ve gone too dark too quickly? It can ruin a piece. To avoid this, always start with lighter shades and build up. You can always make an area darker, but lightening it is a lot trickier.
Pen Malfunctions
If your pen starts to malfunction, it can derail your entire project. Regularly clean your tips and make sure the connections are secure. If all else fails, consult the user manual or contact the manufacturer for advice.
The Joy of Pyrography
Pyrography isn’t just a hobby; it’s an art form. There’s something incredibly meditative about watching a design come to life under the heat of your pen. It offers a unique blend of creativity and craftsmanship that you don’t often find in other artistic endeavors.
Community and Resources
One of the best parts about getting into pyrography is the community. Whether it’s online forums, social media groups, or local clubs, there’s a wealth of knowledge out there. Veteran pyrographers are often more than willing to offer advice and share their experiences.
Books and Tutorials
If you’re the type who likes to learn at their own pace, there are plenty of books and online tutorials available. From beginner guides to advanced technique manuals, these resources can provide invaluable insights into the art of pyrography.
Workshops
Many art stores and community centers offer workshops on pyrography. These classes can be a fantastic way to learn new techniques, get hands-on experience, and meet fellow enthusiasts. Plus, having an instructor on hand to answer questions and offer tips can accelerate your learning curve significantly.
A Few Final Thoughts
So there you have it, a comprehensive guide to understanding the technical term for wood burning—pyrography—and all the cool things you can do with it. Whether you’re new to the craft or an old hand looking for some fresh insights, there’s always something new to learn and explore in the world of pyrography.
Next time you see a beautifully burned wood piece, you can impress your friends with your knowledge of pyrography, toss around terms like “shading techniques” and “layering,” and maybe even inspire someone else to pick up the pyrography pen.
May your lines be straight, your burns even, and your designs ever stunning. So, what will you create next?