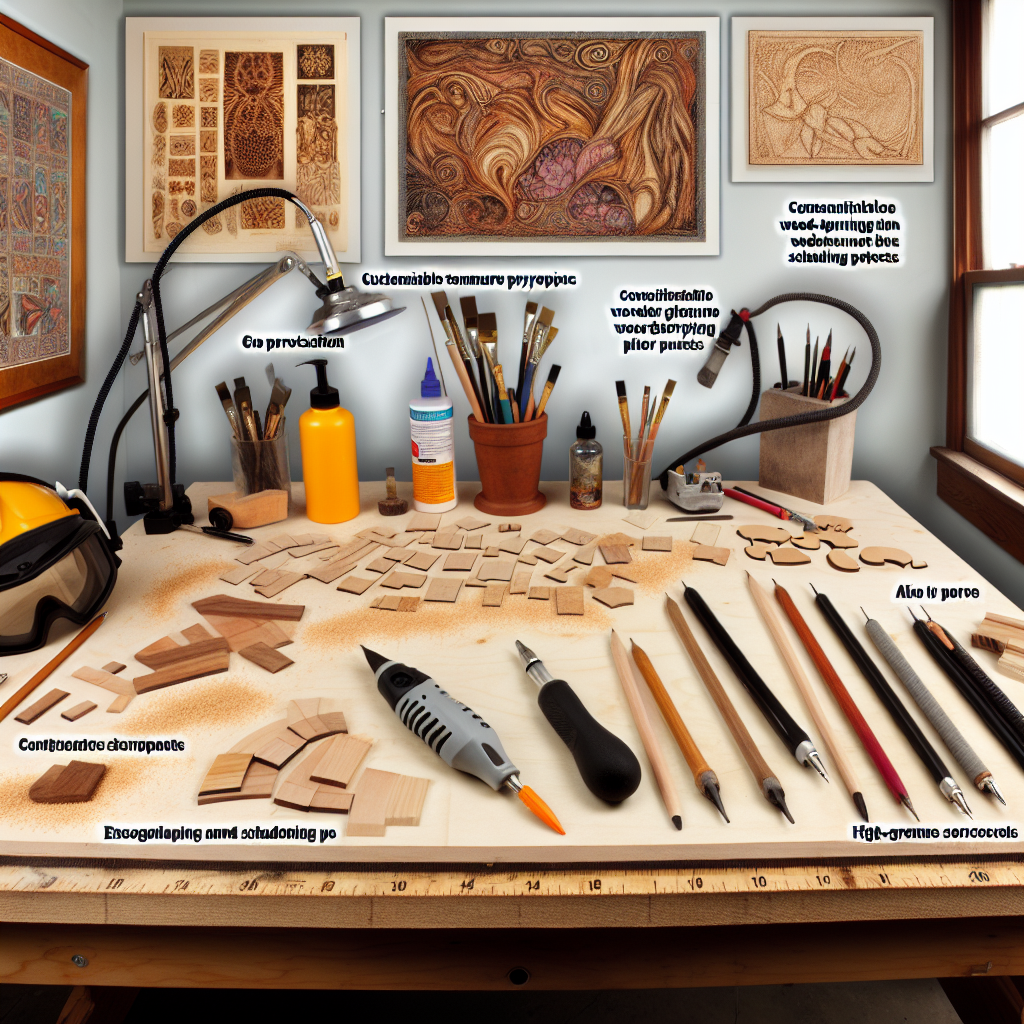
Exploring the Basics of Pyrography: Techniques and Tools for Beginners
Pyrography, the art of decorating wood with burn marks, offers a unique way to express creativity and transform ordinary surfaces into stunning decorative pieces. For beginners interested in this craft, understanding the essential techniques and tools is crucial to embarking on a rewarding artistic journey.
Getting Started with Pyrography
Before diving into the intricate designs of pyrography, it’s important to grasp some fundamental concepts. Here’s what beginners should know:
- Understanding Wood Types: Different woods react differently to heat. Softwoods, like pine, are easier to burn and perfect for beginners. Hardwoods, like oak, may require more skill and patience.
- Choosing Your Workspace: A well-ventilated area is essential. The smoke produced during burning can be harmful, so consider working near a window or using a fume extraction system.
- Familiarizing with Materials: Utilize high-quality wood that’s free from knots and imperfections. Standard sizes are usually best for beginners, focusing on practice rather than complex patterns.
Essential Tools for Beginners
Equipping yourself with the right tools is key to achieving great results. Here’s a list of basic pyrography tools:
- Pyrography Pen: This is the primary tool. Opt for a pen that allows you to adjust temperature and has interchangeable tips for various effects.
- Burning Tips: Tips come in various shapes and sizes. Beginners should start with a fine point for detailed work and a shading tip for adding depth.
- Wood Sealer: A sealant protects your finished pieces. Choose water-based sealers that are compatible with wood.
- Sandpaper: Use sanding blocks to smooth wood surfaces before you start burning, ensuring even and clean designs.
Basic Techniques to Master
Once you have your materials ready, it’s time to practice essential techniques. These foundational skills will enhance your pyrography experience:
- Dirting: This technique adds depth by varying the pressure and speed of the pen. Gently applying pressure creates lighter burns, while more force leads to darker marks.
- Shading: Mastering shading is vital for depth. Angle the pen and move it in circular motions to blend tones effectively.
- Outlining: Start with simple outlines of your design. Solid lines enhance the overall image and can be filled in later for more intricacy.
- Texturing: Experiment with different strokes and pen angles to create textures like fur or fabric. Crosshatching is particularly effective for detailed designs.
Practicing Your Skills
The best way to improve in pyrography is through consistent practice. As a beginner, start with simple projects like:
- Create small pieces, such as bookmarks or coasters, to try out your new skills without overwhelming yourself.
- Use tracing paper to transfer designs onto wood. This helps beginners focus on technique rather than design creation.
- Join online forums or local workshops. Engaging with other artists can provide inspiration and feedback to refine your skills.
Safety First
Safety is paramount when practicing pyrography. Always wear protective eyewear, and if you’re sensitive to smoke, consider using a mask. Keep a fire extinguisher nearby, just to be safe, and never leave the heated tool unattended.
Cultivating Your Style
As you gain confidence, don’t hesitate to embrace your creativity. Explore different techniques, experiment with combinations, and let your style flourish. It’s about finding what works for you and creating pieces that reflect your personality.
The basics of pyrography revolve around understanding your materials, mastering essential techniques, and practicing regularly. With patience and passion, you can transform wood into beautiful works of art that showcase your unique flair and creativity.
Creative Patterns and Designs: Inspiring Ideas for Wood Burning Projects
Wood burning, or pyrography, is more than a technique; it’s an art form that allows creators to express their unique style and narrative through intricate designs. Whether you’re a seasoned pyrographer or just starting, exploring creative patterns and design ideas can significantly elevate your projects. With various styles and techniques at your disposal, the possibilities are endless. Here are some inspiring concepts to fuel your wood burning enthusiasm.
Floral Patterns
Floral designs remain a popular choice for wood burning projects. They can range from simple daisies to elaborate garden scenes. Floral motifs add a soft touch to any woodwork piece, often combined with detailed shading to create a lifelike appearance.
- Wildflowers: Try creating clusters of wildflowers for a rustic feel. Experiment with spirals and curvy lines to mimic their organic shapes.
- Roses: Roses are classic and versatile. You can focus on the petals to create intricate layers, giving the design depth.
- Botanical Illustrations: Using real plants as reference material can guide you in creating realistic representations. This approach can involve combining various species to create unique compositions.
Geometric Designs
Geometric patterns offer a contemporary twist to traditional wood burning. Straight lines and symmetrical shapes can create eye-catching contrasts with the natural beauty of wood.
- Mandalas: These circular patterns are perfect for practicing intricate detail. Each section can be filled with different textures or shading techniques.
- Abstract Figures: Try using triangles, circles, and squares to form abstract designs. The interplay of positive and negative space can be visually striking.
- Optical Illusions: Once you master basic geometric shapes, dive into designs that create depth and perspective, tricking the eye with layers and movement.
Animal Motifs
Animal designs into your wood burning projects can lend them a lifelike quality. These designs range from adorable pets to majestic wildlife and can evoke deeper themes connected to nature.
- Wildlife Silhouettes: This minimalist approach focuses on the outline of animals, allowing the beauty of the wood grain to shine through.
- Detailed Portraits: Choose your favorite animal and create a detailed portrait. Pay attention to fur texture and eye expression for added realism.
- Mythical Creatures: From dragons to griffins, let your imagination soar with designs that celebrate fantasy and folklore.
Seasonal Themes
Embrace the changing seasons by creating wood burning projects inspired by nature’s cyclical beauty. Each season presents a myriad of inspirations.
- Spring: Consider designs that feature blooming flowers, buzzing bees, or rain showers.
- Summer: Capture the essence of summer with tropical motifs like palm trees, sunsets, or beach scenes.
- Autumn: Think about vibrant leaves, pumpkins, and harvest motifs to celebrate fall.
- Winter: Winter designs can include snowflakes, evergreen trees, or cozy cabin scenes.
Custom Typography
Text into your wood burning piece can personalize it significantly. Whether it’s a meaningful quote, a family name, or an inspiring word, typography adds depth to your project.
- Calligraphy Styles: Explore different scripts, from elegant cursive to bold block letters. The choice of font can convey a specific mood.
- Combined Elements: Pair text with images such as borders or symbols to create a cohesive design.
The art of wood burning offers a vast range of pattern and design options that can elevate your artistry. From floral designs and geometric patterns to animal motifs, seasonal themes, and custom typography, the only limit is your imagination. Dive into your next wood burning project with these creative ideas, and unleash your artistic potential while enjoying the process of bringing your visions to life.
Safety First: Essential Precautions for Pyrography Artists
Pyrography, the art of wood burning, is both a rewarding and intricate craft. However, it comes with its own set of safety challenges that every artist should address. Being aware of these precautions can help you focus on creativity while ensuring a safe environment. Below are some essential safety tips that every pyrography artist should keep in mind.
Understanding Your Tools
Before diving into the creative process, it’s crucial to understand the tools you’ll be using. Pyrography pens are designed for precision but can reach high temperatures. Here’s how to handle them safely:
- Always read the manufacturer’s instructions for your pyrography tool before use.
- Inspect your equipment regularly for any damages that could pose risks.
- Use a tool with a comfortable grip to avoid strain and ensure better control.
Creating a Safe Workspace
Your workspace plays a pivotal role in your safety while engaging in pyrography. Here are some suggestions for setting up an effective workspace:
- Well-Ventilated Area: Ensure that you’re working in a ventilated space. Smoke and fumes can build up quickly when burning wood, which could lead to respiratory issues.
- Flame-Resistant Surface: Use a flame-resistant workspace, such as a concrete or metal surface, to protect against accidental burns.
- Organized Environment: Keep your workspace tidy to prevent accidents. Remove clutter and flammable materials away from your project area.
Protective Gear
Wearing the right protective gear is an important part of safety during pyrography. Below are some recommendations:
- Safety Goggles: Protect your eyes from any flying debris or wood particles.
- Dust Mask: A mask will help filter out toxic smoke and dust generated during pyrography, ensuring that you breathe cleaner air.
- Heat-Resistant Gloves: Use gloves to protect your hands from burns, especially when handling hot tools and materials.
Fire Safety Precautions
As wood burning involves heat, fire safety is non-negotiable. Implement the following fire safety measures:
- Keep a fire extinguisher or a bucket of water nearby while working. Accidents can happen, so be prepared.
- Always unplug your pyrography tool when not in use. This minimizes the risk of accidental burns or fires.
- Never leave your tool unattended while it’s plugged in or hot.
Proper Material Handling
Selecting the right materials for your pyrography projects is vital for both safety and quality. Consider the following:
- Choose Safe Woods: Some woods are more prone to release harmful fumes when burned, such as treated wood or softwoods like pine. Opt for hardwoods like oak or maple, which are typically safer for pyrography.
- Storage of Materials: Store wood and other flammable materials away from your workspace, ideally in a designated storage area.
Post-Project Clean-Up
After working on your pyrography project, proper clean-up is crucial. Take these steps:
- Allow all tools and materials to cool down before storing them.
- Dispose of any scrap wood or dust properly, especially if they are still smoldering.
- Clean your tools to keep them functioning correctly and to ensure that they remain safe for future use.
Ultimately, engaging in pyrography can be a fulfilling experience, but it’s vital to prioritize safety. By incorporating these essential precautions into your creative process, you can enjoy your artistic pursuits while minimizing risks. Stay educated, remain cautious, and let your creativity shine through wood burning safely.
Common Mistakes in Wood Burning and How to Avoid Them
Wood burning, known as pyrography, is an art that combines creativity with technical skill. While it can be a rewarding hobby, many people encounter common pitfalls along their journey. Being aware of these mistakes and knowing how to avoid them can significantly enhance your results and enjoyment of the craft.
Inadequate Preparation
One of the most frequent mistakes is diving into a project without proper planning. Failing to prepare can lead to frustration and unsatisfactory results.
- Select the Right Wood: Always choose a wood type that suits pyrography. Softwoods like pine are easier to burn, while hardwoods, such as oak or maple, may create challenges due to their density.
- Sketch Your Design: Before you start burning, sketch your design on paper or directly on the wood with a pencil. This will guide your tool, keeping your work on track.
Improper Tool Use
Understanding how to use your pyrography tools is crucial. One major error is using incorrect temperature settings.
- Too Hot or Too Cold: If your tool is too hot, you may burn through the wood. Conversely, a tool that’s not hot enough won’t leave a mark. Experiment with settings on a scrap piece until you find the perfect temperature.
- Inconsistent Pressure: Maintaining consistent pressure while burning ensures an even finish. Varying pressure can lead to uneven lines, making your art look sloppy.
Neglecting to Practice
Many aspiring pyrography artists underestimate the importance of practice. Like any other skill, wood burning demands consistent effort. To improve your technique:
- Use Practice Wood: Before starting on your final piece, allocate time to burn on scrap wood. This provides invaluable experience without the fear of ruining your main project.
- Try Different Techniques: Experiment with shading, different strokes, and depth. Understanding these various techniques will expand your skill set and enhance your artwork.
Ignoring Safety Precautions
Safety should always come first in any craft. One common oversight is neglecting proper safety measures when using burning tools.
- Ventilation: Make sure you work in a well-ventilated area to avoid inhaling fumes from burnt wood.
- Protective Gear: Wearing gloves and using a smoking area mat can prevent accidents and keep your workspace organized and safe.
Rushing the Process
Impatience can lead to mistakes in wood burning. Rushing through your project can compromise quality. Here are some tips to help you pace your work effectively:
- Set Realistic Timeframes: Break down your project into manageable tasks and set a timeline for each part. This will help keep you focused without feeling overwhelmed.
- Take Breaks: Step back now and then to reassess your work. This can prevent burnout and keep your artistic vision fresh.
Neglecting Finishing Touches
After hours of hard work, it’s tempting to consider your project done once the burning is complete. However, neglecting finishing touches can detract from the overall appeal of your piece.
- Sealing Your Work: Always apply a protective finish like varnish or oil. This not only enhances the appearance but also protects the wood from damage.
- Cleaning Up the Edges: After finishing your burning, use fine sandpaper to smooth any rough edges and enhance the final look.
By recognizing these common mistakes and understanding how to avoid them, you can enhance your pyrography skills. Embrace the learning process, and remember that each piece you create is a step forward in your artistic journey. With practice and patience, you’ll develop into a confident wood burning artist while enjoying the art form to its fullest.
The Role of Finishing Techniques in Enhancing Pyrography Creations
Pyrography, the art of wood burning, captivates many artists and hobbyists with its unique ability to transform ordinary wood into extraordinary pieces of art. However, the journey doesn’t end once you’ve created a stunning design; finishing techniques play a crucial role in elevating your pyrography creations to new heights. These techniques not only enhance the aesthetic appeal but also protect the artwork from environmental factors, ensuring its longevity.
When you complete a pyrographic piece, applying appropriate finishing techniques can significantly influence the final look and feel of your work. Here, we’ll dive into some essential methods and materials that can amplify your pyrography projects.
1. Sanding and Smoothing the Surface
Starting with a smooth surface is vital for achieving optimal results. Here are some tips:
- Choose the Right Grit: Begin with a coarse grit sandpaper (around 120-220) to remove any rough areas. Gradually work your way to a finer grit (400 or higher) to achieve a slick finish.
- Gentle Touch: When sanding, use a light hand to avoid damaging the design you’ve just burned.
- Cleaning Up: After sanding, remove any dust with a soft cloth or a tack cloth to prepare the surface for finishing.
2. Choosing the Right Finish
What you apply on top of your pyrography design can make all the difference. Below are some popular finishing materials:
- Oil Finishes: Natural oils, such as linseed or tung oil, can enhance the wood grain and offer a warm, rich tone. They penetrate the wood, providing moisture protection.
- Water-based Finishes: These finishes are great for those who prefer low odor and fast drying times. Acrylic sealers provide a clear coat without altering the wood’s original color.
- Spray Finishes: If you’re looking for even coverage, consider using spray lacquers or varnishes. Ensure you work in a well-ventilated area when using sprays.
3. Techniques for Application
How you apply the finish can affect the overall outcome. Here are some methods to consider:
- Brush Application: Use a high-quality brush for an even application, ensuring that you paint in the direction of the wood grain.
- Cloth Application: For oils, you might prefer to use a soft cloth to rub the finish into the wood. This method also helps to keep the coat thin and avoid drips.
- Spraying: For those opting for a spray finish, keep the can about 6-12 inches away from the surface and apply in light, even strokes.
4. Additional Protective Measures
In addition to finishing your pyrographic artwork, consider these protective measures to preserve its beauty:
- Coasters and Trivets: If your piece will be used functionally, like in coasters, make sure to seal them thoroughly. This helps prevent moisture damage.
- Display Areas: Choose display locations away from direct sunlight and moisture to minimize fading and warping.
- Regular Maintenance: Dust your pyrography creations regularly and avoid using chemicals that can degrade the finish.
5. Experimenting with Mixed Techniques
Don’t be afraid to get creative with your finishing techniques. Combining methods can yield stunning results. For instance, you might start with an oil finish for depth and then apply a gloss spray for added shine. Experimentation can lead to unique textures and appearances that enhance the artwork’s character.
In the realm of pyrography, finishing techniques are just as fundamental as the burning process itself. By investing time in proper sanding, selecting suitable finishes, applying them correctly, and taking protective measures, artists can substantially enrich their wood-burning projects. The right finishing touches not only elevate the aesthetic quality but also ensure your artwork stands the test of time, allowing future generations to appreciate the craftsmanship and creativity embodied in each piece.
Conclusion
Embarking on the journey of pyrography opens up a world filled with creativity and self-expression through the beautiful medium of wood. As you’ve explored in this article, mastering the art of wood burning isn’t just about owning the right tools; it’s also about understanding the techniques that form the foundation of this captivating craft. Whether you’re a beginner looking to immerse yourself in pyrography or an experienced artist aiming to refine your skills, the basics of this art form are essential to achieving stunning results.
Starting with the basics allows you to develop a solid grasp of different techniques and tools. The variety available—from hot pens to wood-burning stamps—ensures that you can select the method that best suits your style and project. Each tool serves a unique purpose, freeing your imagination and creativity to come to life on wood. various techniques, such as shading, line work, and intricate detailing will help elevate your work and establish a distinctive aesthetic that resonates with your audience.
Once familiar with the foundational techniques, the next phase involves designing your creative patterns. Inspiration comes in many forms. By exploring themes or images that personally resonate with you, be it nature scenes, geometric patterns, or whimsical characters, you can channel your enthusiasm into your projects. Feel free to experiment with scale, texture, and placement. Creating sketches beforehand can also provide clarity and guide your wood-burning journey, ensuring you achieve the results you envision.
As rewarding as wood burning can be, it does come with its share of safety concerns. The tools used in pyrography often operate at high temperatures, making it crucial to implement essential safety precautions while working. Wearing protective gear, including heat-resistant gloves and safety goggles, is a must. Ensuring your workspace is well-ventilated and free of flammable materials creates a safer environment for you to immerse yourself in this serene craft. Remember, prioritizing safety not only protects you but also allows you to focus entirely on the art, without unnecessary worry.
Even seasoned artists encounter pitfalls on their creative journey. Recognizing common mistakes in wood burning—like misjudging the temperature settings or applying too much pressure—can save you time and frustration. Be mindful of wood grain direction and how it affects your designs. Simple practices, such as doing test burns on a scrap piece of wood or using the right pressure, can help maintain the integrity of your work.
Finishing techniques play an undeniable role in enhancing your pyrography creations. After intricately crafting your artwork, how you finish it can significantly impact the final appearance. Whether it’s applying stains, varnishes, or sealing agents, each technique serves to protect your wooden masterpiece while enriching its visual appeal. Consider how different finishes can alter the color and texture of your design, creating an entirely new dimension to your work.
The journey into the art of wood burning is an enriching experience filled with exploration, creativity, and personal expression. By understanding the fundamental techniques and tools available, you set the groundwork necessary for your artistic growth. Delving into creative patterns aggrandizes the potential for unique pieces, while practicing safety ensures an enjoyable and productive environment. Awareness of common mistakes empowers you to learn and grow, transforming initial setbacks into stepping stones.
As you refine your skills and incorporate finishing techniques, your pyrography projects can blossom into stunning artworks. Remember, the key to mastering pyrography lies in continual practice and fostering a deep connection with the materials. Embrace the process—each burn, each design, and each finish tells a story. As you continue on this creative path, may your passion for this art form flourish, inspiring others while igniting your imagination. So gather your tools, ignite your creativity, and let the art of wood burning lead you to new heights of expression and design.