Exploring the Essentials of Pyrography: Tools and Materials for Beginners
Pyrography, often referred to as wood-burning, is a mesmerizing art form that transforms ordinary wood into stunning works of art using a heated pen. For beginners looking to dive into this creative hobby, understanding the essential tools and materials is crucial for a successful start. Here’s a guide to help you gather everything you need to embark on your pyrographic journey.
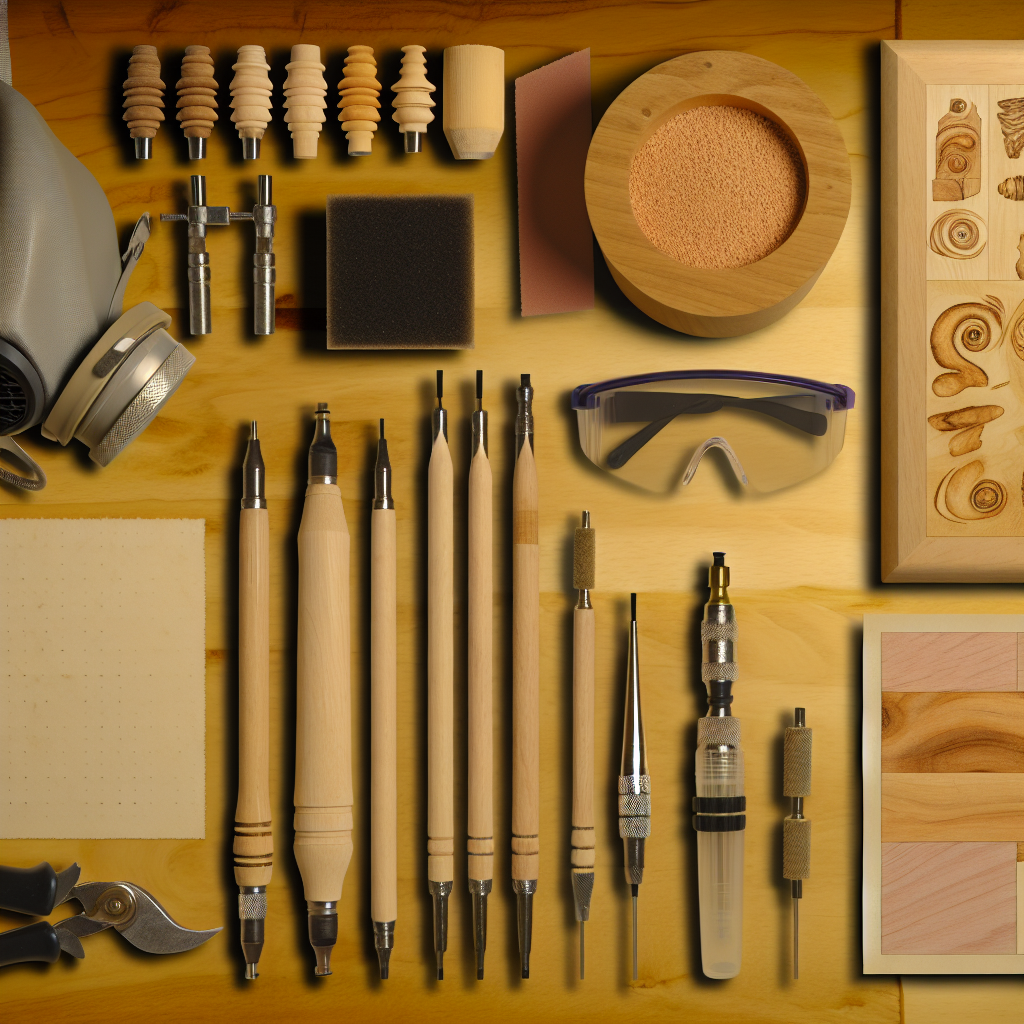
Essential Tools for Pyrography
Starting pyrography requires specific tools, each serving a unique purpose. Here’s a breakdown of the essential tools you’ll need:
- Pyrography Pen: This is the primary tool for creating designs. It comes in various types, including:
- Standard Pen: Ideal for beginners, this pen typically has a fixed temperature.
- Adjustable Pen: Offers variable temperature settings, allowing for a broader range of designs and effects.
- Tips and Nibs: The interchangeable tips on pyrography pens help create different line styles and textures. Commonly used tips include:
- Bullet Tip: Great for outlining and filling in larger areas.
- Shader Tip: Perfect for shading and achieving depth.
- Detailer Tip: Best for intricate designs and fine lines.
- Heat Gun or Burner: While the pyrography pen is the primary tool, a heat gun can assist in softening wood and creating different textures.
- Safety Gear: Safety should always come first. Here’s what you need:
- Respirator Mask: Protect your lungs from smoke and fumes.
- Safety Glasses: Shield your eyes from flying wood particles.
Materials to Get Started
Once you have your tools, the next step is to select the right materials. The choice of wood is vital in pyrography, as different types can significantly affect the outcome of your projects. Here are some popular materials for beginners:
- Wood Types: Look for light-colored, clean wood for the best results:
- basswood: Soft and easy to work with, it’s favored by many beginners.
- birch: Offers a smooth surface; ideal for detailed designs.
- pine: Has a distinctive grain and is readily available.
- maple: Dense and durable, perfect for long-lasting projects.
- Practice Wood: Before embarking on your main project, use scrap wood to practice your techniques.
- Graphite Paper: This is useful for transferring designs onto wood surfaces. Simply place it under your design and trace over it.
- Finishing Products: To protect and enhance your finished piece, consider using:
- Wood Finish or Sealer: Protects the wood from moisture and wear.
- Varnish or Polyurethane: Adds a glossy finish and offers durability.
Additional Supplies
Besides the main tools and materials, a few extra supplies can improve your pyrography experience:
- Clamps: Use these to stabilize your wood while you work.
- Pencil and Eraser: For sketching initial designs and making adjustments.
- Sandpaper: Essential for smoothing the wooden surface before burning.
- Sponge or Cloth: Helps in cleaning your tools and maintaining a tidy workspace.
Exploring the world of pyrography can be a fulfilling creative endeavor. By gathering the right tools and materials, you set the foundation for crafting beautiful designs. As you embark on this artistic journey, remember that patience and practice are key to mastering the art of pyrography. With every project, you’ll not only sharpen your skills but also unlock your creative potential, transforming wood into timeless treasures.
Step-by-Step Techniques to Master Pyrography
The captivating art of pyrography requires not just skill but also an appreciation for creativity and attention to detail. If you’re looking to embark on this intriguing journey, there are several key techniques to help you navigate your way through the basics and beyond. Here’s a comprehensive guide designed to help you master pyrography.
Gather Your Essential Tools
To get started, you’ll need the right tools. The essentials include:
- Pyrography Tool: Invest in a quality pyrography pen or burner. Look for adjustable temperature settings to control the intensity of your designs.
- Wood Selection: Choose a smooth, untreated wood surface. Basswood and birch are popular choices due to their fine grain.
- Sketching Tools: Pencils or carbon paper to transfer your designs onto the wood.
- Eraser: A good eraser will help in tidying up any leftover pencil marks.
- Safety Gear: Goggles and a mask can protect you from dust and fumes during wood burning.
Preparing Your Wood Surface
Preparation is key to achieving great results in pyrography. Before you start burning, ensure your wood is clean and smooth. Sand the surface with fine-grit sandpaper to remove any imperfections. This step minimizes the risk of burning unevenly and helps the design stand out more prominently.
Sketching Your Design
Once your wood is prepared, it’s time to sketch your design. You can either freehand your design or use transfer techniques. Here are some options:
- Freehand: This method allows for spontaneity and creativity. Use a soft pencil to lightly sketch your design.
- Transfer Paper: Place carbon paper under your design and trace it with a pencil. This method provides a clean outline to work with.
Understanding Pyrography Techniques
Mastering pyrography requires familiarity with various techniques. Each method impacts the texture and depth of your artwork differently. Here are the fundamental styles:
- Outline Technique: Start by outlining your design with your pyrography tool. This gives you a clear boundary to work within.
- Shading Technique: Use different heat settings to create shading. By manipulating the temperature, you can achieve light or dark contrasts.
- Texturing Technique: Experiment with different nibs to produce unique textures and patterns for added depth.
Practicing with Control
Control is essential in pyrography. Start by practicing your strokes on scrap pieces of wood before diving into your main project. Maintain a steady hand and apply consistent pressure while guiding your tool across the surface. This practice will help you become more comfortable with the pyrography pen.
Advanced Techniques to Explore
Once you have a handle on the basics, consider exploring more advanced techniques to enhance your artistry:
- Layering: Layer your burns by building up colors and textures over time.
- Color Enhancement: Incorporate colored pencils or paints after pyrography for vibrant accents.
- Mixed Media: Combine pyrography with other art forms such as painting or stenciling for unique effects.
Finishing Your Artwork
After completing your design, it’s essential to treat the piece to enhance its longevity and appeal. Here’s how:
- Sanding: Lightly sand the piece to remove any rough edges or burnt debris.
- Sealing: Apply a clear finish or sealant. This protects your artwork and enhances its shine.
- Display: find a suitable display method that showcases your newfound pyrography skills.
The journey to mastering pyrography is both exciting and rewarding. By gathering the right tools, preparing your surfaces, practicing various techniques, and experimenting with your creativity, you can create stunning pieces of art that reflect your unique style. Embrace the process, and watch as your skills flourish in this beautiful and ancient art form.
Creative Project Ideas for Aspiring Pyrographers
For those stepping into the world of pyrography, the possibilities for creative projects are nearly limitless. The beauty of this art form lies not only in the stunning images you can create but also in the wide range of materials and techniques you can explore. Here are some engaging project ideas that can fuel your imagination and help you hone your pyrography skills.
Wooden Coasters
Beginning with wooden coasters is a great way to familiarize yourself with the tools and techniques of pyrography. These small canvases allow you to experiment with various designs, from simple patterns to intricate illustrations. To create stunning coasters:
- Choose a type of wood that complements your design.
- Practice burning different textures, such as smooth lines and shaded areas.
- Consider themes like nature, geometric shapes, or personalized monograms.
Once you’ve mastered this project, you can create custom sets for gifts or for your home.
Decorative Wall Art
If you’re ready to move beyond small projects, try your hand at decorative wall art. Pyrography on wood panels can become striking displays in any room. Here’s how to get started:
- Select a wooden board of your choice—pine, birch, or plywood work well.
- Sketch your design lightly on the surface before burning.
- Experiment with contrasting techniques such as shading and outlining to enhance your artwork.
This project not only beautifies a space but also serves as a great conversation starter.
Personalized Gifts
Handcrafted gifts are always appreciated, and pyrography offers a personal touch that cannot be replicated commercially. Consider creating:
- Personalized picture frames with names or dates burned into the wood.
- Custom cutting boards for your friends who love to cook.
- Engraved wooden spoons with delightful messages or designs.
These gifts show thoughtfulness and allow you to put your unique artistic spin on personal items.
Jewelry and Accessories
Taking pyrography to the next level, you can create unique jewelry pieces. Wooden pendants and earrings can feature beautiful and intricate designs. Here’s what to consider:
- Choose thin slices of wood or wooden shapes for a lightweight accessory.
- Use a fine-tipped pen for details and small designs.
- Finish your pieces with suitable coatings to enhance durability and appearance.
Wearing or gifting these handmade accessories becomes a meaningful expression of creativity.
Wooden Signs
Creating personalized wooden signs is another excellent project that allows your creativity to shine. Signs can range from humorous quotes to important family rules. Explore these tips:
- Decide on a message that resonates with you or fits the intended placement.
- Choose a wood type that provides a good contrast with your chosen design.
- Incorporate a combination of fonts and decorative elements to make your sign unique.
This project is especially enjoyable when creating customized signs for weddings, homes, or special occasions.
Pyrography Burn Box
Creating a burn box—a small wooden box featuring pyrography artwork—makes for both a functional and decorative project. Use the following steps to guide you:
- Choose a simple box to keep your pyrography tools organized.
- Experiment with designs that could transform the box into a statement piece.
- Add compartments or sections for different tools to enhance functionality.
A beautiful burn box not only serves a practical purpose but also adds charm to your workspace.
Each of these projects allows aspiring pyrographers to express their creativity while developing their skills. The world of pyrography offers endless opportunities to create art that speaks to you, enhances your living space, or serves as cherished gifts for loved ones. Give these ideas a try, and watch your artistic journey unfold!
Understanding Wood Types and Their Impact on Pyrography
When venturing into the world of pyrography, one of the fundamental aspects every beginner should grasp is the type of wood they will be working with. Each wood species offers unique characteristics that can significantly impact the results of your artwork. In this guide, we’ll dive deep into understanding various wood types and how they influence pyrographic techniques.
Softwoods vs. Hardwoods
Wood can be broadly categorized into two types: softwoods and hardwoods. Understanding the difference between these will help you choose the right material for your pyrography projects.
- Softwoods: These come from coniferous trees, such as pine, cedar, and fir. They generally have a lighter weight and are easier to burn, making them ideal for beginners. Softwoods typically show less detail but allow for quicker work, which can be advantageous when mastering your techniques.
- Hardwoods: Sourced from deciduous trees like oak, maple, and walnut, hardwoods are denser and denser compared to softwoods. They can produce finer details and more intricate designs but can be more challenging to work with. The density of hardwood absorbs heat differently, which can require adjusting your pyrography tool temperature and technique.
Popular Wood Types for Pyrography
Let’s take a closer look at some popular wood types that pyrography artists commonly use:
- Basswood: This is a favorite among pyrography enthusiasts. It possesses a fine, even grain and is soft enough to allow for intricate designs. Basswood also responds well to burning, producing clear, rich lines without too much resistance.
- Birch: Another excellent choice, birch has a light color that allows for brilliant contrasts when burned. Its slightly tougher texture can create unique effects but requires a bit more skill to master.
- Pine: This softwood is readily available and affordable. The light color and fast burning properties make it a fantastic choice for beginners. However, its resinous nature might cause some irregular burning, leading to varied outcomes.
- Maple: Known for its hardness, maple offers a beautiful canvas for detailed designs. The fine grain enhances intricate artwork but requires more effort to achieve the desired burn depth.
- Cherry: This hardwood darkens over time, giving your pyrographic art a marvelous patina. Its medium density makes it suitable for both beginner and advanced projects, allowing for a wonderful range of techniques.
Grain Patterns and Texture
The grain pattern and texture of the wood also play a crucial role in how flames interact with the surface. Some grains are tighter, making them less absorbent, while others have more open grain structures, which catch and hold heat better. When choosing wood for pyrography:
- Straight Grain: Ideal for clear and detailed artwork, straight grain allows tools to glide smoothly, providing a consistent burn.
- Open Grain: This can make it challenging to achieve clean lines due to varying absorption rates. However, it can create interesting textural effects.
- Knots and Burls: These imperfections can add a unique character to your artwork but may complicate the burning process. Some artists even choose to embrace these features to create even more depth in their pieces.
Preparation Tips for Pyrography
Before you start your pyrographic adventure, it’s essential to prepare your wood properly:
- Choose the Right Thickness: Thicker wood will withstand heat better but may require deeper burning techniques.
- Sanding: Lightly sand the surface to achieve a smooth finish. This helps the pyrography tool glide over the surface and improves overall burn quality.
- Test on Scrap Pieces: Always test your technique on scrap wood of the same type to avoid unexpected results in your main project.
By understanding the types of wood available, their characteristics, and how they affect your pyrography techniques, you can greatly enhance your artistic process. Choose wisely, prepare adequately, and let your creativity flow onto the chosen wood canvas. Happy burning!
Tips for Finishing and Preserving Your Pyrography Artwork
Finishing and preserving your pyrography artwork is essential to maintain its beauty and longevity. After investing time and effort into creating intricate designs on wood, metal, or leather, it’s crucial to protect your pieces from damage while enhancing their visual appeal. Here are some expert tips on how to finish and preserve your pyrography creations effectively.
Understanding Finishing Techniques
Finishing techniques can significantly impact the look and feel of your pyrography art. They not only help protect your artwork but also enhance its natural grain and colors.
1. **Sanding**: After your pyrography work is complete, gently sand the surface using fine-grit sandpaper. This helps to remove any soot or residue from the burning process, providing a smooth and clean surface. Be cautious, as vigorous sanding can damage your design.
2. **Sealing**: A good sealant is vital for protecting your artwork from environmental factors. Here are some popular sealing options:
- Clear varnish: A clear, water-resistant varnish will help guard against moisture and UV damage. Apply it evenly with a brush, and allow it to dry completely.
- Shellac: This natural finish dries quickly and is ideal for wooden surfaces. It provides a warm glow to the wood and enhances its overall look.
- Oil finishes: These penetrate deeply into the wood, providing excellent protection while enriching the color. Remember to apply multiple coats for durability, allowing each layer to dry before adding the next.
Preserving Your Artwork
Once you’ve finished your pyrography piece, preserving it is the next step. Proper preservation is essential for keeping your artwork in optimal condition over time.
1. **Avoid direct sunlight**: Exposure to sunlight can fade colors and damage your artwork. Display your pieces in areas that receive indirect light or use UV-filtering glass if using frames.
2. **Control humidity**: High humidity levels can lead to warping and mold growth. Keep your workspace and display area at a stable temperature and moisture level. Dehumidifiers can be particularly helpful in damp environments.
3. **Regular cleaning**: Dust your pyrography art using a soft, dry cloth. Avoid using any harsh chemicals that could discolor or damage the wood. If necessary, use a mild soap solution, but ensure to rinse well and dry immediately.
Storage Tips
When not on display, proper storage is crucial to prevent damage. Follow these storage tips to keep your pyrography artwork safe:
- Use protective covers: If you need to stack or store your artwork, consider placing each piece in a protective cover. Acid-free tissue paper or bubble wrap can help prevent scratches and pressure marks.
- Store vertically: When storing multiple pieces, always keep them upright rather than stacking. This reduces the risk of bending or warping over time.
- Avoid basements and attics: These areas often experience extreme temperatures and humidity, which can be detrimental to the longevity of your artwork.
Final Touches
After completing the finishing and preservation processes, consider adding a final touch to your pyrography artwork. Framing your piece not only adds to its aesthetic appeal but also provides an additional layer of protection. Choose a frame that complements your artwork without overwhelming it.
For outdoor pieces, explore weather-resistant coatings to enhance durability against the elements. However, regularly inspect any outdoor pieces for signs of wear and reapply sealants as needed.
By following these tips, you can ensure that your pyrography artwork remains stunning and well-preserved for years to come. Engaging in these finishing and preservation techniques not only protects your creations but also showcases the skill and effort you dedicated to crafting them. So, take these strategies to heart and enjoy sharing your artistry with others!
Conclusion
Delving into the art of pyrography opens up a world rich with creativity, skill, and techniques that can truly put your artistic flair to the test. From the very beginning of your journey, it’s essential to arm yourself with the correct tools and materials tailored for beginners. As we explored, choosing the right pyrography pen is crucial since it serves as an extension of your vision and creativity. Along with specific woodburning tips, selecting quality wood—like basswood or birch—can enhance your projects significantly, allowing for smoother burns and clearer images.
Once equipped, the next step is developing fundamental techniques that will enable you to bring your ideas to life. Each stroke of the pen requires practice and understanding of temperature variations, which affect the darkness of your burns. Learning about basic patterns, shading, and different stroke techniques like cross-hatching or stippling is vital. As you become proficient in these skills, remember that the mastery of pyrography is an art form that flourishes with patience, diligence, and a willingness to learn from both successes and missteps.
What comes next is unleashing your creativity through project ideas specifically curated for aspiring pyrographers. From intricately designed coasters and picture frames to personalized gifts and decorative wall hangings, the possibilities are virtually limitless! Engaging in these projects allows you to experiment with various techniques and wood types, helping you to refine your abilities. Furthermore, incorporating elements such as color through paints or stains can create stunning enhancements to your pyrographic artworks, attracting even more interest and admiration.
Understanding the types of wood you work with is another pivotal aspect of pyrography that significantly impacts your outcomes. Each wood type offers unique characteristics, affecting how well it accepts burns. For instance, softwoods like pine provide a more forgiving surface, whereas hardwoods like oak may yield more defined details but require additional skill and temperature control. A common tip for newcomers is to always test on scrap pieces of the same wood type first—this practice can save time and frustration by helping you adjust your techniques according to how each type reacts.
The finishing touches on your pyrography artwork determine its longevity and overall appeal. After the burning process, applying a suitable finish is necessary to protect the surface and enhance its beauty. Whether you opt for oils, varnishes, or wax finishes, these treatments provide a protective layer that can prevent moisture damage, dirt accumulation, and fading over time. Moreover, this protective measure can bring out the natural grain and color of the wood, turning your project into a display-worthy masterpiece.
As you embark on your pyrographic journey, remember that every artist starts somewhere. Embrace the learning curve with enthusiasm and persistence, as this ancient art form offers immense rewards. Whether your ultimate goal is to create beautiful decorative pieces or to develop a profit-making home business, the skills you cultivate can be endless. Engaging with a community, sharing your projects, and accepting constructive criticism can further accelerate your growth in this intricate craft.
Ultimately, the art of pyrography is more than simply burning wood. It’s about expressing yourself creatively, overcoming challenges, and finding joy in craftsmanship. By exploring the essentials, mastering techniques, and executing projects, you’re well on your way to becoming a pyrography artist. Take the knowledge you’ve gathered here and let your imagination soar. With passion, practice, and just the right amount of daring, you can carve out a niche within this fascinating world, where creativity meets skilled craftsmanship. So grab your tools, choose your wood, and start burning your way to artistic accomplishment, one stroke at a time!