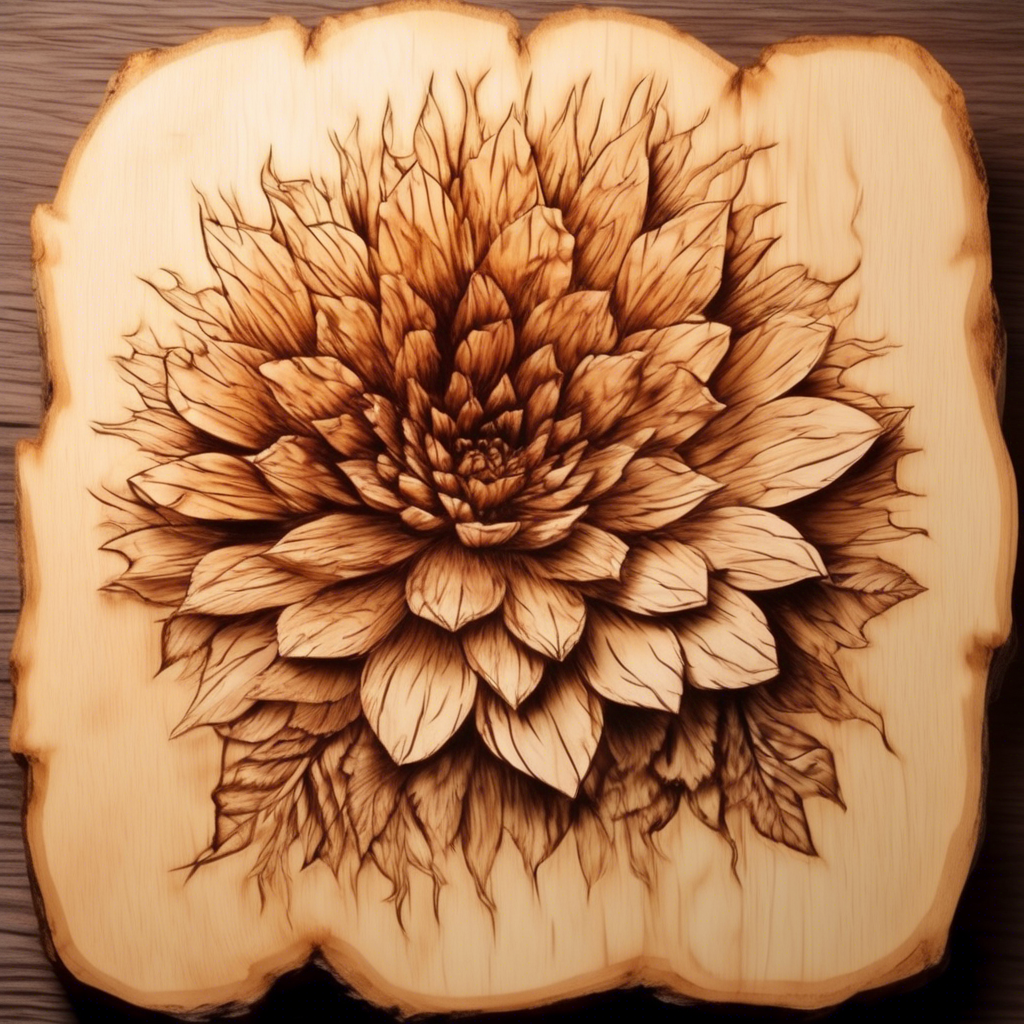
Techniques for Creating Stunning 3D Effects in Wood Burning Art
Creating lifelike, three-dimensional effects in wood burning art is an exciting way to enhance your pieces and captivate viewers. Mastering these techniques can significantly improve the depth and realism of your artwork. Here are some practical methods to help you achieve stunning 3D effects in your wood burning projects.
Understanding the Basics of Wood Burning
Wood burning, or pyrography, involves using a heated tool to burn designs into wood. The temperature and pressure you apply influence the colors and textures. To create 3D effects, grasp the fundamentals of shading and varying line weights. Begin with a simple design and gradually work your way up, focusing on playing with these elements.
Shading Techniques
One of the most effective ways to portray depth is through shading. Here are some popular shading techniques to consider:
- Gradient Shading: Achieve a smooth transition from light to dark by using varying pressure on the wood burner. Start light, and gradually increase the pressure for darker tones.
- Cross-Hatching: Layer intersecting lines to create shadows. This technique works well for detailing in objects like leaves or fabric folds.
- Dot Shading: Use tiny dots to build up areas of darker tone. This is excellent for creating texture and dimension, particularly in natural elements.
Experiment with these methods to find what works best for your style and subject matter.
Line Weight and Texture
Adjusting the line weight in your designs can dramatically affect the perception of depth. Thicker lines can appear closer, while thinner lines recede into the background. Incorporate varying line weights as you burn outlines and details, paying attention to which elements you want to emphasize.
One effective strategy is to outline the foreground objects with a heavier line weight while using lighter lines for background elements. This adds dimension and guides the viewer’s eye effectively.
Using Light and Shadow
Creating a strong contrast between light and shadow is crucial for achieving a 3D effect. Consider the light source in your artwork:
- Identify the Light Source: Determine where the light is coming from. This will guide your shading choices, helping you decide where to add highlights and shadows.
- Highlights: Leave areas unburned or lightly burned to represent highlights. These are typically the parts of your subject that catch the light.
- Shadows: Use darker burns to create shadows on the opposite side of your light source. This contrast adds depth and makes your image pop.
Layering Techniques
Layering can significantly enhance the visual appeal of your wood burning. By adding multiple layers to your artwork, you can create different depths and textures. Try these approaches:
-
Burning and Rubbing: After burning an initial layer, you can use sandpaper or a soft cloth to gently rub down certain areas. Then, burn additional details over the top for a unique effect.
-
Coloring: While traditional wood burning uses only the burned wood’s natural color, consider adding colored pencils or dyes after your burning is complete. This can create striking effects, especially when combined with your burning techniques.
Perspective Techniques
Perspective can elevate your 3D effects. Use aerial perspective by making distant objects lighter and less detailed, while enhancing foreground elements. This technique draws viewers’ eyes toward the main subject and adds realism.
You can also use overlapping shapes to create depth. When one shape overlaps another, the viewer instinctively perceives depth. Be mindful of how overlapping elements interact in your design.
Practice and Experiment
The best way to master 3D effects in wood burning art is through practice and experimentation. Start with small projects, trying out different techniques and approaches. Don’t hesitate to mix and match these techniques to discover what works best for your artistic voice.
Remember, art is subjective, and what resonates with one viewer may not with another. Trust your instincts, and allow your creativity to flow. As you develop your skill, you’ll find unique ways to produce stunning 3D effects that make your wood burning art truly stand out.
By embracing these strategies, you will not only enhance your current skill set but also inspire yourself and others to appreciate the intricate beauty of wood burning art.
Tools and Materials Essential for Wood Burning Projects
Embarking on wood burning projects is an exciting venture that combines creativity and craftsmanship. To achieve striking results, having the right tools and materials is essential. This guide will explore the key items that can transform your wood burning experience from ordinary to extraordinary.
Essential Tools for Wood Burning
When it comes to wood burning, the primary tool you will need is a pyrography pen. However, several other tools can enhance your art:
- Pyrography Pen: This is your main tool for wood burning. Choose one with adjustable temperature settings as this allows for different shading techniques and designs.
- Various Tip Attachments: Different tips create different effects. Chisel tips for shading, pointed tips for line work, and decorative tips for unique textures are all useful additions.
- Scissors and Craft Knife: These are essential for precise modifications on your wood pieces. They also help in trimming designs and managing stencils effectively.
- Pencil and Paper: Sketching your design before burning helps you visualize the final outcome. Use graphite or colored pencils that will not leave residue on the wood.
- Sandpaper: A smooth surface is crucial for wood burning. Sand your wood piece before starting to remove any rough spots and allow for even burning.
Materials You Will Need
The right materials significantly impact the quality of your wood burning projects. Here are some critical materials to gather:
- Wood: Choose softwoods like pine, basswood, or birch. These woods burn easily and produce cleaner lines. Avoid hardwoods as they can be tricky to work with.
- Finishing Products: Sealant or wood finish is vital once your artwork is complete. It protects your work and enhances its beauty. Look for eco-friendly options for a safer finish.
- Stencils and Templates: These can be useful for beginners. Pre-made stencils help guide your design and ensure precision in complex patterns.
- Transfer Paper: To transfer your designs onto the wood, use transfer paper. Simply trace your design onto the transfer paper and place it on the wood, then rub to transfer.
- Clamps: Clamping your wood securely prevents it from moving while you’re working, allowing for more consistent results.
- Protective Gear: Safety glasses, gloves, and a mask keep you safe from smoke and debris. These are essential when working with heated tools and wood dust.
Additional Aids for Enhanced Techniques
To elevate your wood burning skills, consider investing in some additional aids:
- Wood Burning Guidebook: A good reference book can provide invaluable tips and techniques. Look for guides that cater to various skill levels and offer detailed instructions.
- Coloring Materials: If you want to add color to your designs, consider using colored pencils, paints, or even markers specifically suitable for wood.
- Router Tools: For those looking to add depth to their projects, a router can help create grooves and intricate designs on wood surfaces for added texture.
Setting Up Your Workspace
Having a designated workspace allows you to organize your tools and materials efficiently. Ensure that your workspace is well-ventilated, as wood burning can produce fumes. A sturdy table and a comfortable chair will help you work longer without discomfort. Additionally, keep a dedicated area for finished projects, ensuring they don’t get damaged while you work on new pieces.
To sum it all up, having the right tools and materials for wood burning is a crucial step toward creating captivating art. From a quality pyrography pen and various wood types to safety equipment and workspace organization, each element plays a vital role in your craft. As you gather your resources, remember that practice will refine your skills, leading to stunning and intricate wood burning artwork.
Exploring Different Styles and Patterns in Pyrography
Pyrography, the art of decorating wood with burn marks, has captivated artisans and hobbyists alike for centuries. This technique allows for intricate designs, which can range from simple patterns to more complex images. By exploring different styles and patterns in pyrography, you can elevate your artisan skills and create unique pieces that stand out.
One of the most intriguing aspects of pyrography is its flexibility in style. Artists often adopt various techniques to express their creativity, each producing a distinct visual result. Here are a few popular styles to consider when diving into pyrography:
- Realistic Portraits: This style focuses on capturing lifelike images, often of people or animals. Mastering this technique requires patience and excellent control of the burning tool.
- Patterns and Textures: Many pyrographers create patterns such as geometric designs or floral motifs. Textures can add depth to your work, giving it an almost three-dimensional effect.
- Abstract Art: For those who embrace creativity without boundaries, abstract pyrography allows for free-form designs. This style encourages experimentation with shapes, lines, and fills.
- Nature Scenes: Landscapes and wildlife are popular subjects in pyrography. These pieces often tell a story and evoke emotions through scenic depictions.
Adopting diverse patterns is equally essential in refining your pyrography skills. Patterns can dictate the overall vibe of the artwork and offer a cohesive look. Not only do they enhance the aesthetic appeal, but they also provide a structured approach to designing your piece. Here are some pattern ideas to inspire your next project:
- Mandala Patterns: Intricate and symmetrical, mandalas often symbolize harmony and unity. They can be time-consuming but yield breathtaking results.
- Birds and Animal Designs: Capturing the essence of animals can bring your work to life. Learning to depict feathers, fur, or scales adds depth and complexity.
- Floral Designs: Flowers can range from simple outlines to detailed representations. Their organic shapes can create a lovely contrast against the wood grain.
- Tribal Patterns: Inspired by various cultures, tribal patterns often feature bold lines and shapes. These designs are eye-catching and have a unique historical context.
The technique you choose plays an instrumental role in the outcome of your pyrography. It’s vital to practice different methods to discover what works best for your style and preferences. Here are a few techniques to explore:
- Shading: Create depth by varying your burn intensity. Using a lighter touch will yield softer browns, while more pressure can produce darker shades.
- Stippling: This method involves creating dots to form images. It’s effective for rendering soft textures and can add a unique touch to your piece.
- Line Work: Straight lines, curves, and patterns can transform a simple design into an elaborate one. Control over your tool is crucial for precision.
- Burning Depth: By adjusting how deeply your tool penetrates the wood, you can create varying textures, giving your work a tactile quality.
Choosing the right materials is also an essential step in creating stunning pyrography. Selecting high-quality wood can greatly affect the outcome of your artwork. Softwoods like pine are easier to burn into, while hardwoods like oak can provide rich grain patterns and depth. Also, consider using pre-treated wood or specially formulated pyrography materials to achieve the best results.
As you develop your skills in pyrography, don’t be afraid to combine different styles and patterns. Innovating your personal approach will not just enhance your creativity but also set your work apart from others. Embrace experimentation to discover your unique voice within this beautiful art form.
Ultimately, pyrography offers endless possibilities for expression. Whether you prefer to create realistic portraits, intricate patterns, or abstract designs, the key lies in mastering different techniques and styles. With time and practice, you will be able to produce artworks that not only tell a story but also resonate with your audience.
Step-by-Step Guide to Mastering Shading in Wood Burning
Mastering shading in wood burning, or pyrography, adds depth and dimension to your art. It transforms simple designs into intricate compositions, capturing light and shadow realistically. Whether you’re a beginner or more advanced, a structured approach can enhance your skills. Here’s a step-by-step guide to help you achieve stunning shading effects in your wood burning projects.
Understanding Your Tools
Your choice of tools plays a vital role in achieving effective shading. Here’s a rundown:
- Pyrography Pen: Opt for a pen with interchangeable tips to diversify your shading techniques.
- Different Tips: Use various tips like the shader, writer, and ball tips for different shading effects.
- Temperature Settings: Familiarize yourself with your pen’s temperature settings; lower heat is typically better for gradual shading.
Choosing the Right Wood
The type of wood you select significantly influences your final artwork. Softwoods like pine or basswood are great for beginners due to their smooth surfaces. However, hardwoods such as oak or walnut can offer richer tones and textures for more advanced projects.
Planning Your Design
Before you start burning, carefully plan your design. Sketch your idea on paper first or directly onto the wood, ensuring to include the shaded areas. Consider conducting a few test burns on scrap wood to visualize your shading. This practice helps you understand how different temperatures and techniques will affect your design.
Mastering Different Shading Techniques
Here are some core techniques to consider:
- Cross-Hatching: This technique involves creating parallel lines in one direction and then layering additional lines in another direction. This builds up darker areas and adds texture.
- Burning in Circles: Instead of straight lines, use circular motions to create softer gradient effects. This works particularly well for organic shapes.
- Gradient Shades: To achieve a smooth transition between light and dark, gradually increase your pressure or temperature while maintaining a consistent flow.
- Scumbling: This technique involves tiny, circling motions to create a rough or textured appearance. It’s excellent for depicting things like fur or grass.
Gradual Layering
Layering is essential for effective shading. Start with a light tone and progressively build up darker shades. Remember, less is more! If you over-burn, it can be challenging to lighten areas later. Use the following method:
- Begin with the lightest shade in your design.
- Slowly apply additional layers for depth. Allow previous layers to cool before adding more.
- Continuously step back and review your work to maintain a balanced look.
Practice Makes Perfect
Regular practice is crucial for mastering shading techniques. Set aside dedicated time each week to work on your pyrography skills. Experiment with different wood types, pens, and techniques. As you practice, you’ll develop a keener eye for shading and an intuitive understanding of how to create three-dimensional effects.
Finishing Touches
After finishing your wood burning, consider applying a finish to enhance and protect your work. Natural oils, sealants, or wax can enrich the wood’s appearance and provide longevity. Be sure to test your chosen finish on a scrap piece first to see how it interacts with your design.
Seek Feedback and Learn
Engaging with fellow wood burning artists can provide fresh perspectives. Join online forums or local art classes to both share your work and gain insights from others. Constructive criticism is invaluable in your journey to mastering shading in wood burning.
Mastering shading in wood burning art is a fulfilling journey that enhances your artistic expression. By understanding your tools, selecting appropriate wood, and practicing essential techniques, you’ll bring your wood burning art to life with stunning depth and detail. Enjoy the creative process, and let your imagination guide you!
Tips for Maintaining Safety and Precision While Wood Burning
Wood burning, also known as pyrography, is a captivating art form that combines creativity and craftsmanship. However, it’s crucial to maintain safety and precision while engaging in this intricate practice. Here are some essential tips to help you enjoy wood burning without compromising on safety or the quality of your work.
Prioritize Your Safety Gear
Your safety should always come first. Before starting any wood-burning project, make sure to wear the appropriate protective gear:
- Safety goggles: Protect your eyes from smoke and debris.
- Mask: Use a mask designed to filter out smoke particles.
- Gloves: Fit your hands with gloves to safeguard against burns.
- Proper clothing: Wear long sleeves to prevent skin exposure and burns.
Choose the Right Workspace
Your workspace can significantly impact both your safety and precision. Follow these guidelines to optimize your work environment:
- Well-ventilated area: Ensure your workspace is well-ventilated to avoid inhaling toxic fumes.
- Stable surface: Use a sturdy table or workstation to minimize the risk of your materials moving while you work.
- Organized layout: Keep all tools and materials organized to prevent accidents caused by clutter.
Understand Your Tools
Familiarity with your tools is essential for maintaining precision. Spend time learning about your wood-burning tools and their features:
- Pyrography pen: Understand temperature controls and different tip options available.
- Wood types: Get to know which wood types respond best to burning for various effects.
- Maintenance: Keep your equipment in good condition to ensure optimal performance.
Plan Your Design Carefully
A well-planned design is key to maintaining precision in your wood burning projects. Consider these tips when sketching out your ideas:
- Sketch first: Draw your design on paper before transferring it to wood.
- Light pencil marks: Use a light pencil to outline your design on the wood; this helps with visibility but won’t interfere with the burning process.
- Test areas: Practice your burning technique on scrap wood to refine your skills.
Control Your Temperature
The temperature of your wood-burning tool plays a significant role in the precision of your work. Follow these best practices:
- Start with low heat: Begin with a lower setting to gain control over your work, especially during intricate detailing.
- Adjust as needed: Gradually adjust the temperature based on the wood type and design elements. Different woods require different temperatures for best results.
- Utilize heat-resistant tools: Always use tools made for high temperatures to maintain accuracy and safety.
Maintain Focus and Take Breaks
Maintaining focus is crucial for both safety and precision. Here’s how to ensure you remain attentive during your wood-burning sessions:
- Stay hydrated: Keep water nearby to maintain energy and concentration.
- Set a timer: Regularly take breaks to prevent fatigue, which can lead to careless mistakes.
- Limit distractions: Work in a quiet environment to keep your mind clear and focused on the task.
Handle Materials with Care
Caring for your materials is vital to achieving the desired results in wood burning. Here are some tips:
- Work on clean wood: Ensure your wood surface is free of dirt, moisture, and oils for better burning quality.
- Secure your materials: Use clamps or weights to hold the wood steady during the burning process.
- Practice proper storage: Store your tools and materials in a cool, dry place to prolong their lifespan.
Following these tips can greatly enhance your wood-burning experience while ensuring safety and precision. This art form requires patience and practice, but with the right approach, you can create stunning pieces that will showcase your talent and commitment to the craft.
Conclusion
Creating stunning 3D effects in wood burning art is a rewarding journey that combines creativity with technical skill. It’s not just about drawing patterns on wood; rather, it’s about bringing your ideas to life through depth and dimension. By mastering various techniques such as layering, shading, and contrasting burns, you can transform a flat piece of wood into a visually captivating artwork. Techniques like these allow your designs to pop, creating an illusion of depth that captures the viewer’s eye.
To embark on your wood burning projects, having the right tools and materials is crucial. A quality pyrography pen is a must, as it provides you with the necessary precision and control over your designs. Pair it with a variety of nibs for different textures and effects, as well as a reliable wood surface. Softwoods like pine or basswood are ideal for beginners, while hardwoods can offer rich details for seasoned artists. Don’t forget about safety gear; a well-ventilated workspace, gloves, and protective eyewear will keep you safe while you immerse yourself in the art of pyrography.
As you explore the vast world of wood burning, you’ll discover various styles and patterns that can significantly enhance your artistic expression. From geometric shapes to organic forms, each style offers unique ways to create depth and interest in your artwork. Experimenting with different patterns not only broadens your skill set but also encourages you to find your niche within the pyrography community. Let your imagination lead the way; whether you’re drawn to nature-inspired designs or complex abstract patterns, there’s a wealth of inspiration waiting for you.
With the fundamental techniques in place, a step-by-step approach to mastering shading can elevate your art to new heights. Shading, in particular, is what allows artists to create realism and three-dimensionality in their pieces. Practice various shading techniques—like cross-hatching or stippling—to find what works best for you. Understanding how light interacts with objects and how to replicate that in your wood art will not only improve your abilities but also enrich the storytelling aspect of your art.
Preserving safety and precision throughout your wood burning journey cannot be overstated. The tools may be efficient and the results rewarding, but safety should always be a top priority. Create a designated workspace that is free from distractions and clutter, allowing you to concentrate fully on your project. Familiarize yourself with best practices for handling your pyrography tools to avoid unwanted accidents. Moreover, taking breaks can help maintain your focus and prevent strain, ensuring that the quality of your work remains high while keeping your safety in check.
Ultimately, the path to creating eye-catching 3D effects in wood burning art is filled with learning opportunities. By diligently practicing different techniques, utilizing the right tools, exploring a variety of styles, and mastering the art of shading, you will develop your unique artistic voice. Remember, every artist has a different approach, and it’s all about finding what resonates with you personally. Keep experimenting, stay committed to honing your skills, and most importantly, enjoy the process. Wood burning art offers limitless possibilities for creativity and expression, making it an exciting medium to explore and master.
In embracing all these aspects, you not only sharpen your skills but also connect with a wider community of artists and enthusiasts. Share your journey and your artworks; this not only provides you with feedback but also helps inspire others to explore the wonders of pyrography. As you grow and refine your techniques, the beauty of your wood burning projects will reflect your dedication and passion for this intricate art form. With practice, patience, and persistence, you can achieve depth and dimension in your creations that will not only impress but will also leave a lasting impression on everyone who encounters your art. Dive into the world of wood burning with enthusiasm and curiosity, allowing the journey itself to fuel your creativity.