Effective Pyrography Etching Techniques for Beginners
Pyrography, or wood-burning art, is an engaging and rewarding craft that allows you to create stunning designs on various surfaces using heat. For beginners, mastering effective pyrography etching techniques can seem daunting at first, but with the right skills and tools, anyone can achieve beautiful results. This guide explores essential techniques that will set you on the path to becoming a proficient pyrography artist.
Understanding Your Tools
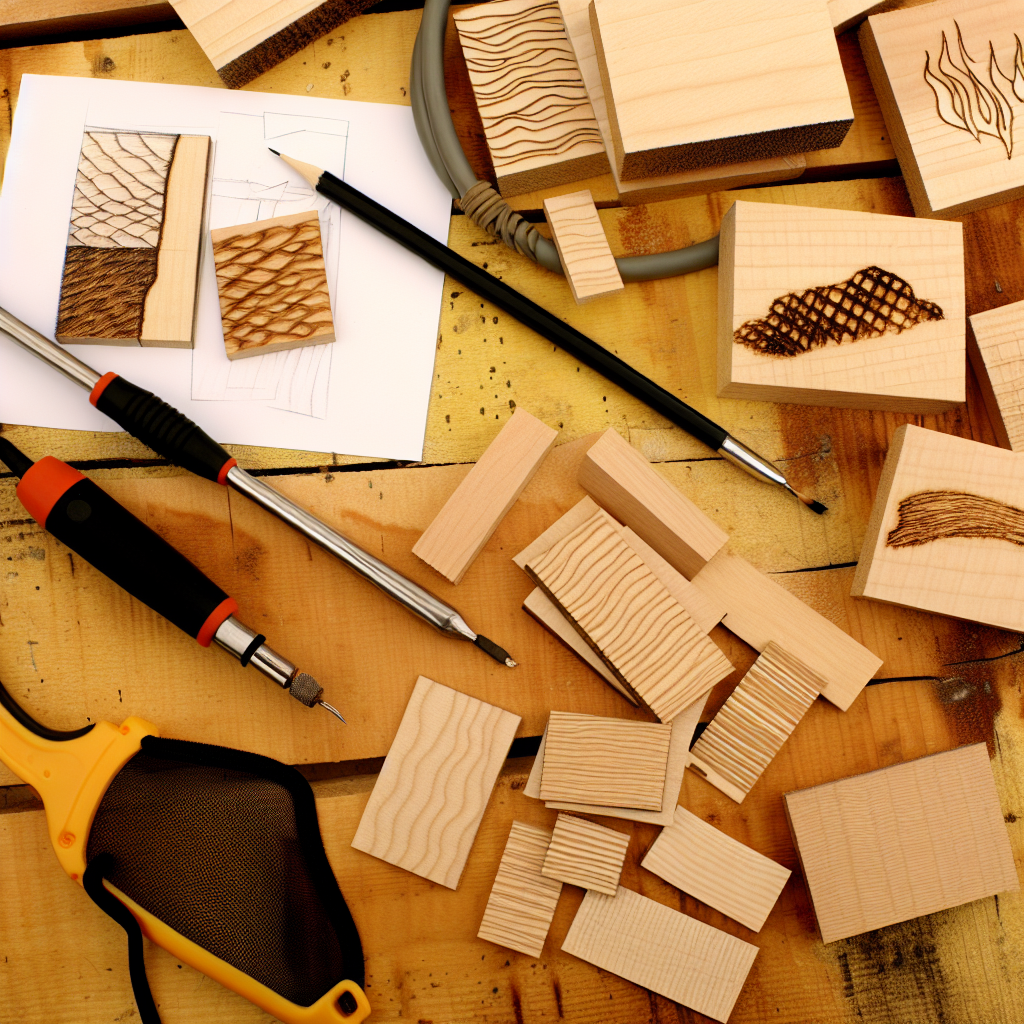
Before diving into techniques, familiarize yourself with the tools you’ll be using:
- Pyrography Pen: This versatile tool heats up and allows you to draw or burn designs into materials such as wood, leather, and other surfaces. Many pens come with interchangeable tips for different effects.
- Tips and Attachments: Various tip shapes let you create different patterns. For example, a fine point tip is excellent for detailed line work, while a shader tip is used for shading and filling areas.
- Wood or Material: Choose a high-quality piece of wood or other material. Softwoods like pine or basswood are ideal for beginners because they burn easily and produce smooth results.
- Graphite Pencil: Sketching your design with a light pencil can help guide your burning, making it easier to follow your desired pattern.
- Safety Gear: A well-ventilated workspace is essential, along with a mask if you’re sensitive to fumes. Heat-resistant gloves can also protect your hands.
Basic Techniques to Get Started
Employing fundamental techniques will enhance your skills and confidence. Let’s explore some effective methods:
1. Straight Lines and Outlines
Begin by practicing straight lines. Use a firm, even pressure to achieve consistent width. For outlines, move slowly and steadily across the surface, ensuring that your pen doesn’t linger too long in one spot to avoid burns.
2. Shading Techniques
Shading adds depth to your projects, and there are a few approaches to it:
- Cross-Hatching: Create a textured shadow by drawing intersecting lines in different directions.
- Stippling: Use small dots to build up darker areas gradually. This technique emphasizes detail and allows for precision.
- Blending: Lightly use the shader tip to smooth out lines, creating a softer transition between dark and light areas.
3. Texturing Techniques
Adding texture brings your work to life. To achieve this:
- Burning Patterns: Experiment with small repetitive motions to create textured effects like fur or grass.
- Use of Light Pressure: A light touch can produce fine lines, while more pressure leads to bolder burns. Altering pressure can yield different textural results.
Creating Your First Project
Once you’re comfortable with the techniques, select a simple design for your first project. Transfer your design onto the wood with a light graphite sketch. Start with outlining the primary shapes before moving on to shading and texture. Maintaining a steady hand and consistent pressure will enhance the quality of your work.
Practicing and Refining Your Skills
As with any art form, practice is essential. Dedicate time to experiment with different techniques and designs. Don’t hesitate to try new styles or materials; this is how you’ll learn and evolve as an artist.
Joining the Pyrography Community
Connecting with fellow pyrography enthusiasts can provide inspiration and valuable tips. Consider joining online forums, attending workshops, or participating in social media groups dedicated to pyrography. Sharing your work and receiving feedback can greatly enhance your skills.
Final Tips for Success
Here are some quick reminders for a successful pyrography experience:
- Always test your pen on a scrap piece of wood before starting your main project.
- Have patience; skill develops over time.
- Take breaks to avoid fatigue, especially during intricate projects.
- Enjoy the process, and don’t be afraid to make mistakes!
Mastering pyrography etching techniques requires practice and experimentation. As you grow in your skills, don’t forget to enjoy the artistic journey and the beautiful creations that come from it.
Essential Tools and Materials for Pyrography
Pyrography, the art of decorating surfaces with burn marks, requires specific tools and materials that make the process enjoyable and effective. Whether you’re a novice or an experienced artist, understanding the essential elements can significantly enhance your work. Here’s a comprehensive look at the critical tools and materials you’ll need for pyrography.
Pyrography Tools
1. Pyrography Pen
The pyrography pen is arguably the most crucial tool of the trade. This tool allows for precise control over the burning process. There are two primary types of pyrography pens:
- Basic Pen: A plug-in tool with a fixed tip that can create constant heat.
- Variable Temperature Pen: Offers adjustable heat settings, giving you greater versatility.
2. Pyrography Tips
Various tips allow for different effects and line thicknesses. The most common tips include:
- Shader Tip: Ideal for shading and blending.
- Fine Point Tip: Perfect for intricate details.
- Ball Tip: Useful for producing round dots or circles.
- Stamp/Lettering Tip: Designed to create stamped images or lettering.
3. Heat Resistance Surface
A heat-resistant workspace is vital for safety and effectiveness. Consider using:
- Wooden Boards: Soft woods like pine are ideal for beginners.
- Cutting Mats: Protect your workspace from burns while allowing for easy cleaning.
Materials for Pyrography
1. Wood
Choosing the right wood is paramount in pyrography. Some popular choices include:
- Birch Plywood: Smooth surface that is easy to work on.
- Maple: Harder wood that offers durability and a fine grain.
- Pine: Soft and easy to burn, making it perfect for beginners.
- Cherry: Offers a warm tone, great for artistic projects.
2. Leather
Leather is another fascinating medium for pyrography. It provides a unique texture and appearance. However, always choose vegetable-tanned leather, as it holds heat better and produces clearer marks.
3. Paper Products
If wood and leather feel daunting, start with paper projects. Heavier weight papers designed for burning can yield beautiful results, making it easier to practice your techniques.
Additional Supplies
1. Sandpaper
Before you begin your pyrography project, it’s essential to prepare your surface. Sandpaper can smooth rough edges, ensuring a clean, professional finish on your wood or leather.
2. Pencil and Ruler
Sketching your design beforehand can significantly improve your workflow. Use a light pencil to outline your artwork, and a ruler to help maintain proportion and symmetry.
3. Eraser
An eraser can help correct any missteps in your initial sketch, allowing for a cleaner result as you transition from drawing to burning.
4. Safety Gear
Protecting yourself is essential while engaging in pyrography. Consider these items:
- Gloves: Heat-resistant gloves can protect your hands from burns.
- Mask: A mask will help filter out any smoke or fumes produced during the burning process.
- Safety Glasses: Essential for eye protection if using tools that generate sparks.
Organizing Your Workstation
Creating a well-organized workspace can greatly enhance your artistic experience. Ensure all tools and materials are within easy reach to maintain a smooth flow while you work. Utilize storage solutions such as drawers or toolboxes to keep your pyrography supplies organized.
By assembling the right tools and materials, you elevate your pyrography craft and enable yourself to explore the vast creative possibilities this art form offers. Happy burning!
Common Mistakes to Avoid in Pyrography Etching
Pyrography etching is a captivating art form that brings wood to life with intricate designs. However, many beginners and even seasoned artists make common mistakes that can hinder their progress and affect the final output. Understanding these pitfalls is essential for anyone looking to enhance their pyrography skills and create stunning pieces of art.
Overlooking Surface Preparation
One of the first mistakes artists often make is neglecting surface preparation. Properly preparing the wood surface can significantly impact the quality of your work. Always choose smooth, unfinished wood to allow the pyrography tool to glide effortlessly. If you are using reclaimed wood, sand it to a finer grit to remove any splinters or rough patches.
Choosing the Wrong Wood Type
Not all wood is created equal when it comes to pyrography. Some woods can scorch easily, while others may not hold the etching well. Softwoods like pine and cedar are generally easier to work with, as they take the heat better. In contrast, dense hardwoods like maple or oak can be challenging and may require higher temperatures.
Ignoring Temperature Settings
The temperature of your pyrography tool is crucial to achieving the desired effect. Many artists make the mistake of using the same setting for all types of wood and designs. Here are some tips to avoid this mistake:
- Test the Temperature: Always test your tool on a scrap piece of wood similar to your project.
- Adjust for Detail: Use lower temperatures for fine details and higher temperatures for bolder designs.
- Know Your Tool: Different tools produce different effects; familiarizing yourself with your equipment is key.
Rushing the Process
Patience is vital in pyrography etching. Rushing through your design can lead to unexpected mistakes and a lack of precision. Take your time, allowing each section to dry and cool before moving to another area. This will ensure that your artwork remains clean and prevents unwanted smudging.
Neglecting Practice
Another common misstep is underestimating the need for practice. Pyrography is a skill that improves over time, and neglecting to practice can stunt your development. Setting aside regular practice time allows you to experiment with different styles and techniques. Doodling or sketching designs can also boost your confidence as you learn the intricacies of pyrography.
Not Using Reference Material
One mistake many artists make is forgoing reference materials. Whether it’s photographs, sketches, or tutorials, having a source of inspiration can guide your design process and help you maintain proportions. Use these references as a guide for your next project, ensuring that your designs come to life more accurately.
Overthinking Designs
While creativity is vital, overthinking can lead to paralysis by analysis. Artists often get caught up in the details, fearing they won’t achieve the perfect design. Instead, start with simpler designs and gradually move to more complex patterns. This strategy will relieve pressure and allow for a more enjoyable creative process.
Underestimating Cleanup Time
Cleanup is an essential part of the pyrography process that can easily be overlooked. After working on your etching, soot and debris can accumulate on the surface, impacting the overall appearance. Always clean your workspace and tools thoroughly. Use a soft cloth to wipe away any residue, ensuring your artwork shines in its finished form.
Ignoring Safety Precautions
Safety should never take a backseat in any art form. Using a pyrography tool involves high temperatures, which can pose risks. Here are some safety tips to bear in mind:
- Work in a Ventilated Area: Ensure proper airflow to avoid inhaling smoke from the wood.
- Utilize Proper Hand Protection: Use heat-resistant gloves if necessary.
- Keep a Fire Extinguisher Nearby: Always be prepared for any mishaps that may occur.
Avoiding these common mistakes will help you progress in the art of pyrography etching. By focusing on surface preparation, temperature settings, and incorporating safety measures, you will enhance your skills and produce beautiful works of art that truly reflect your creativity. Embrace the journey of learning, and remember that every misstep is an opportunity for growth.
Advanced Pyrography Techniques for Experienced Artists
For experienced artists ready to elevate their pyrography skills, advanced techniques offer a wealth of creativity and expression. Pyrography, the art of decorating wood or other materials with burn marks, requires not only patience and practice but also an understanding of various methods that can enhance the visual impact of your work.
Texturing Techniques
Creating depth and dimension through texturing is one of the vital advanced pyrography techniques. Artists can experiment with different tips and speeds to achieve unique effects. Here are some notable texturing methods:
- Cross-hatching: This involves drawing closely spaced parallel lines that intersect to create a shaded area, giving the illusion of depth.
- Scumbling: By varying pressure and movement, artists create a soft, mottled texture, ideal for replicating natural surfaces like foliage.
- Stippling: This technique utilizes small dots to build texture and shading, providing a distinct visual interest in highlighted areas.
Layering for Depth
Another crucial aspect of advanced pyrography is layering. This technique involves applying multiple burn layers to achieve a richer, more complex finish. Here’s how to effectively layer:
- Start with the Base: Establish your light base layer with your chosen pyrography tool. This layer should be the foundation, hinting at the final design.
- Add Mid-Tones: Gradually introduce mid-tones to create more depth. Use a slower, more controlled technique for these components.
- Finish with Highlights: apply the lightest color to emphasize specific areas, giving a three-dimensional effect.
Color Integration
While pyrography traditionally focuses on the burn marks, integrating color can greatly enhance the artwork. Artists can use various methods to add color:
- Wood Stains: Applying a wood stain after the burning process can bring depth and richness to your piece.
- Watercolors: Light washes of watercolor can complement the burned images without overpowering the wood’s natural texture.
- Pencils and Inks: Using colored pencils or inks can define details and add vibrancy, allowing for a blending of techniques.
Precision and Control
Advanced pyrographers must also master precision control over their tools. The ability to modify temperature settings and select suitable tips impacts the outcome significantly. To enhance control:
- Use Variable Temperature Tools: High-quality pyrography tools provide users with adjustable temperature settings, allowing for different burning intensities.
- Invest in Quality Tips: Various tip shapes achieve different lines and textures, so exploring different options can broaden artistic expression.
- Practice Steady Hand Techniques: Regularly practicing steady hands helps create clean lines and consistent shading, crucial for detailed pieces.
Artistic Composition
Understanding artistic composition is vital for creating captivating pyrography pieces. Consider the following principles:
- Balance: Distribute visual weight evenly across the piece to create harmony.
- Contrast: Use contrasts between light and dark areas to draw focus and enhance visual interest.
- Focal Points: Identify the area that draws the viewer’s eye and design around it to guide viewers’ attention.
Experimentation and Personal Style
Perhaps the most impactful advanced technique is experimentation. Encouraging personal expression leads to unique outcomes, allowing artists to develop their styles. Attempt to:
- Challenge Convention: Break away from traditional methods to discover new applications of pyrography.
- Combine Techniques: Blend pyrography with other art forms, like painting or carving, to produce innovative results.
- Document Your Progress: Keep a journal or portfolio of techniques tried and lessons learned, serving as both a reference and inspiration over time.
Mastering advanced pyrography techniques opens a world of artistic possibilities. By incorporating texturing, layering, color, and composition, seasoned pyrography artists can make their mark, breathing life and personality into each unique creation. Embrace the journey of experimentation and refine your skills, ultimately allowing your artistic voice to shine vividly through your art.
The History and Evolution of Pyrography Art
Pyrography, the art of embellishing surfaces with designs using heat, has a rich history that dates back thousands of years. Originating from the Greek words “pur” meaning fire and “graphos” meaning writing, this captivating craft has transformed significantly throughout the ages. Understanding the journey of pyrography can enhance one’s appreciation of this unique art form and its techniques.
The earliest evidence of pyrography can be traced back to ancient civilizations. In Africa, artisans used heated tools to pierce designs into wood, a method that was not only artistic but practical as well. Similarly, in South America, indigenous tribes created intricate patterns on calabash gourds through a combination of burning and carving techniques. These early instances of pyrography demonstrate its functional aspects, often used to tell stories or mark important cultural symbols.
As we moved into the Middle Ages, the techniques evolved. European artisans began to embrace pyrography, using it primarily for religious artifacts. Churches featured beautifully decorated wooden altars and devotional items engraved with sacred imagery. These pieces were often created with simple heated implements, reflecting the craftsmanship and devotion of the time. The rise of Christianity saw a growth in the use of symbols and iconography, making pyrography a prominent feature in the embellishment of religious items.
With the onset of the Renaissance, a resurgence of interest in arts and humanities brought about new innovations in pyrography. Artists began to experiment with various techniques and tools, pushing boundaries beyond religious motifs. They introduced shading and intricate designs, enhancing the visual impact of pyrography. This period marked a shift from purely functional objects to decorative art, where skilled artisans became well-regarded figures in society.
As we entered the 19th century, pyrography became more accessible to the general public with the invention of specialized tools. The introduction of electric pyrography pens revolutionized the craft, allowing for greater precision and versatility. Hobbyists and amateur artisans could now create detailed and complex designs without the labor-intensive methods of the past. This technological advancement sparked a surge in popularity, especially in North America and Europe, where pyrography became a common pastime.
Throughout the 20th century, pyrography continued to evolve, influenced by various art movements. The Arts and Crafts movement, for instance, emphasized handmade craftsmanship and the beauty of natural materials. This philosophy resonated with pyrographers, who sought to promote the value of handcrafted artworks. As a result, the craft saw a resurgence in interest, often incorporated within the context of home décor items, jewelry, and furniture design.
Today, pyrography has embraced modern techniques and technologies while retaining its traditional roots. Contemporary artists experiment with digital tools and mixed media, blending pyrography with painting and sculpting. The versatility of this craft means it can be applied to a wide range of surfaces, from wood to leather and even paper. Moreover, social media platforms have brought pyrography to a wider audience, allowing artisans to showcase their work and share tips and techniques.
In established pyrography communities, artists thrive by exchanging ideas, improving techniques, and hosting workshops. This collaborative spirit fosters growth and evolution within the art form, encouraging both beginners and seasoned professionals to explore new avenues. Additionally, the increasing interest in sustainable materials has prompted many pyrographers to utilize reclaimed wood and eco-friendly inks, emphasizing the importance of environmental awareness in art.
The history and evolution of pyrography art reveal much about cultural transitions, technological advancements, and artistic expression. From its ancient beginnings to the digital age, this art form continues to captivate and inspire. As techniques progress and new artists emerge, pyrography remains a testament to human creativity and the endless possibilities of turning fire into art.
Conclusion
As you embark on your pyrography journey, remember that this captivating art form blends creativity with technique, providing an enriching experience for artists at every skill level. Whether you are a beginner just picking up the tools or an experienced artist refining your craft, understanding various pyrography etching techniques is vital to your success.
For those just getting started, effective pyrography etching techniques simplify the learning curve, allowing you to explore your creative potential while developing foundational skills. Emphasizing the importance of practice, you can begin with basic shapes and simple designs before moving on to more intricate work. The emphasis on mastering line control and shading will lay the groundwork for more complex projects. Engaging with these fundamental techniques nurtures confidence, enhancing your ability to express yourself through wood burning.
Equipping yourself with the right tools and materials significantly influences your pyrography success. Essential items like pyrography pens, different nibs, and quality wood are paramount. Investing in a good-quality pyrography pen not only ensures better results but also enhances your overall experience. Each type of nib offers unique capabilities, so experimenting with different styles allows you to discover what works best for your projects. Moreover, understanding the properties of your chosen wood helps ensure that your artwork will withstand the test of time. A well-prepared workspace with a selection of reliable materials sets the stage for creativity to flourish.
As you practice, it’s vital to remain aware of common mistakes that often plague beginners. Early on, many artists struggle with uneven burn depth, pressure inconsistency, or working on unsuitable surfaces. Recognizing these potential pitfalls paves the way for initial accomplishments and boosts your motivation. Embracing informality in your practice can help relieve the pressure associated with perfection, ultimately leading to a more enjoyable learning experience. Remember, even experienced artists make mistakes — viewing them as opportunities for growth rather than failures is imperative.
Once you’ve honed your skills and gained confidence, it’s time to dive into advanced pyrography techniques. With a solid grasp of fundamentals, you can explore methods such as shading, texturing, and layering that will elevate your artwork to new heights. Techniques including stippling, crosshatching, and feathering contribute depth and intricacy, allowing you to create multi-dimensional works that captivate viewers. Advanced artists can also experiment with mixed media, incorporating paints or stains into their pyrography projects to achieve stunning, unique finishes. The possibilities are vast, encouraging you to express your individuality and pursue personal artistic visions.
Understanding the rich history and evolution of pyrography art can further enhance your appreciation for this unique craft. This art form dates back centuries, evolving from primitive burning techniques into the sophisticated practices we know today. Each cultural influence has contributed to the broader spectrum of styles and techniques, informing modern pyrographers about the endless potential of the medium. By studying artists who have paved the way throughout history, you gain insight into various methods, which can inspire your own artistic journey.
Ultimately, pyrography is more than just a hobby; it’s an evolving form of artistic expression that offers endless opportunities for exploration and creativity. As you delve into this captivating discipline, allow your passion to guide you through the ups and downs inherent in the artistic process. With a foundation built on effective techniques, the right tools, awareness of common mistakes, and an understanding of advanced methods, you’ll cultivate your unique artistic voice.
Embrace the vibrant tapestry of pyrography history as you forge your path in this timeless art. Every mark you make with your pyrography pen carries echoes of the past while paving the way for new expressions. Celebrate the joy of creation. With patience, practice, and dedication, your artistry will blossom and resonate within the community of fellow pyrographers, inspiring the next generation to explore the mesmerizing world of pyrography. Dive in and let the warmth of creativity ignite your passion for this enduring art form.