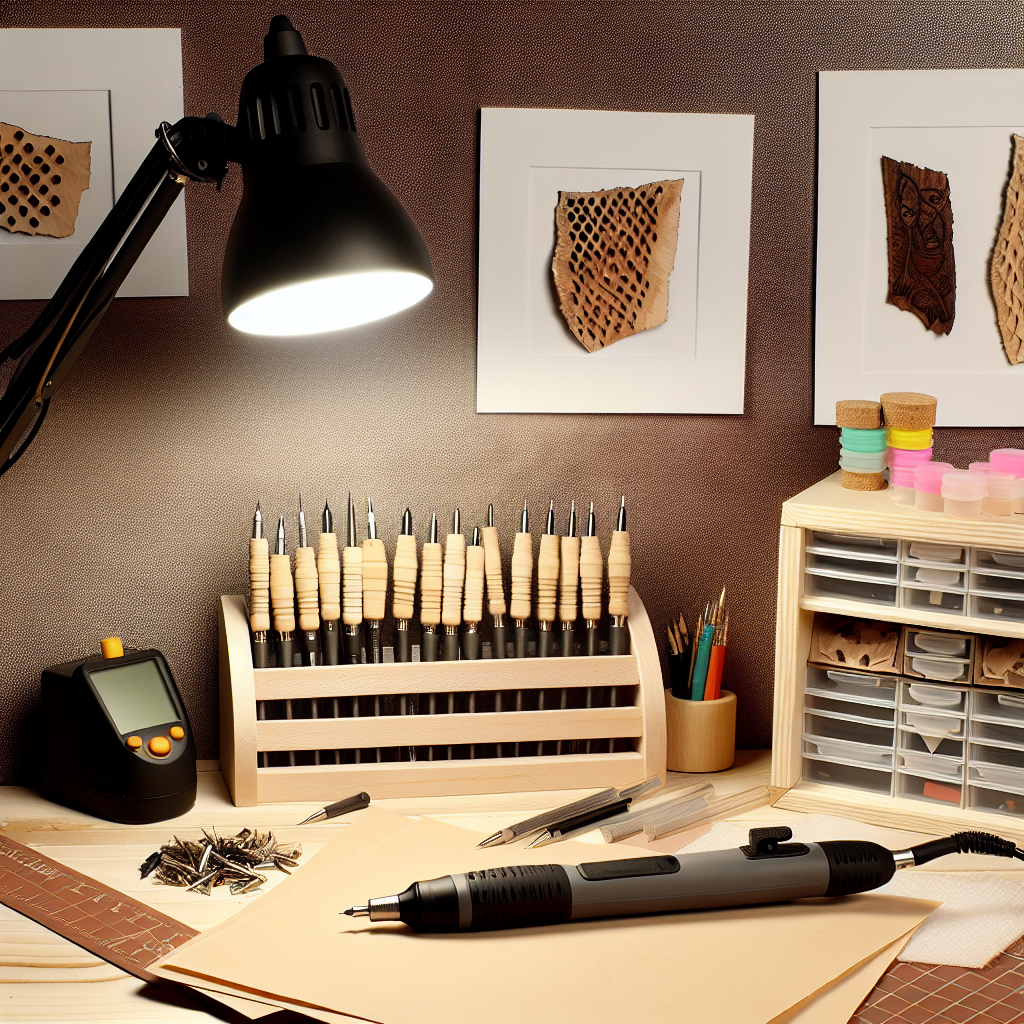
Essential Accessories to Enhance Your Pyrography Tools
Every pyrography artist knows that having the right tools can make a significant difference in the quality of their work. While a good pyrography pen is essential, enhancing that setup with the right accessories can boost your creativity and efficiency. Here’s a look at some essential accessories that can elevate your pyrography experience.
Quality Blanking Material
One of the fundamental components of pyrography is the surface you burn on. Selecting high-quality blanking material ensures better results and enhances the longevity of your projects. The most common materials include:
- Wood: Basswood, birch, and maple are popular choices due to their smooth textures and fine grains.
- Leather: A unique and exciting medium, leather offers different challenges and opportunities for design.
- Canvas: This fabric-based option allows for versatility in artistic expression.
Interchangeable Tips
The versatility of pyrography is greatly increased by using interchangeable tips. Having a variety of tips readily available allows you to create different effects:
- Fine points: Ideal for detailed work and intricate designs.
- Flat tips: Perfect for shading and wider strokes.
- Shader tips: Useful for blending and adding depth to your artwork.
Work Surface with Heat Resistance
Using a dedicated work surface designed to withstand high temperatures is vital for safety and comfort. Select a well-padded, heat-resistant work surface to protect your furniture. Options include:
- Silicone mats: Non-stick and heat resistant, perfect for catching stray burns.
- Wooden boards: Look for boards that won’t easily warp or crack when heat is applied.
Good Lighting
Optimal lighting can make all the difference while working on detailed pyrography projects. Natural light is always best, but when that’s not an option, consider:
- Adjustable LED lamps: These provide ample light without overheating.
- Magnifying lamps: Great for intricate work since they provide focused illumination and magnification.
Protective Gear
Safety should always be a priority in pyrography. Protective gear helps to protect you from heat and other risks:
- Heat-resistant gloves: Essential for handling hot tools safely.
- Eye protection: Keep a pair of safety goggles on hand to protect your eyes from smoke and debris.
Storage Solutions
Keeping your tools organized can significantly enhance your workflow. Consider investing in storage solutions like:
- Toolboxes: Keep all your tools in one designated space for easy access.
- Pencil holders: Use them to keep interchangeable tips organized and easily reachable.
Cleaning Supplies
After working on pyrography projects, maintaining your tools is crucial for longevity. Consider the following cleaning supplies:
- Brushes: Small brushes can help you remove dust and debris from the tips.
- Microfiber cloths: Ideal for wiping down your work surfaces and tools without scratching.
Design Tools
Using design tools can aid in planning your pyrography work. Helpful additions include:
- Pencils and stencils: For sketching on your surface before burning.
- Transfer paper: Helps to transfer designs directly onto the wood or leather for accuracy.
By incorporating these essential accessories to enhance your pyrography tools, you can improve both your efficiency and creativity. Remember that the key to stunning pyrography artwork lies not only in your main tools but in how you enhance your overall setup. Investing time and resources into these accessories will undoubtedly pay off in the quality of your work.
Choosing the Right Wood for Pyrography Projects
When diving into pyrography, the choice of wood significantly influences your final artwork. Not all woods are created equal, and different types exhibit unique characteristics that affect both the burning process and the final result. Understanding these differences will help you select the right wood for your pyrography projects.
Softwoods vs. Hardwoods
The first major distinction in wood type is between softwoods and hardwoods. Each has its own strengths and weaknesses:
- Softwoods: Generally easier to work with, softwoods like pine and cedar burn more readily, allowing for quick and bold designs. Their softer texture means that the burning tool will glide smoothly, making them ideal for beginners. However, softwoods often have more resin, which can create uneven burning.
- Hardwoods: Oak, maple, and cherry are examples of hardwoods that provide a denser surface and refined detail in pyrography. Although they can be more challenging to burn, hardwoods tend to yield more intricate designs and richer color variations due to their grain structure.
Grain Patterns
The grain pattern of the wood also plays a crucial role in how the finished piece looks. Here are several aspects to consider:
- Straight Grain: Easier to work with and produces consistent results. Maple and cherry are examples of woods with straight grains.
- Figured Grain: Woods like walnut and mahogany exhibit unique patterns, creating stunning visual depth. These types of wood can add character to your artwork but may require a more delicate touch due to inconsistencies in burning.
- Open Grain: Woods such as oak have larger pores, which can absorb more heat during burning and may lead to a more pronounced texture. This can be advantageous for specific styles but might complicate fine detail work.
Wood Thickness
The thickness of the wood is another crucial factor. Thicker boards provide more stability and can handle deeper burns. However, they can also lead to challenges in reaching your desired depth while maintaining control over the pyrography tool’s temperature. For smaller projects, thinner wood is often sufficient, as it allows for quicker results and is generally easier to manipulate.
Considerations for Treatment and Finishing
Before initiating any delicate pyrography work, it’s essential to consider whether the wood has been treated with functional chemicals or finishes. Here are some key points to keep in mind:
- Untreated Wood: Raw, untreated wood is the best choice for pyrography, ensuring an even burning temperature and depth.
- Treated Wood: Wood stained or finished with chemicals can affect the burning process, often resulting in a smoke that does not adhere evenly to the surface.
Specific Wood Types for Pyrography
Here are some popular wood types that enthusiasts frequently choose for pyrography along with their specific qualities:
- Pine: Affordable and readily available, it’s perfect for beginners. It burns easily but may splinter during the process.
- Birch: Known for its pale, even surface, birch allows for finer detail work, making it a favorite among seasoned pyrographers.
- Hickory: Very dense and robust, hickory can produce beautiful contrasts and has excellent durability.
- Maple: Renowned for its hardness and smooth grain, maple is excellent for intricate designs and holds up well under heat.
Testing Before Committing
Before beginning a significant project, it’s a good idea to conduct some test burns on small wood scraps. This allows you to gauge how the wood responds to heat and helps you make adjustments to your technique as necessary. Pay attention to the wood’s reaction to heat, the depth of your burn, and how it holds detail.
Ultimately, choosing the right wood for your pyrography projects can enhance not only your artwork’s beauty but also your overall experience as you create. By experimentation and understanding specific wood characteristics, you’ll truly elevate your craft.
Techniques to Master the Art of Pyrography
Pyrography, the art of decorating wood or other materials with burn marks, requires a combination of creativity, technique, and practice. Mastering this unique craft is not just about owning the right tools, but also honing specific techniques that can elevate your work to new heights. Let’s explore several techniques that can help you become a skilled pyrographer.
Understanding Your Tools
Having the right tools is foundational in pyrography. The primary tool is a pyrography pen, which comes with different nibs that allow for varying effects. Understanding how to use these nibs effectively is crucial:
- Fine Point Nibs: Ideal for detailed lines and intricate designs.
- Shader Nibs: Best for shading and filling larger areas smoothly.
- Ball Nibs: Great for creating dots and stippling effects.
Experimenting with different combinations of these nibs will allow you to find your preferred style.
Choosing the Right Wood
The choice of wood significantly impacts the outcome of your pyrography. Softwoods such as pine and cedar are easier to burn but may not hold intricate details as well as hardwoods like maple or birch. Here are some considerations for selecting wood:
- Look for a smooth, untreated surface that is free of knots.
- Consider the wood’s grain; fine grains allow for more precision.
- Test different types to see which you prefer working with.
Practice Basic Techniques
Before diving into complex designs, it’s beneficial to practice fundamental techniques:
- Line Work: Use even pressure to create consistent lines.
- Shading: Vary the speed of your movements to create lighter or darker shades.
- Texturing: Experiment with different nibs to produce various textures on the surface.
Starting with simple patterns will help you build confidence and skill before moving onto more complex designs.
Mastering Temperature Control
Another key aspect of pyrography is temperature control. Adjusting the heat of your pyrography tool affects the darkness and depth of your burn:
- Low Temperature: Ideal for light burn marks and shading.
- Medium Temperature: Useful for general line work and detail.
- High Temperature: Produces deep, dark burns suitable for outlining and creating bold designs.
Understanding how to manage temperature can make a significant difference in achieving the desired effect in your artwork.
Different Styles
Adding various styles to your work can keep your art fresh and engaging. Here are a few techniques to consider:
- Realism: Focus on fine details and accurate shading techniques.
- Abstract: Use freeform lines and shapes to create unique pieces.
- Nature-Inspired: Draw inspiration from flora and fauna to compose intricate designs.
Don’t hesitate to combine techniques and styles; mixing realism with abstract elements can lead to a distinctive art form.
Finishing Touches
Once you’ve completed your artwork, the finishing touches can elevate its presentation and longevity:
- Sealing: Use a clear wood finish to protect your piece from elements and wear.
- Framing: Consider framing your artwork to enhance its aesthetic appeal.
- Varnish: Applying varnish adds a rich sheen that can deepen the colors.
By incorporating these techniques into your practice, you’ll find your skills in pyrography will strengthen over time. Whether you’re creating gifts, home décor, or art pieces, mastering these techniques will help you express your creativity and bring your designs to life.
Safety Considerations for Pyrography Enthusiasts
Pyrography, the art of woodburning, is a wonderful way to express creativity. While this craft can be highly rewarding, it comes with certain safety concerns that every enthusiast should consider. Understanding these considerations helps ensure a safer, more enjoyable experience, allowing you to focus on your creative expression without unnecessary worry.
First and foremost, having the right workspace is crucial. Choose a well-ventilated room, ideally with windows or exhaust fans to reduce the buildup of smoke and fumes from heated wood or other materials. This is particularly significant for those who burn wood with a protective finish, as fumes from these substances can be harmful. Also, ensure that your workspace is free of flammable materials. A clean area not only enhances your craft but also minimizes the risk of fire hazards.
When it comes to protective gear, always prioritize safety. Consider using the following:
- Safety Glasses: Protect your eyes from flying debris when carving the wood.
- Heat-Resistant Gloves: These can prevent burns while handling hot tools.
- Dust Mask: Wearing a mask can filter out harmful particles, especially when sanding the wood after pyrography.
- Apron: A heat-resistant apron can shield you from hot splinters and protect your clothing.
One fundamental aspect of pyrography is the use of heat tools. Always make sure to use equipment that’s in good condition. Inspect the tool for any signs of wear or damage before use. If your tool is not functioning properly, it can become more dangerous, leading to accidents or unexpected burns. One great practice is to always unplug the tool when not in use and let it cool down properly before setting it aside. This simple action can prevent accidental burns.
It’s also essential to know how to manage emergency situations. Keep a fire extinguisher in your workspace, ensuring that it’s readily accessible. Familiarize yourself with how to operate it before any incident occurs. Additionally, having a first aid kit on hand is advisable. Make sure to include burn ointment and other supplies to treat minor injuries. Knowing how to respond to small mishaps can ease panic and reduce the severity of injuries.
As you dive deeper into pyrography, consider the materials you use. Not all woods are created equal; some treatment processes involve chemicals that release harmful fumes when heated. Softwoods, like pine, are usually safe and easier to work with than treated woods. If you’re unsure about a material, research its properties first, or consult with more experienced pyrographers. Opt for natural products whenever possible to minimize exposure to harmful substances.
Moreover, pay attention to your posture and ergonomics while working. A poor posture can lead to discomfort, repetitive strain injuries, or long-term health issues. Arrange your workspace to ensure that you maintain a comfortable position, supporting your back and neck while you work. Use a chair that provides proper support, and take regular breaks to stretch and relieve tension in your muscles.
Educate yourself. Joining pyrography forums or communities can provide access to a wealth of information on techniques and safety standards. Learning from others’ experiences can help you avoid common pitfalls. Seeking mentorship from seasoned artists offers additional learning opportunities, uncovering best practices for safety and technique. The more knowledgeable you are, the more you can mitigate risks associated with this art form.
Engaging in pyrography brings immense joy, yet it demands attention to safety at all stages of the creative process. By setting up a safe workspace, using the right protective gear, managing your tools, knowing emergency procedures, choosing safe materials, maintaining an ergonomic workspace, and actively educating yourself, you’ll enjoy your pyrography sessions with confidence. Treat safety as an integral part of your workflow, and you’ll find that it enhances both your experience and the quality of your work.
Maintaining and Caring for Your Pyrography Equipment
Maintaining your pyrography equipment is crucial for achieving the best results in your wood-burning projects. From the burning pens to the wood itself, proper care can significantly enhance your crafting experience. Let’s explore some essential tips to ensure your pyrography tools stay in top shape.
Regular Cleaning of Your Pyrography Pens
Cleaning your pyrography pens after each use should be a top priority. Residue buildup can affect the precision and heat of the burner. Here are some cleaning tips:
- Cool Down: Always let your pyrography pen cool completely before attempting to clean it.
- Use a Soft Cloth: Wipe down the tip and handle with a soft, damp cloth to remove any burnt wood dust.
- Advanced Cleaning: For stubborn residues, use a gentle brush or a toothpick to carefully remove any buildup around the nib.
Regular cleaning not only improves performance but also prolongs the life of your equipment.
Storing Your Tools Correctly
Storage plays a significant role in the longevity of your pyrography tools. Consider the following when storing your equipment:
- Temperature Control: Keep your tools in a cool, dry place away from extreme temperatures to prevent damage.
- Use Cases: Invest in tool cases or boxes with compartments to protect the tips from physical impact.
- Humidity Levels: If you live in a humid climate, consider using silica gel packs to absorb moisture and prevent rust on metal parts.
Regularly Inspecting Your Equipment
Frequent inspections can save you from facing issues during the creative process. Here’s what to check:
- Cords and Connections: Every time you set up your workspace, inspect the power cords for any signs of fraying or wear.
- Nib Condition: Assess the condition of your pyrography tips. Replace them if they show signs of wear or a damaged surface.
- Electrical Components: Ensure that your pen connects securely to the power unit, and check for any loose fittings.
Maintaining Your Workspace
Your workspace can impact the maintenance of your pyrography tools. A well-organized area not only makes working easier but also protects your equipment. Consider these tips:
- Clean Workspace: Regularly remove dust and debris from your working area to avoid settling on your tools.
- Tool Organization: Keep your pyrography equipment organized. Use shelves or pegboards to store your pens, nibs, and accessories.
- Good Lighting: Ensure you have adequate lighting in your workspace. Proper visibility can help you see any issues with your tools during regular checks.
Replacing Worn Parts
Even with excellent care, some components may need replacement over time. Here’s how to approach replacement:
- Identify Worn Parts: Determine what parts of your tools wear out quickly, like nibs and grips.
- Know When to Replace: If your pyrography pen isn’t heating properly or the nib shows significant discoloration, it’s time for a replacement.
- Quality Over Cost: Invest in quality replacement parts to maintain the performance of your pyrography tools.
By taking proactive measures in maintaining your pyrography equipment, you ensure a more enjoyable and productive crafting experience. Care for your tools, and they will continue to illuminate your artistic journey for years to come.
With these practical tips, you’ll be well on your way to keeping your pyrography tools in great condition, allowing your creativity to shine through every project. Whether it’s a simple wood-burning design or an elaborate art piece, well-maintained equipment can make all the difference.
Conclusion
The world of pyrography is an exciting blend of art and craft, where creativity takes shape through the gentle dance of a heated tool on wood. Throughout this exploration, we’ve delved into essential accessories to enhance your pyrography tools, setting the stage for a rewarding journey into this captivating discipline. From high-quality tips that allow for delicate line work to stable work surfaces ensuring precision during intricate designs, having the right accessories can make a significant difference in your projects’ outcomes. Each accessory you choose is more than just a tool; it becomes an extension of your vision, aiding you in translating your ideas into beautiful woodburned pieces.
Selecting the right wood for your pyrography projects stands as a vital consideration. The type of wood not only affects the overall look of your work but also influences how easily you can manipulate your tools. With softwoods like basswood being popular for beginners due to their even grain and smooth texture, it’s crucial to experiment with various types to understand how each reacts to burning. Each wood species—whether it’s the warm hues of cedar or the stunning patterns found in oak—offers unique properties that can enhance or challenge your artistry.
Technique plays a pivotal role in mastering pyrography. Whether you’re dabbing, shading, or creating intricate cuts, the various methods you adopt will define your artistic signature. Having a grasp on techniques allows you to control the heat output and pressure, ultimately transforming your approach into a refined skill set. With practice, you can achieve stunning results, allowing your creativity to flourish. Whether you’re learning the basics or advancing to complex styles, each project is an opportunity to push the boundaries of your artistic capabilities.
However, amid the excitement of crafting, safety must remain at the forefront. Pyrography, while enjoyable and rewarding, involves working with heated tools and materials that can pose risks if not approached cautiously. Ensuring proper ventilation while working, using heat-resistant gloves, and being aware of your surroundings are all essential safety practices. By creating a secure workspace and adopting safe habits, you can immerse yourself in the joy of pyrography without unnecessary concern.
The final step to enhancing your pyrography practice lies in maintaining and caring for your equipment. Just as a painter respects their brushes and colors, pyrography enthusiasts should thoroughly clean their tools after each session. Regular upkeep not only prolongs the life of your devices but also ensures optimal performance with every use. From cleaning wire tips to inspecting cords and connections, diligent care enhances the consistency of your output and contributes to honing your craft. This effort reflects a commitment to quality, serving as a foundation for growth in your pyrography journey.
As you integrate these insights—from choosing the right accessories, wood, and techniques to prioritizing safety and maintenance—you position yourself for blossoming success as a pyrography artist. Every aspect intricately ties together in the tapestry of your craft, making bottomless opportunities for growth uniquely yours. Remember, pyrography is not merely about creating art; it’s about enjoying the process, learning from each piece, and continually refining your skills.
In this ever-evolving practice, allow your inspiration to guide you while grounding yourself in the fundamentals that have been highlighted. Take the time to experiment, innovate, and most importantly, let your passion fuel the fiery artistry that flows from your pyrography tools. Engaging with fellow artists, sharing experiences, and keeping abreast of new developments in the field can add further depth to your understanding and overall joy in this beautiful art form.
Whether you’re just starting or looking to advance your pyrographic skills, the journey is yours to shape. Embrace each component discussed here, and let them be stepping stones toward creating your unique masterpieces. Your creative expression deserves to light up the world, one burn at a time. With the right foundation and an adventurous spirit, the art of pyrography invites you to create, communicate, and connect with the vibrant community that shares your artistic passion.