
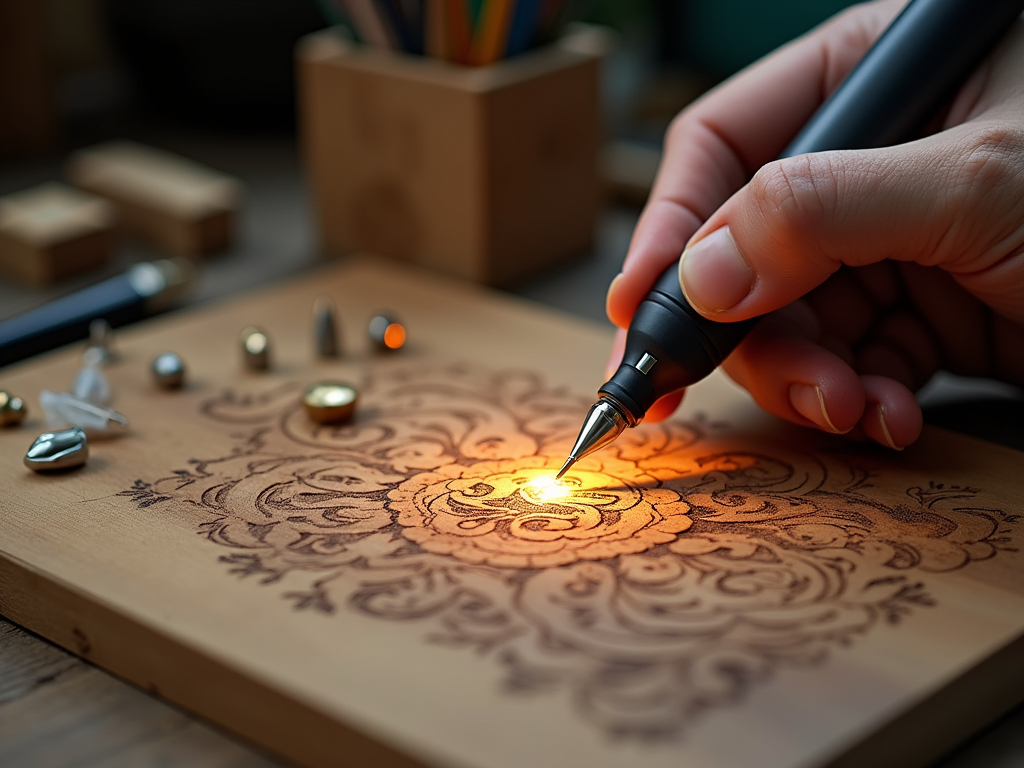
I create wood burning art with intense focus on safety and proper methods, working with temperatures that can reach 900°F. The right approach combines basic safety rules with correct techniques to prevent mistakes and create beautiful pyrography pieces.
Key Takeaways
- Always work in a well-ventilated area with proper safety equipment, including respirators and safety glasses.
- Select light-colored, fine-grained woods like basswood and birch for consistent burning results.
- Start with temperatures between 200-300°F and adjust based on wood type and desired effects.
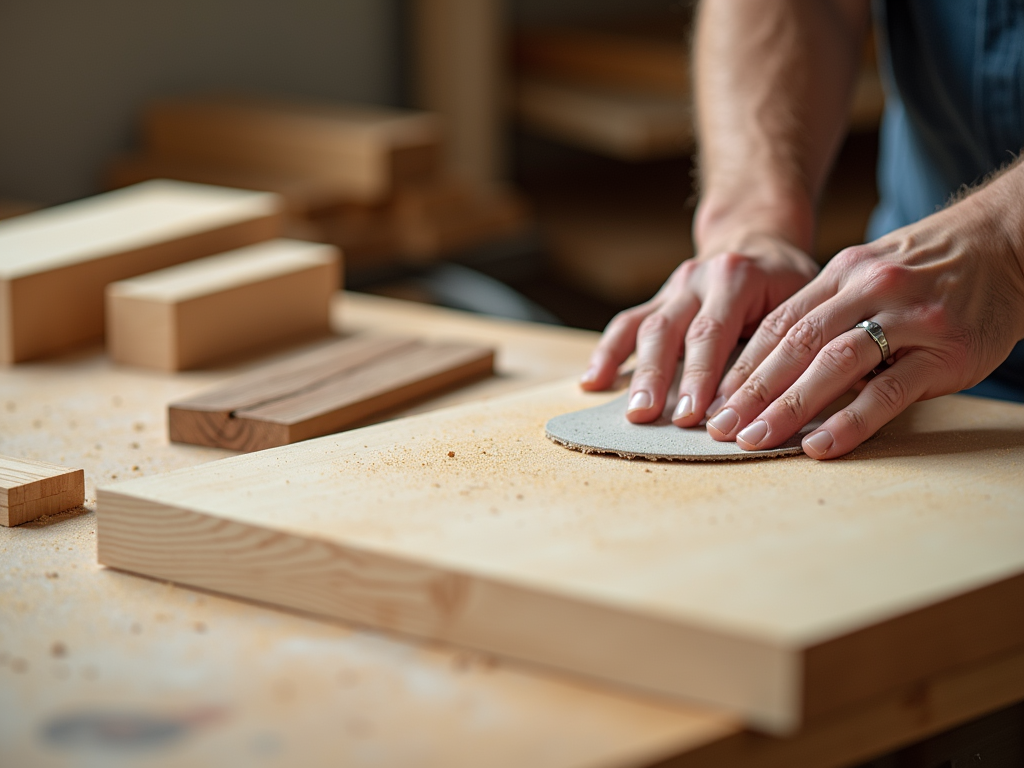
- Properly prepare wood surfaces through progressive sanding grits from 80 to 400.
- Maintain gentle pressure and controlled movements while burning, letting heat do the work rather than force.
Mastering Pyrography with Proper Techniques
I’ve learned that success in pyrography depends on several critical factors. The workspace needs good ventilation and proper safety gear. Light-colored woods with fine grains produce the best results. Temperature control remains essential – I start low and adjust up as needed. Surface prep makes a huge difference; I sand progressively finer until the wood feels smooth. My burning technique stays light and controlled, letting the heat create the marks rather than pressing hard.
Building a Strong Foundation for Pyrography
These fundamentals create the foundation for stunning pyrography art. Each piece benefits from careful attention to these basic yet vital practices. Safety always comes first, followed by proper material selection and preparation. The results speak for themselves when I follow these proven methods.
Essential Safety Measures Every Wood Burning Artist Must Know
Safety isn’t optional when working with pyrography tools that reach temperatures up to 900°F. I’ve learned that proper safety practices in wood burning art can prevent serious accidents and health issues.
Critical Safety Steps for Wood Burning
My dedicated workspace includes an exhaust fan and open window to remove toxic fumes from burning wood. A respirator rated for particulates protects my lungs from harmful smoke, while safety glasses shield my eyes from flying embers and debris.
Here are the key safety practices I follow during every wood burning session:
- I keep my work surface clear of paper, cloth, and other flammable materials.
- My hot tools rest on a wire stand or ceramic holder between burns.
- I keep burn cream and bandages within arm’s reach.
- I never walk away from plugged-in tools, even for quick breaks.
- I unplug my pyrography pen before changing tips or cleaning.
Even experienced artists can make dangerous mistakes in pyrography, so I take extra care with tool maintenance. Before starting any project, I check my equipment for frayed cords or loose connections. This simple inspection has saved me from potential electrical hazards.
Fire safety remains my top priority. I position my fire extinguisher nearby and ensure my smoke detector works properly. When I’m done working, I double-check that all tools are unplugged and completely cool before storage.
During detailed work, like when I’m trying to achieve specific shading effects, it’s easy to forget about safety. That’s why I’ve made these practices automatic habits. By maintaining consistent safety protocols, I protect myself while creating beautiful wood-burned art.
Remember, some woods release more toxic fumes than others when burned. I always research the type of wood I’m using and adjust my safety measures accordingly. If I notice any eye irritation or breathing difficulties, I stop working immediately and improve ventilation before continuing.
Choose the Right Woods and Tools for Success
Wood Selection Fundamentals
Starting with the right wood makes a huge difference in pyrography results. I’ve found that beginners should stick to light-colored, fine-grained woods like basswood, birch, and poplar. These woods accept burn marks consistently and don’t fight against your artistic vision. Before making common pyrography mistakes, it’s crucial to understand which materials work best.
For intermediate projects, I recommend exploring pine, maple, cherry, and oak. These woods need higher temperatures and more skill to master. Pine can be tricky – watch out for sap pockets and knots that can catch you off guard and mess up your burning pattern. Some woods are absolute no-gos for pyrography. Treated wood, plywood, particleboard, and MDF should never be burned as they release toxic fumes that can harm your health.
Essential Tools and Transfer Methods
A quality wood burning tool with temperature control is non-negotiable – don’t try to get by with a soldering iron. Temperature control lets you create different burning effects and adjust based on the wood type you’re using. I always tell my students to invest in proper pyrography equipment rather than trying to cut corners with makeshift tools.
Here’s what I recommend for transferring patterns to wood:
- Graphite paper – Perfect for beginners since mistakes can be erased
- Carbon paper – Creates darker, more visible lines for complex designs
- Tracing paper – Ideal for transferring original artwork or wood burning patterns
The right transfer method can make or break your project. I prefer graphite paper for most projects since it gives me the flexibility to adjust my design before burning. By carefully selecting both your wood and tools, you’ll set yourself up for success in pyrography. Just remember to prioritize safety in your pyrography practice by avoiding toxic materials and using proper ventilation.
When working with different woods, I adjust my technique to match the material. Softer woods need a lighter touch and lower temperature, while harder woods require more heat and pressure to achieve the same effect. This understanding helps me create better shading and texturing in my burns.
If you do make a mistake, don’t panic. There are several ways to fix pyrography errors, but starting with the right materials significantly reduces the chance of needing these fixes in the first place.
Master Your Temperature Settings
Finding the Sweet Spot
I always start my wood burning projects between 200-300°F (93-149°C) to establish a baseline that works across most wood types. This starting point helps me avoid two major problems that I see many beginners face in their wood burning mistakes and how to fix them.
Temperature control directly impacts the quality of your burns. Getting it wrong can seriously affect your work – too low and you’ll get faint, inconsistent lines that barely show up, while too high will char the wood and create unsightly dark spots. I’ve learned that matching your tip choice to the right temperature makes a huge difference in the final result.
Here’s what I’ve found works best for different scenarios:
- Dense woods like maple or oak need higher temperatures, typically around 275-300°F
- Softwoods like pine work better at lower temperatures, usually 200-250°F
- Fine-detail tips perform best at lower temperatures to maintain control
- Shader tips need higher heat to create smooth, even tones
- Damp wood requires higher temperatures and longer burning times
The moisture content in your wood can throw off your temperature settings. I make sure my wood is properly dried before starting – this helps me maintain consistent burns and avoid those frustrating uneven marks. When I notice my lines becoming patchy or faint, I know it’s time to adjust my temperature settings for better shading results.
I’ve discovered that different tips need specific temperature ranges to work effectively. My shader tips typically need higher temperatures than my writing tips to create those smooth, even tones I’m looking for. For intricate details and working with detailed patterns, I dial back the heat to maintain precise control.
Safety remains crucial while adjusting temperatures. I always keep my safety practices in check by using proper ventilation and heat-resistant surfaces. If I notice any mistakes from incorrect temperature settings, I know there are ways to fix common pyrography errors without starting over.
Perfect Your Wood Surface Preparation
Understanding the Sanding Process
I’ve found that proper surface preparation makes an enormous difference in creating stunning wood burning art that avoids common pitfalls. Starting with coarse 80-120 grit sandpaper helps remove major surface imperfections and old finishes. Moving through progressively finer grits – 150, then 180, followed by 220, and finally 320-400 – creates an ideal surface for burning. This stepped approach prevents deep scratches from showing up in your final piece.
Wood-Specific Requirements
Different wood types need different preparation techniques. Softer woods like pine or basswood require extra care during sanding to prevent fuzzing, which can ruin your shading and texture effects. I’ve learned that using light pressure and keeping the sandpaper clean prevents these issues. Hardwoods like oak or maple need more initial work with coarse grits to break down their dense surface structure.
Here’s what I’ve found essential in the cleaning process:
- Use a tack cloth to pick up fine dust particles that regular cloths might miss
- Remove any remaining dust with a slightly damp cloth, allowing it to dry completely
- Check the surface in good lighting to spot any missed areas
- Run your hand over the wood to feel for rough spots
- Clean your work area thoroughly to prevent dust from settling back on the prepared surface
Before starting your main project, I always recommend testing your preparation on a scrap piece of the same wood. This helps you determine how different pyrography tips will interact with your prepared surface. Testing also reveals if you need additional sanding or if you’ve achieved the perfect smoothness for your planned design.
A clean workspace becomes crucial for maintaining your freshly prepared surface. I make sure to store prepared wood pieces in a dust-free area until I’m ready to start burning. This attention to surface preparation directly impacts the quality of your line work and your ability to correct any mistakes that might occur during the burning process.
Master Burning Techniques
Tool Handling Essentials
I’ve found that proper tool handling makes the difference between amateur and professional-looking burns. The sweet spot for holding your wood burning tool is at a 45-degree angle – this gives you the perfect balance of control and visibility. Think of it like holding a pencil, but with a bit more tilt. When you’re just starting out, avoiding common pyrography mistakes can fast-track your progress.
Pressure control is crucial – let the heat do the heavy lifting. Many beginners press too hard, trying to force darker lines. Instead, maintain gentle contact and let the temperature settings create your desired shade. This approach helps you achieve smooth shading and texturing while protecting your tools and wood surface.
Movement and Heat Control
Short, controlled strokes produce cleaner results than long continuous lines. I recommend breaking down complex designs into smaller segments. This technique gives you better control and helps maintain consistent line quality. For those new to patterns, starting with basic wood burning designs can help build confidence.
Speed and heat management go hand in hand. Here are key points to remember:
- Moving too quickly creates faint, inconsistent lines that lack depth
- Going too slow can result in unwanted dark spots or scorching
- Lift your tool regularly to prevent heat buildup in one area
- Match your speed to the wood type and temperature setting
- Practice maintaining steady hand movement for even burns
Your pyrography tool needs regular breaks to maintain optimal temperature. I’ve learned to lift the tip briefly every few strokes, allowing it to regulate heat. This practice helps prevent those frustrating dark spots and ensures clean, controlled burns. If you’re experimenting with different effects, selecting the right burning tip can make your technique even more effective.
Heat control might take some trial and error, but don’t get discouraged. When mistakes happen, there are several ways to fix them. Always remember to follow proper safety guidelines for pyrography while practicing these techniques. Your skills will improve with each project as you build muscle memory and develop a feel for the right pressure, speed, and heat combinations.

Sources:
Woodburning, Lisa Shackleton
Great Book of Woodburning, Lora S. Irish
Pyrography Basics, Lora S. Irish
The Art and Craft of Wood Burning, Lora S. Irish