Best Practices for Sealing and Protecting Your Pyrography Artwork
Creating pyrography artwork is a rewarding endeavor that allows you to express your creativity in a unique medium. However, properly sealing and protecting your artwork is essential to maintain its beauty and longevity. By following best practices, you can ensure your pyrography pieces remain stunning for years to come.
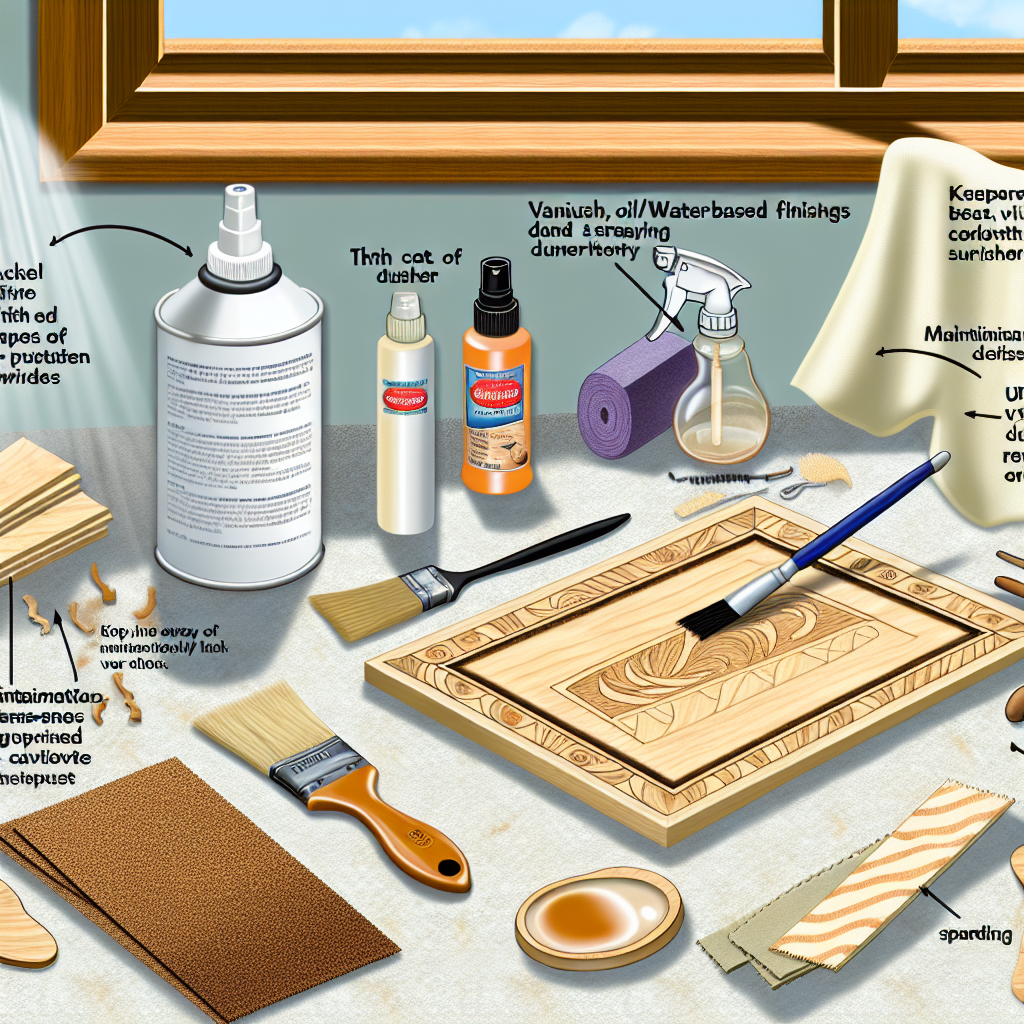
Choosing the Right Finish
The type of finish you choose can greatly affect the final appearance and durability of your pyrography work. Consider the following options:
- Clear varnishes: These are the most common choices for finishing pyrography. They provide a protective layer while preserving the look of the wood grain.
- Oil finishes: These penetrate the wood, providing a rich, warm tone. However, they may take longer to dry and require multiple applications.
- Water-based finishes: These are easy to work with and dry quickly. They typically have lower fumes, making them a safer choice for indoor use.
Preparation Before Sealing
Proper preparation is key to achieving a professional-looking finish on your pyrography artwork. Here are steps to consider:
- Clean your artwork: Dust and debris can interfere with the sealing process. Use a soft, dry cloth to carefully wipe the surface of your piece.
- Sanding: Lightly sand the surface with fine-grit sandpaper (220 grit or finer) to create a smooth finish. Be cautious not to damage your design.
- Testing: It’s wise to test your chosen finish on a scrap piece of wood. This helps you see how it interacts with the wood tone and your burning technique.
Application Techniques
When applying your chosen finish, technique matters. Use the following methods for optimal results:
- Brush application: Choose a high-quality, soft brush to apply a thin coat evenly. Avoid over-brushing to prevent streaks.
- Spraying: For a smooth, even finish, spray coats are effective. Hold the sprayer about 12 inches from the surface and apply multiple light coats rather than one heavy application.
- Dipping: For smaller pieces, dipping them into the finish can be beneficial. Ensure to let any excess drip off prior to drying.
Drying and Curing
Giving your artwork proper drying time is just as important as the sealing process itself. Follow these tips for best results:
- Follow manufacturer instructions: Each sealant has specific drying and curing times. Adhering to these guidelines will guarantee the best protection.
- Avoid humidity: Ensure your workspace is free from excess moisture as it can affect the drying process and lead to issues such as cloudiness.
- Isolate from dust: Place your artwork in a dust-free environment to avoid contaminants settling on the wet finish.
Regular Maintenance
Even after sealing, regular maintenance is essential to keep your pyrography artwork in pristine condition. Consider the following practices:
- Dust regularly: Use a soft cloth to gently dust your artwork as needed. This prevents buildup that can dull the finish over time.
- Avoid direct sunlight: Protect your artwork from strong light to prevent fading. Display pieces in areas where they’re shielded from harsh lighting.
- Watch the temperature: Extreme temperature fluctuations can affect the integrity of the seal. Keep your artwork in a stable environment to enhance its lifespan.
By implementing these best practices, you can effectively seal and protect your pyrography artwork, ensuring its beauty endures. With the right care and attention, your creations can be enjoyed for yourself and others for many years, serving as a testament to your craftsmanship and creativity.
Understanding the Importance of Protective Finishes for Wood Art
When creating wood art, many artists pour their heart and soul into each piece, carefully selecting the wood, crafting intricate designs, and applying techniques like pyrography. However, once the artwork is complete, the choice of protective finish is equally critical. A good finish not only elevates the aesthetic appeal but also ensures the longevity of the piece. Here’s a closer look at the importance of protective finishes and how they can benefit your wood art.
Enhancing Aesthetic Appeal
One of the primary functions of a protective finish is to enhance the visual characteristics of the wood. A high-quality finish can:
- Bring out the richness of the wood grain.
- Add a gloss or matte finish to complement the design.
- Provide a vibrant color boost when using stains or dyes.
Choosing the right finish allows artists to create a desired atmosphere, enhancing the overall presentation of the artwork while protecting it from future damage.
Protection Against Environmental Factors
Wood is a natural material that can be affected by various environmental factors. A protective finish acts as a barrier, safeguarding the wood from:
- Moisture: High humidity can cause wood to swell, while low humidity can lead to cracking. A protective layer minimizes these risks.
- UV Rays: Sunlight can fade colors and weaken the wood over time. UV-blocking finishes slow down this process.
- Dust and Dirt: A finish makes it easier to clean the artwork, keeping it looking pristine without damaging the wood.
Preventing Damage from Insects and Fungi
Wood is susceptible to damage from pests like termites and fungi. Applying a protective finish can deter these threats. Many modern finishes include fungicides and insecticides that can prevent infestations. This proactive measure is crucial for artworks displayed in various environments, including homes, galleries, or outdoors.
Creating a Durable Surface
Artworks often face wear and tear, especially if handled frequently. A strong protective finish provides a tough, durable surface that can withstand scratches, dings, and even moisture exposure. Here are some common types of finishes that offer durability:
- Polyurethane: This finish is known for its toughness and water resistance, making it a popular choice for functional art pieces.
- Shellac: While not as durable as polyurethane, shellac provides a rich finish that’s easy to apply and repair.
- Varnish: Available in various sheens, varnish offers a strong layer of protection against water and sun damage.
Ease of Maintenance
Regular maintenance is crucial for preserving the beauty of your artwork. Properly finished wood art requires less maintenance than untreated pieces. To keep things simple:
- Dusting and occasional cleaning with a damp cloth suffices.
- Reapplication of the finish may only be necessary every few years, depending on the type and exposure to elements.
Final Touches That Matter
Applying a protective finish is not just an afterthought but a significant part of the wood art creation process. Here are some tips to effectively seal and protect your artwork:
- Choose the right finish: Consider the type of wood and the artwork’s purpose.
- Follow application instructions: Each finish requires specific preparation and application techniques for the best results.
- Test on a sample: Before final application, test the finish on a scrap piece to see how it affects the wood’s appearance.
Investing time and resources into selecting and applying the right protective finish for your wood art is crucial. It enhances visual appeal, protects against environmental hazards, and ensures the artwork lasts for years. By prioritizing proper finishing techniques, artists can truly preserve the integrity and beauty of their creations.
Common Mistakes to Avoid When Sealing Your Pyrography Projects
When sealing your pyrography projects, avoiding common mistakes is essential to ensure that your artwork remains vibrant and well-protected. Here are several pitfalls that many artists encounter, along with tips on how to sidestep them.
Neglecting Proper Surface Preparation
Before applying any sealant to your pyrography artwork, ensure that the surface is adequately prepared. This step cannot be overlooked. Dust, dirt, or unnecessary oils from your fingers can interfere with the adhesion of the sealant, leading to unsightly blemishes or peeling over time. Take these actions to ensure a clean surface:
- Wipe your artwork gently with a soft cloth.
- Lightly sand the surface with fine-grit sandpaper to remove any rough spots.
- Use a tack cloth to pick up any remaining dust.
Choosing the Wrong Sealant
Not all sealants are created equal, and using the wrong type can harm your artwork. A common misconception is that any wood finish will suffice. However, differences in sealants can drastically affect the final appearance of your piece. Here’s what to consider:
- Select sealants designed for wood—specifically, those that are compatible with pyrography.
- Opt for clear finishes if you want to maintain the natural look of your artwork.
- Check the sealant’s drying time and whether it’s water-based or oil-based, as this can impact application.
Applying Too Much Sealant
Less is often more when it comes to sealing pyrography projects. Many artists mistakenly believe that a thick application will provide better protection. In reality, this can lead to issues like bubbling or an uneven finish. Follow these tips for best results:
- Use a foam brush or spray to apply a thin, even coat.
- Allow each coat to dry completely before applying another. This will help you achieve the desired finish smoothly.
- Consider applying multiple thin layers instead of one or two thick layers.
Ignoring Ventilation
Ventilation is crucial when working with sealants, particularly those with strong fumes. Artists often overlook the importance of a well-ventilated workspace, putting themselves at risk. To ensure a safe working environment:
- Work in a well-ventilated area, ideally outdoors or near an open window.
- Wear a mask if you are sensitive to fumes, especially when using oil-based finishes.
Sealing Too Soon
Another common mistake is sealing your artwork before it’s ready. Rushing into sealing without allowing adequate curing time for the pigment can lead to smudging or uneven appearance. To avoid this issue:
- Let your pyrography project dry completely; this may require several hours or even days, depending on the medium used.
- Perform a test by gently touching an inconspicuous spot to check if it’s fully dry.
Skipping Testing on a Sample Piece
Before diving straight into sealing your primary artwork, it’s beneficial to test the sealant on a scrap piece of wood. Many artists skip this crucial step, leading to devastating results if the sealant alters the appearance of their work. Follow these guidelines:
- Always test on a similar wood type to see how the finish interacts with your pyrography.
- Observe the drying time and the final finish to ensure it meets your expectations.
Forgetting About Maintenance
Once you’ve sealed your artwork, don’t forget about long-term maintenance! Neglecting this aspect can lead to premature wear, particularly if your pieces are displayed in bright sunlight or humid environments. Keep these maintenance tips in mind:
- Avoid placing your pyrography artwork in direct sunlight to prevent fading.
- Occasionally dust your pieces with a soft, dry cloth to keep them looking their best.
By paying attention to these common mistakes and implementing careful practices, you’ll not only enhance the longevity of your pyrography projects but also preserve their beauty. Each piece deserves the best care, and taking the time to seal and protect your artwork thoughtfully will ensure that it remains a cherished treasure for years to come. Remember, creativity shines timelessly when coupled with knowledge and diligence.
Natural vs. Synthetic Sealants: Which is Better for Your Artwork?
When considering how to protect your artwork, particularly pyrography pieces, the choice of sealants can make a significant difference. Artists frequently wrestle with the decision between natural and synthetic sealants to preserve the integrity and appearance of their work. Understanding the advantages and disadvantages of both types can help you make an informed decision that suits your artistic style and desired outcome.
Natural sealants, often derived from plant resins or oils, offer a range of benefits. They tend to be more environmentally friendly and non-toxic, making them appealing to artists who prioritize sustainability and health in their creative process. Common examples of natural sealants include:
- Linseed Oil: This oil penetrates wood deeply, enhancing the grain and providing a warm finish. However, it can take a long time to dry.
- Shellac: Made from the secretions of the lac bug, shellac is a versatile sealant that dries quickly and offers a beautiful, glossy finish. It’s best used on small projects due to its sensitivity to heat and moisture.
- Beeswax: Often used in combination with other oils, beeswax creates a soft sheen and provides a moisture barrier. It can be reapplied easily for maintenance.
Natural sealants typically exhibit an organic aesthetic and a pleasing touch, but they also have limitations. The drying time for many can be lengthy, which might not suit every artist’s timeline. Additionally, some natural products can be prone to yellowing over time, especially those that aren’t adequately protected from UV light.
On the other hand, synthetic sealants are crafted using chemical processes and can offer highly durable finishes. They can be tailored for specific applications, which allows you to achieve a desired effect with greater precision. Consider these options:
- Acrylic Sealers: These are water-based options that provide a clear finish, are easy to clean up, and dry quickly. They also resist yellowing and are generally more waterproof than natural alternatives.
- Polyurethane: Known for its toughness, polyurethane sealers come in both oil-based and water-based formulas. They can withstand harsh conditions and are ideal for pieces exposed to wear and tear.
- Epoxy Resin: This provides a glossy, glass-like finish and excellent durability. However, application can be tricky, as it requires precise mixing and temperature control.
While synthetic sealants offer a wide range of benefits—including faster drying times and superior durability—they may also pose risks. Some synthetic products emit volatile organic compounds (VOCs), which can be harmful if inhaled over long periods. Proper ventilation and protective equipment are advisable during application.
So, how do you decide which option is best for your artwork? Start by considering the purpose of your piece. If it’s a one-of-a-kind item meant for display in a controlled environment, a natural sealant may serve your needs without issue. For artwork that will be exposed to varying conditions—like humidity, sunlight, or frequent handling—a synthetic sealant might be the more reliable option.
Keep in mind, the application technique also plays a critical role in the final outcome. Regardless of your choice, follow these best practices:
- Prep Your Surface: Ensure your artwork is clean and free from dust or debris before applying any sealant.
- Test First: Always conduct a small test patch on a discrete area or scrap piece to see how the sealant interacts with the material.
- Layering: For some sealants, applying multiple thin layers can provide enhanced protection and better overall appearance.
- Allow Adequate Drying Time: Be patient and let each layer dry fully before applying the next coat. This prevents muddiness and ensures the best finish.
Both natural and synthetic sealants have their merits and challenges. The ideal choice boils down to your specific artistic goals, the type of pyrography you create, and the conditions in which your artwork will be displayed. Taking the time to understand your options will empower you to protect your creations effectively, ensuring they stand the test of time while showcasing your skill and artistry.
Tips for Maintaining the Longevity of Your Pyrography Creations
Creating stunning pyrography artwork is a rewarding endeavor, but maintaining its beauty and integrity over time requires specific care and attention. By following a few key practices, you can ensure that your pyrography pieces remain vibrant and free from damage. Here are essential tips to help you maintain the longevity of your prized creations.
Store Properly
Where and how you store your pyrography artwork plays a crucial role in its preservation. Consider the following points:
- Avoid Direct Sunlight: UV rays can fade colors and damage wood over time. Always keep your artwork out of direct sunlight to preserve its quality.
- Climate Control: Store your pieces in a cool, dry environment. Extreme temperatures and humidity can warp or crack the wood.
- Use Protective Wrapping: When transporting or storing artworks, use acid-free tissue paper or bubble wrap to cushion them and prevent scratches.
Regular Cleaning
Dust and dirt can accumulate over time, making your artwork look dull. Here’s how to keep your pyrography clean:
- Use a Soft Cloth: Gently wipe your artwork with a microfiber cloth to remove dust. This avoids scratching the surface.
- Avoid Chemicals: Refrain from using harsh cleaners that can erode the wood or alter the color. Instead, use a slightly damp cloth if necessary and ensure it’s not wet enough to warp the wood.
Apply a Protective Finish
Adding a finish not only protects your pyrography art but can also enhance its appearance. Consider these options:
- Varnish: A clear varnish can shield your artwork from moisture and dirt. Look for a varnish specifically designed for wood to avoid yellowing over time.
- Wax Finish: Applying a natural wax, such as beeswax, can provide a subtle sheen and protect against minor scratches.
- Spray Finishes: For a more uniform finish, use a spray polyurethane. Be sure to follow the manufacturer’s instructions and work in a well-ventilated area.
Limit Wear and Tear
Protecting your artwork from physical contact is vital. Here are the best practices:
- Hanging and Display: Use proper hanging hardware to ensure your pieces stay secure on walls. Consider framing your pyrography art if appropriate.
- Handling: When you need to handle your artwork, always do so with clean hands and, if possible, wear soft gloves to prevent fingerprints and oils from damaging the wood.
- Temperature Considerations: Keep your artwork away from heat sources (like radiators) and air conditioning vents to avoid warping the wood.
Consider Restoration Techniques
Even with the best care, wear may occur. If your pyrography artwork shows signs of age, here’s what you can do:
- Reapply Finish: If the protective finish starts to wear off, it may be time to reapply your chosen finish—keeping in mind compatibility for existing layers.
- Spot Repairs: For minor scratches or discoloration, facial restoration through careful application of wood filler or touch-up ink can rejuvenate the artwork.
Documentation and Insurance
It’s wise to keep a detailed record of your artwork, specifically for valuable pieces:
- Document Details: Note the creation date, materials used, and any particular features of your artwork. This documentation can assist with evaluations and help you keep track of maintenance.
- Consider Insurance: If your pyrography is of significant value, look into insuring it. This can provide peace of mind, knowing your investment is protected.
Protecting your pyrography artwork is a multifaceted process that requires regular attention and care. By implementing these best practices, you can enjoy your creations for years to come, keeping their vibrancy and integrity intact. Remember, preserving your art not only reflects your dedication to your craft but also allows future generations to appreciate your unique vision.
Conclusion
As you refine your skill in pyrography and put time and love into each piece, protecting your artwork becomes paramount. Grasping the importance of effective sealing and protective measures ensures that your creations withstand the test of time. This final segment serves to consolidate your understanding of the best practices, materials, and care necessary for preserving your pyrography projects.
Sealing your pyrography artwork is an essential step that can significantly enhance aesthetics and durability. The protective finish not only prevents deterioration from environmental factors but also accentuates the unique details and shades of your designs. Using the right sealants can help guard against scratches, moisture, and UV rays that may cause fading over time, allowing your pieces to remain vibrant and beautiful.
When choosing a sealant, it’s vital to consider the type of finish you desire and the characteristics of the materials involved. Natural sealants, such as oils and waxes, are often favored for their eco-friendliness and ability to enhance the natural beauty of wood grains without overpowering the artwork. On the other hand, synthetic finishes may offer higher durability and resistance to wear, making them a choice for pieces that will be frequently handled or displayed in challenging environments. Weighing these options carefully will allow you to choose the best protective finish that fits the specific needs of your artwork.
Navigating the common pitfalls when sealing your pyrography projects can save you from potential heartaches later. Many artists may rush directly into the sealing process without properly preparing their work. Failure to clean the surface or allowing time for cooling after burning can lead to uneven finishes and imperfections in the final product. Additionally, many opt for quick-drying sealants, only to discover that these can result in bubbling or cracking. Engaging in hands-on techniques and ensuring a thorough understanding of each product’s drying times can enhance your sealing outcomes significantly.
To maintain the longevity of your pyrography creations, regular maintenance is key. Simple habits, such as dusting with a soft cloth and avoiding exposure to harsh cleaning chemicals, can profoundly extend the life of your artwork. If your pieces are situated in areas that attract moisture, consider using a dehumidifier or keeping them in temperature-controlled environments to minimize the risk of wood warping or mold growth. Additionally, every now and then, consider checking the condition of the sealant. If it appears worn or damaged, reapplying a fresh layer may be necessary.
Don’t underestimate the emotional connection that exists between an artist and their work. Each pyrography piece represents countless hours dedicated to honing a craft, making it all the more significant to care for it properly. By appreciating and respecting your artwork with the right sealing and maintenance techniques, you can ensure that it continues to tell your story for years to come.
Creating impactful and enduring pyrography art involves not just the act of burning the designs but sealing it thoughtfully to protect against the elements. Selecting the appropriate sealant, avoiding common mistakes, and engaging in regular maintenance are all integral parts of the process. This attention to detail not only enhances the aesthetic appeal but also fosters a longer life for your artistic endeavors.
Ultimately, the journey of being a pyrography artist is as important as the creations themselves. By implementing these best practices for sealing and protecting your pyrography artwork, you’ll be empowering your creations to shine brightly in your home or as gifts to others, upholding the integrity of your artistry. The blend of technique, material knowledge, and diligent care will help you navigate the beautifully intricate landscape of pyrography, offering you endless opportunities for expressive creativity while ensuring your artwork flourishes for generations to admire.