Mastering the Techniques of Shading in Pyrography
Shading is a crucial aspect of pyrography, bringing depth and dimension to woodburning art. Mastering the techniques of shading can elevate your artwork from simple designs to intricately detailed pieces that convey emotion and realism. Whether you’re just starting or looking to refine your skills, understanding the fundamental methods and practices of shading in pyrography is essential.
Understanding Basic Shading Techniques
In pyrography, several shading techniques can enhance your work. Here are some key methods to consider:
- Hatching: This technique involves drawing parallel lines close together. The density of the lines influences the darkness of the shade.
- Cross-hatching: By layering cross-lines over hatching, you can create a more textured and darker shadow effect.
- Stippling: This method uses dots to build up tone. The closer the dots are placed, the darker the region becomes.
- Blending: When you manipulate the heat of the pyrography tool, you can blend strokes to create smooth transitions between dark and light areas.
Choosing the Right Tools for Shading
To master shading in pyrography, it’s vital to select the right tools. Here are some essential tools every pyrographer should have:
- Variable Temperature Wood Burner: This allows you to adjust the heat, enabling various shading techniques.
- Different Nibs: Use a variety of nibs like shader, ball, and pointed nibs for different effects and textures.
- Wood Selection: The type of wood can impact how well your shading techniques show. Softer woods like pine or basswood work well for beginners.
- Sandpaper: Smooth surfaces allow for better shading results. Sandpaper helps prepare your wood.
Layering: The Key to Depth in Shading
One of the most effective strategies for achieving realistic shading is layering. This process involves:
- Applying a light base layer.
- Gradually adding darker shades by building up layers.
- Using different nibs for varying textures, ensuring each layer dries before adding the next.
Layering not only creates depth but also helps avoid harsh lines, resulting in a more natural appearance. Be patient; the key to mastering layering is practice. Experiment with different speeds and heat levels to find what works best for you.
Understanding Light and Shadow
A firm understanding of light and shadow is crucial for effective shading. Keep these points in mind when working on your pyrography art:
- Light Source: Identify where the light is coming from in your composition. Shadows will fall opposite the light source.
- Cast Shadows: These are the darkest areas where objects block light. Pay attention to the shapes and placement of shadows relative to objects.
- Highlights: Areas that receive direct light should be left lighter in tone, giving contrast to shadows.
Practicing Shading Techniques
Practice is key to mastering shading. Consider these approaches:
- Study Real-Life Objects: Use real-life references to understand how light interacts with surfaces. Try to recreate those shadows on wood.
- Create Practice Panels: Use scrap wood to practice various shading techniques without the pressure of creating a finished piece.
- Join Pyrography Communities: Engaging with others in the pyrography community can provide insights and feedback on your shading techniques.
By integrating these techniques and consistent practice, you’ll slowly develop your unique approach to shading in pyrography. With an understanding of different methods and a commitment to improve, you can master the art of shading, creating breathtaking works that stand out.
The Role of Wood Types in Achieving Effective Shading
When delving into pyrography, understanding the immense influence of wood types can significantly enhance your shading techniques. Each type of wood has unique attributes that affect how the burning process interacts with the surface. Consequently, choosing the right wood is essential for achieving effective shading in your artwork.
The density of the wood plays a critical role in determining the darkness and texture of the burn. Hardwoods, such as maple and oak, tend to resist burning more than softwoods like pine and cedar. Consequently, softwoods typically yield more intense shading with less effort. Here are a few key factors to consider regarding wood types:
- Density: The density of the wood dictates how much heat it can absorb. Denser woods can create a more gradual shading effect, while softer woods allow for quicker results.
- Grain Pattern: The grain of the wood influences how heat penetrates and reacts. A tight grain can give finer details, while an open grain might produce more distinctive effects.
- Color: Different wood colors yield variable results. Lighter woods, like birch, allow the original hue of the wood to contrast against the burn, while darker woods, like walnut, often absorb more heat and create deeper shades.
Experimentation with various wood types can lead to surprising outcomes, enhancing your personal style. For example, when using basswood, many artists find that it burns evenly and offers a clean finish, making it the top choice for beginners. Its light color also provides a stark contrast, enabling more pronounced shading.
On the other hand, cherry wood presents a unique combination of warmth and complexity. It starts as a light tone but develops a deep, rich hue as it ages. When pyrographed, cherry can create stunning shadows that are enhanced over time, showcasing the art in a continual evolution.
Another interesting choice is mahogany. This wood type is not only aesthetically pleasing but offers a soft and even burn that many artists appreciate. Whether opting for detailed designs or broader strokes, mahogany can accommodate both styles effectively. Its reddish-brown color provides a rich backdrop that amplifies the detail of the shading.
For those seeking to explore more unconventional options, consider using plywood. Though some purists may shy away from it, plywood presents a diverse layering of woods, fostering an interesting array of textures and tones. Be mindful of the adhesive used in plywood, as it can affect the burn quality. Always test on a small section first.
A practical strategy for achieving effective shading involves testing various wood types at the start of any project. Grab small pieces of each wood type you’re considering, and practice different shading techniques. This method will not only provide clarity on how each wood responds but will also help refine your technique.
Shading density also varies based on the burning tool you choose. The tip’s size and shape impact how the wood absorbs the heat. A finer tip will allow for intricate, delicate lines, whereas a broader tip will cover larger areas quickly, perfect for creating deep shadows and gradients. Maintaining controlled movements allows for better shading accuracy, especially when working with denser woods.
As you gain experience, observing the interaction between the wood type and your technique will illuminate your path as an artist. You’ll start to develop a sense of what wood types complement your style best. Keep detailed notes on your experiments so you can track which combinations yield the most satisfying results.
Embracing the different properties of wood types will inevitably lead to impressive shading techniques in pyrography. Whether you gravitate towards the softer textures of pine or the complex tones of cherry, the wood you select will greatly affect your artistic expression. With practice and exploration, you’ll master the art of shading and bring your pyrographic visions to life, enriched by the unique qualities of each wood type.
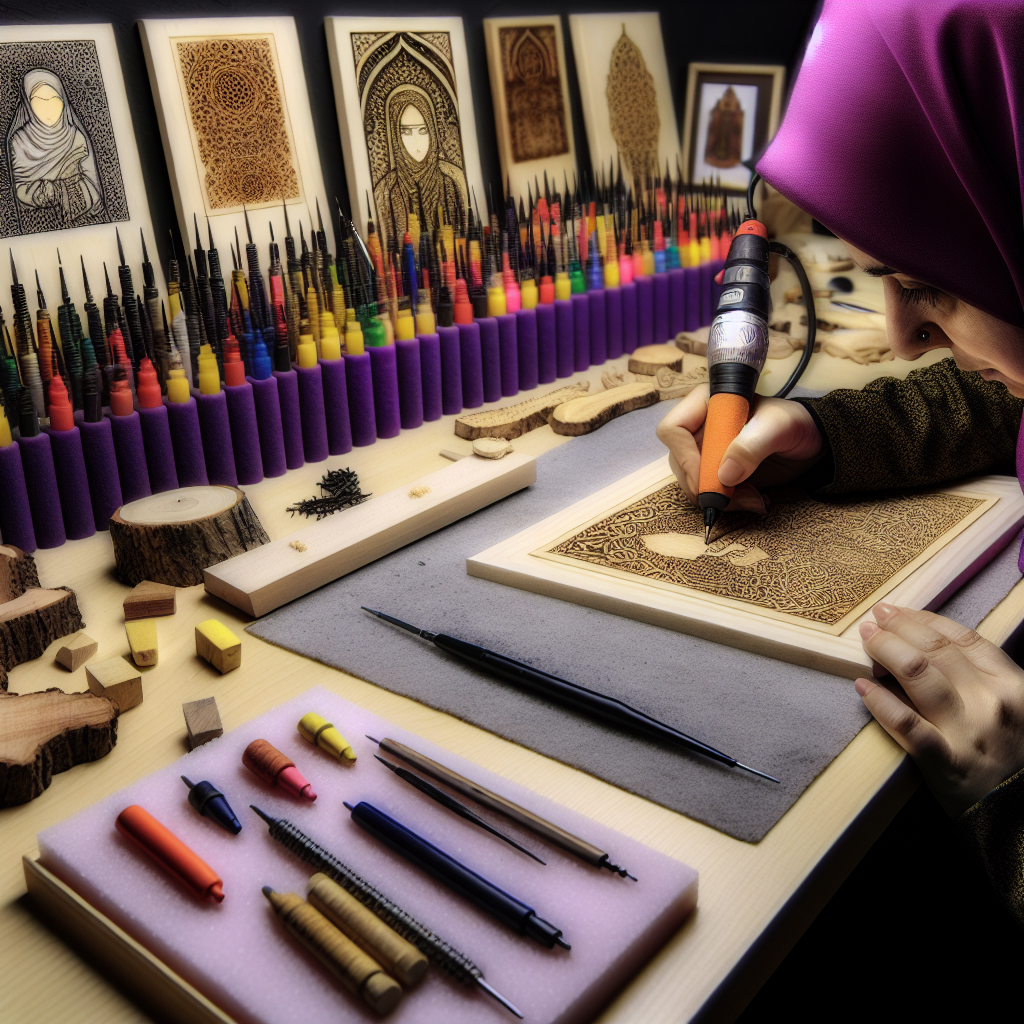
Tools and Materials Essential for Advanced Shading in Pyrography
Creating intricate and stunning shaded designs in pyrography requires not only skill and creativity but also the right tools and materials. Whether you’re a beginner or an experienced artist looking to enhance your shading techniques, having the essential gear can significantly impact the quality of your work. Let’s explore the various tools and materials that are crucial for advanced shading in pyrography.
Pyrography Pens and Burners
The primary tool for any pyrography artist is the pyrography pen or burner. These come in various forms, each suitable for different styles of shading:
- Variable Temperature Burners: These allow you to adjust the temperature, giving you better control over the depth and darkness of your burn. A variable temperature pen is ideal for achieving subtle gradations in shading.
- Interchangeable Tips: Many burners come with various tips designed for different techniques, such as shading, fine lines, and larger areas. Consider investing in a set that offers detailed tips for advanced shading.
- Digital Burners: These provide precise temperature settings and can often display the current heat level, making it easier to maintain consistency in shading.
Types of Wood
The choice of wood can dramatically affect your shading results. Certain woods absorb heat and respond differently to pyrography:
- Maple: Known for its fine grain and light color, maple is excellent for achieving detailed shading and designs.
- Pine: This softwood has a distinctive grain pattern that adds character but can be more challenging for blending shades.
- Birch: Birch not only offers a smooth surface but also absorbs heat evenly, making it a favorite among pyrography artists.
Additional Tools for Precision
Aside from the burner and wood, having a few additional tools enhances your ability to create graduated shading:
- Shading Tools: Steel wool or a brush can help blend the burned areas, giving a softer appearance to shadows.
- Sandpaper: Using fine-grit sandpaper can refine your surface for a more polished finish and lighter burn.
- Pencils and Graphite Paper: Sketching your design beforehand allows for better planning. Graphite paper is great for transferring images onto the wood.
Safety Equipment
Safety should never be overlooked when engaging in pyrography. Ensure you have:
- Protective Eyewear: This will shield your eyes from smoke or sparks while burning.
- Masking Tape: Use this to secure your project in place and potentially cover areas that may get burned unintentionally.
- Ventilation: Working in a well-ventilated space helps to clear any fumes and reduces the risk of smoke inhalation.
Finishing Products
Once you’ve completed your pyrography artwork, it’s crucial to protect and enhance the surface:
- Clear Sealants: Applying a clear coat can protect your work from moisture and dust while enhancing its natural beauty.
- Wood Stains: If you’re looking to add depth, a wood stain can help highlight the burned areas by darkening the wood without compromising the design.
- Varnish: Make sure to use a varnish suitable for wood to provide a long-lasting finish.
Mastering the art of shading in pyrography involves the right combination of tools and materials. Investing in high-quality equipment and understanding their uses will lead to more impressive results and ultimately elevate your craft. Always remember that practice and experimentation with these tools will yield the best outcomes, allowing you to develop a personal style in your shading techniques.
Exploring Different Shading Styles and Their Unique Effects
When diving into the world of pyrography, mastering different shading styles can elevate your artwork, adding depth and character to your pieces. Each shading style offers unique effects that can transform a simple image into a stunning work of art. By experimenting with these techniques, you can develop your signature style and enhance your creative expression.
Types of Shading Styles
Understanding various shading techniques is essential for any pyrography artist. Here’s a breakdown of some popular styles:
- Pointillism: This technique involves creating an image using small dots or dashes. Taking inspiration from the dot-based paintings of Seurat, you can vary the size and density of the dots to manipulate shadows and highlights.
- Hatching: Hatching consists of applying closely spaced parallel lines to create shading. The closer the lines are, the darker the area will appear, allowing for smooth transitions of light and shadow.
- Cross-Hatching: Building on hatching, cross-hatching incorporates intersecting lines. By layering the lines in different directions, you can achieve richer textures and depth, amplifying the three-dimensionality of your artwork.
- Blending: Blending involves smoothing out heated areas to create soft transitions between light and dark. This technique often results in a more realistic look and can be achieved using tools such as a blending stump or even a simple cloth.
- Stippling: Stippling focuses on using a series of small dots to form an image, similar to pointillism. However, stippling emphasizes texture and shading rather than just defining shapes, making it ideal for achieving intricate details.
Exploring Each Technique
Let’s delve deeper into some of these shading styles to help you understand their unique effects:
Pointillism
Pointillism requires patience and precision, as it’s all about the arrangement of individual dots. Start with a light touch to build your image gradually. The beauty of this technique lies in its ability to create dimensionality from afar, as the viewer’s eyes blend the dots into a cohesive image.
Hatching and Cross-Hatching
With both hatching and cross-hatching, you can control the darkness of your shading by adjusting the angle and pressure on the pen. Practice various line widths and spacing to achieve different effects. For example, sparseness in the lines creates light shadows, whereas a dense pattern produces deep shadows. This technique is particularly effective for depicting folds in fabric or the curvature of objects.
Blending
The blending technique offers a smooth texture by softening transitions. It’s especially useful for portraits or realistic representations, where lifelike features need delicate shading. Start with light strokes and gradually build up intensity. You might also explore the use of different tools, like a heat gun, to further manipulate the burnt areas for a more uniform blending effect.
The Impact of Style on Artwork
Choosing the appropriate shading style isn’t just about technique; it profoundly influences the emotional tone and message of your artwork. Here are a few considerations:
- Atmosphere: Darker shading styles can create a moody, intense atmosphere, while lighter techniques might evoke feelings of serenity and openness.
- Detail vs. Simplicity: high levels of detail through stippling or cross-hatching can draw attention and create focus, while simpler designs may deliver a more minimalist impact that leaves room for interpretation.
- Emphasis on Texture: Different shading methods can either highlight or downplay texture, affecting how the viewer perceives the materiality and the subject matter.
Practical Applications in Pyrography
Diverse shading styles enhances your pyrography projects. Whether you’re creating intricate designs on wood slices for home decor or crafting personalized gifts, the choice of shading can set your work apart. Choose a style based on the effect you want to achieve and the overall mood you wish to convey.
Experimenting with various shading techniques can lead to unexpected discoveries, ultimately shaping your unique artistic voice. Remember, the key to mastering shading in pyrography lies in practice, patience, and a willingness to explore. With each piece you create, you’ll continue to refine your skills and develop a deeper understanding of how shading can impact your artwork.
Ultimately, it’s the artistry behind the burn that makes pyrography a compelling form of creative expression. So, pick up your pyrography tool and start exploring the endless possibilities of shading!
Common Challenges in Pyrography Shading and How to Overcome Them
Embarking on a journey in pyrography can be a thrilling experience, but artists often encounter several challenges when it comes to shading. Mastering this essential skill can elevate your artwork, adding depth and dimension to your designs. Let’s explore some common obstacles and practical solutions to help you refine your pyrography shading techniques.
Inconsistent Shading Quality
One of the most frustrating challenges in pyrography is achieving consistent shading. Newbies may struggle with varying pressure, leading to uneven tones. To overcome this:
- Practice Even Pressure: Focus on maintaining a steady pressure throughout your strokes. This consistency ensures a uniform burn depth.
- Experiment with Different Tools: Different tips produce varying effects. Try using a shading tip versus a writing tip to see which yields better control for your style.
- Test on Scrap Wood: Before working on your main piece, practice on scrap wood to hone your pressure control and achieve the desired effect.
Difficulty in Achieving Gradients
Creating smooth gradients is a hallmark of skilled pyrography but can be tricky for beginners. To tackle this issue:
- Utilize Short, Overlapping Strokes: Instead of long lines, use small, overlapping strokes to blend colors more effectively.
- Vary Your Tool Temperature: Higher temperatures create deeper burns, while lower temperatures can produce lighter shades. Adjust your tool accordingly to achieve the desired gradient.
- Layering Technique: Start with lighter shades and gradually add darker tones. This layering gives you the control needed to create subtle transitions.
Burn-Out or Overburning
Overburning is a prevalent issue that leads to dark patches within an artwork, causing a loss of detail. To avoid this problem:
- Monitor Your Temperature Settings: Keep an eye on your tool’s temperature, adjusting it based on the wood type you’re working on. Softer woods burn faster than harder woods.
- Move at a Consistent Pace: Quick movements can lead to burns. Ensure you’re moving the tool at a steady speed to avoid overburning.
- Take Breaks: Regularly step back and assess your work. This will help you catch any areas that may need refinement before it’s too late.
Control of Fine Details
Shading in intricate sections can be daunting, especially when working with small areas where precision is key. To improve control:
- Use Smaller Tips: Invest in smaller pyrography tips designed for detail work. These allow for better precision during shading.
- Implement Slow Movements: Take your time when working on fine details. Slow and deliberate movements reduce the risk of mistakes.
- Practice Stippling: This technique involves creating texture through small dots. It can provide depth without requiring extensive shading, making it ideal for detailed work.
Choosing the Right Wood
The choice of wood plays a crucial role in shading. Some woods are more forgiving than others. Here’s how to tackle this challenge:
- Experiment with Different Species: Softer woods like basswood or pine are excellent for beginners due to their ease of burning. Explore various woods to find what works best for you.
- Avoid Highly Resinous Woods: These can create uneven burns. Instead, opt for woods that are known for stable burning properties.
- Understand Wood Grain: Pay attention to the grain direction; it influences how the wood reacts to the heat. Burning against the grain can lead to darker patches.
Maintaining Focus and Avoiding Mistakes
Maintaining focus is essential to avoid mistakes that can derail the entire piece. Consider these strategies:
- Create a Comfortable Workspace: Ensure your work area is well-lit and free of distractions. The right setting promotes concentration.
- Take Breaks: Regular breaks help refresh your mind. Stepping back from your piece can clarify your vision and help maintain accuracy.
- Stay Organized: Keep your tools and materials organized. A cluttered workspace can lead to accidents.
By addressing these common challenges, you can refine your shading skills in pyrography and produce stunning work. Remember, practice makes perfect, so stay persistent and patient, and your efforts will surely pay off.
Conclusion
Mastering the art of shading in pyrography is an intricate journey that not only enhances the aesthetic of your woodburning projects but also showcases your skill and creativity. As we’ve explored, mastering the techniques of shading is foundational for anyone serious about creating expressive and captivating designs. Through practice and understanding of various shading methods, you can add depth and dimension to your creations, turning simple lines into dynamic imagery that pulls the viewer in.
Understanding the role of wood types in shading is equally crucial. Different woods react uniquely to heat and burn marks. For instance, softwoods may burn quickly and require a lighter hand, while hardwoods allow for more extended burning times, which enables more profound shading effects. Experimenting with various wood types not only influences your shading capabilities but also enriches your artistic palette. Choosing the right wood can transform your approach to shading, allowing for more intricate designs and richer textures.
The tools and materials you use are pivotal in achieving effective shading. A well-equipped pyrography toolkit can elevate your work dramatically. High-quality pyrography pens with adjustable temperature settings provide the flexibility needed to experiment with different shading techniques. Additionally, incorporating diverse nibs, ranging from fine points to broader shaders, allows for various styles and effects. Materials such as quality wood finishes and protective coatings also play a role, further enabling your shaded designs to shine with clarity and longevity. Investing in the right tools not only fortifies your current projects but also sets the stage for future endeavors.
Exploring different shading styles opens a world of creative possibilities. Whether you’re interested in stippling, hatching, or creating gradients, each shading style can evoke different emotions and atmospheres in your artwork. For example, a finely executed gradient can impart a sense of tranquility, whereas bold stippling might elicit more dynamic energy. Understanding and incorporating these diverse styles into your work allows for a more personalized approach, inviting viewers to engage with your pieces uniquely. The ability to transition between styles based on the theme of your artwork offers limitless expression and creativity.
As with any art form, challenges are part of the learning curve, especially when it comes to shading in pyrography. Common hurdles include achieving consistent burn depth, managing uneven wood grain, and overcoming the temptation to rush the shading process. However, recognizing these challenges allows you to develop strategies to overcome them. Patience is key; take your time to practice control over your pyrography pen, allowing each stroke to build gradually. By learning to adjust your techniques based on the wood’s response and becoming attuned to the nuances of your tools, you will find success becomes more attainable.
The journey of mastering shading in pyrography is a blend of technique, material understanding, and personal expression. Each project you undertake serves as an opportunity to refine your skills and explore new methods. By focusing on these critical areas—techniques, wood types, tools, styles, and challenges—you create a solid foundation for excellence in your pyrography work. Moreover, it is essential to adopt a mindset of continuous learning and exploration. The more you immerse yourself in practice and experimentation, the more proficient you will become.
Sharing experiences and insights with fellow pyrography enthusiasts can enrich your journey. Engaging in workshops or online forums can provide tips and tricks that you may not encounter through solo practice. Learning from others who face similar challenges or have mastered techniques can significantly enhance your shading capabilities. Celebrating successes, no matter how small, can also motivate you and inspire innovation in your artistic journey.
Ultimately, mastering the art of shading in pyrography is more than just a technical skill; it is about discovering the joy of creating and expressing oneself through this extraordinary medium. Embrace the process, appreciate the imperfections, and enjoy the transformation of wood into stunning pieces of art that reflect your unique voice. Whether you are a novice or more experienced, this practice not only cultivates skill but also ignites a passion that can enrich your life and the lives of others who appreciate your work. As you continue exploring and mastering shading, may each piece you create become another step in your creative evolution.