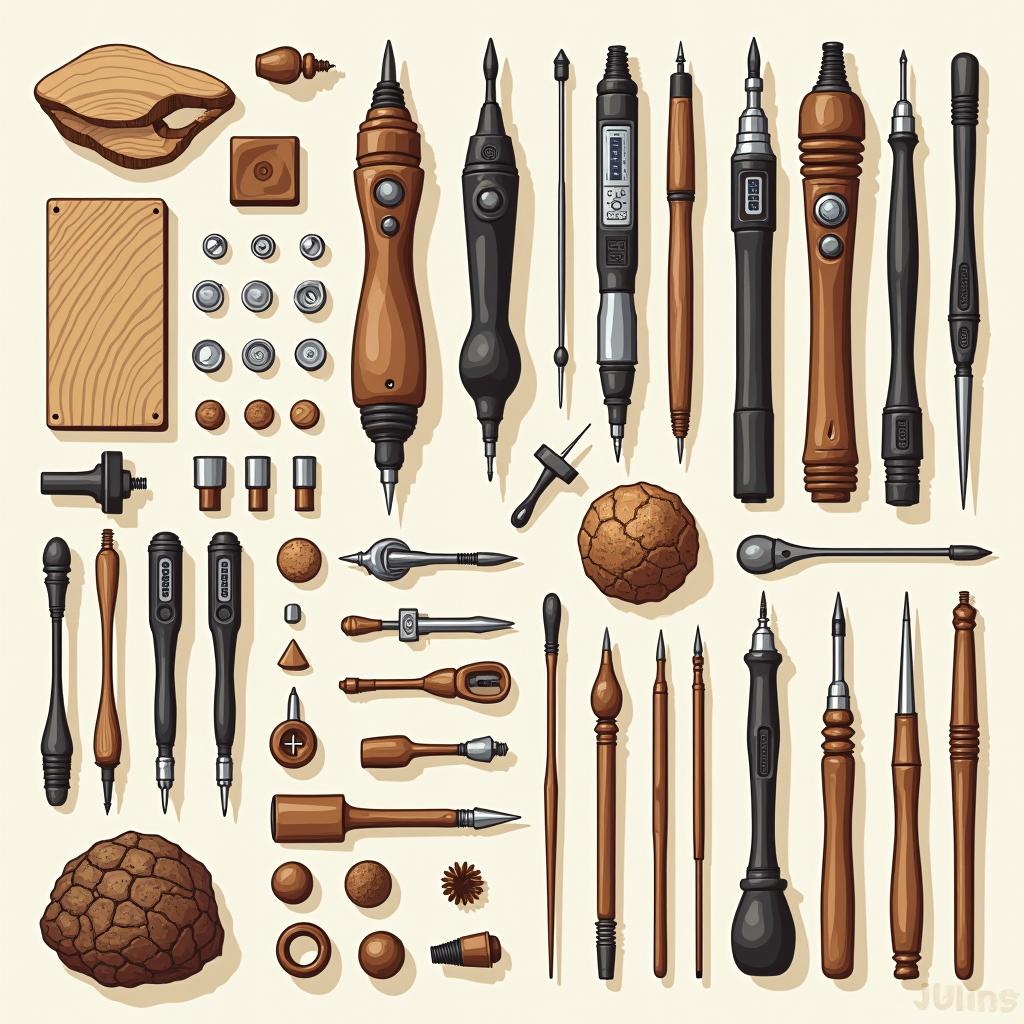
Essential Pyrography Tools for Woodburning: A Complete Guide
Engaging in the art of pyrography, or woodburning, can be a rewarding experience that allows for personal expression and creativity. To start this fascinating journey, you need the right tools to ensure precision and quality in your designs. Here’s a comprehensive look at essential pyrography tools that will elevate your woodburning projects.
Understanding the Pyrography Pen
The most crucial tool in any pyrography artist’s arsenal is the pyrography pen. Often referred to as a woodburning tool, investing in a high-quality pen can make a significant difference in your artwork. These pens come in various types:
- Basic Plug-In Pens: These are typically the least expensive and are great for beginners. They usually have fixed tips.
- Adjustable Temperature Pens: These allow you to control the heat, providing more versatility for detailed work.
- Digital Pens: Equipped with digital displays, these pens offer precise temperature control and are ideal for intricate designs.
Important Pyrography Tips
Regardless of the type you choose, make sure to select a pen that feels comfortable in your hand. A pen with a lightweight design allows for longer periods of use without fatigue. Moreover, it’s beneficial to practice on scrap wood before starting on your main projects, as this helps you get accustomed to the pen’s heat and control.
Variety of Tips and Nib Sets
No pyrography pen is complete without a range of tips or nibs. Different nibs allow artists to create various textures and effects. Here are some common types of tips:
- Flat Nibs: Ideal for shading and covering larger areas.
- Round Nibs: Great for fine detailing and writing.
- Ball Nibs: Perfect for stippling and creating dot patterns.
- Texture Nibs: Used to produce textured effects on your woodburning.
Always have a selection of tips on hand to suit different styles and techniques.
Choosing the Right Wood
The type of wood you select greatly impacts your artworks’ outcome. Softer woods such as pine, basswood, and birch are excellent for beginners due to their ease of handling. Here are some characteristics to consider:
- Grain Pattern: Look for wood with a fine grain for smooth burning.
- Color: Light woods tend to show burning marks more vividly than darker woods.
- Moisture Content: Ensure the wood is dry; moist wood can produce uneven burning.
Safety Equipment and Accessories
Woodburning can produce fumes, so it’s essential to work in a well-ventilated area. Here are some safety tools you should consider:
- Respirator Mask: Helps filter out harmful fumes while working.
- Safety Goggles: Protects your eyes from any accidental sparks while burning.
- Heat-Resistant Gloves: They provide protection against burns and ensure better handling of heated tools.
Other Helpful Pyrography Tools
Several other tools can enhance your pyrography experience:
- Stencil Set: Useful for creating consistent designs and patterns.
- Ruler and Compass: Essential for precise measurements and lines.
- Sharpener: Keep your nibs sharp for optimal results.
- Cleansing Pads: Regularly clean your tips to maintain their performance.
Exploring Finishing Techniques
To protect your woodburned creations, consider applying a finish. Depending on the desired look, you might choose:
- Varnish: Provides a glossy finish while protecting the wood.
- Oil: A natural finish that enhances the wood’s grain.
- Wax: Offers a soft sheen and a very natural feel.
The right pyrography tools can significantly impact your woodburning experience. By understanding the essential tools and materials, you’ll be well-equipped to create stunning artworks that showcase your talent and creativity. Happy burning!
Techniques for Mastering Woodburning Arts
Woodburning, or pyrography, combines artistry and technique to create stunning designs on wood. Whether you’re a novice or looking to elevate your existing skills, mastering woodburning arts requires a blend of creativity and technical know-how. To achieve striking results, understanding various techniques is essential.
Understanding the Basics
Before diving into advanced techniques, it’s important to get a grip on the fundamentals. Beginners should familiarize themselves with the tools and materials involved in woodburning. Start with:
- Wood Quality: Choose a smooth, untreated wood like basswood or birch. These types provide a clean surface for detailed work.
- Pyrography Tools: Invest in a reliable pyrography pen with interchangeable tips. This versatility allows for different styles and effects.
- Safety Gear: Always use gloves and a mask when woodburning to protect yourself from fumes and heat.
Essential Techniques to Master
Once you’re comfortable with the basics, it’s time to explore techniques that will enhance your woodburning skills.
1. Line Work
Line work is foundational in pyrography. This technique involves creating designs using continuous lines. Key points to consider:
- Varying Line Thickness: Use different pressure levels on your tool to create lines of various thicknesses, adding depth and character to your artwork.
- Consistency: Practice maintaining a steady hand to ensure lines are uniform. This skill develops with time and practice.
2. Shading Techniques
Shading adds dimension to your work. Mastering shading techniques can transform flat images into captivating pieces. Here are a few methods:
- Gradient Shading: Gradually adjust the pressure and speed of your tool to create soft transitions between light and dark areas.
- Cross-Hatching: Overlay lines at different angles to create texture and depth. This method can give the illusion of shadow and light.
3. Stippling
Stippling involves creating images through a series of dots or small burn marks. This technique can yield stunning and unique results.
- Spacing Matters: The closer the dots are to each other, the darker the area will appear. Varying the spacing allows for greater control over shadows.
- Blend Colors: Use stippling to introduce colors by adjusting the size of the dots, giving your designs a painterly effect.
Combining Techniques for Complex Designs
Combining different techniques can result in breathtaking pieces of art. For example:
- Integrating Line Work and Shading: Start with a line drawing and layer shading over it. This approach brings your outlines to life.
- Adding Stippling to Enhance Details: Use stippling in areas of detail, such as eyes or texture in fur, after laying down the initial burnt lines.
4. Experiment with Different Wood Types
Every type of wood burns differently. Experimenting with various woods can give unique textures and colors to your work. Some popular woods include:
- Pine: Soft and easy to burn, ideal for beginners.
- Cherry: Offers beautiful color variations and a rich finish.
- Oak: Provides a texture that can enhance the quality of shading.
5. Practice and Patience
Above all, mastery comes from consistent practice. Set aside regular time to hone your skills. Don’t rush; patience is key in woodburning. Each burn will teach you something new. Keep a journal of your techniques, results, and ideas for future projects. Tracking your progress can inspire you and highlight areas for improvement.
By employing these diverse techniques and dedicating time to practice, you will develop a unique style and elevate your woodburning artistry. Embrace the learning process, and soon, your creations will capture the imagination of those who see them.
Safety Considerations When Using Pyrography Tools
When setting out to explore the art of pyrography, or woodburning, it’s essential to prioritize safety. Engaging with hot tools can pose numerous risks, so understanding and implementing safety measures will enhance not only your well-being but also the quality of your work.
Understanding Heat Sources
Pyrography tools, particularly woodburning pens, operate at high temperatures. To avoid accidents:
- Stay Mindful of the Heat: The tip of the pen reaches temperatures that can exceed 1000°F. Always handle the tool by its insulated parts, avoiding contact with the heated tip to prevent burns.
- Use in a Controlled Environment: Work in a well-lit, ventilated area free of clutter. Ensure flammable materials are kept at a safe distance.
Protecting Your Workspace
Creating a safe workspace allows for an enjoyable pyrography experience. Here’s what to consider:
- Protective Surfaces: Utilize a heat-resistant mat or board to protect your work surface from scorching or damage.
- Declutter: Keep your workspace tidy to prevent accidents. Organize tools and materials neatly and avoid accumulating debris that could catch fire.
Personal Protective Equipment (PPE)
Wearing appropriate protective gear is crucial when using pyrography tools. Consider the following:
- Safety Glasses: Protect your eyes from smoke, splinters, or other particles that may be released during woodburning.
- Heat-Resistant Gloves: Use gloves specifically designed to withstand high temperatures to safeguard your hands when handling the tool.
- Dust Masks: Some types of wood may release harmful fumes or dust. A dust mask can help reduce inhalation of these particles.
Handling Pyrography Tools
Proper handling techniques not only improve your skills but also enhance safety. Here are some tips:
- Always Unplug: When changing tips or taking breaks, make it a habit to unplug your woodburning tool. This prevents accidental activation.
- Use Tool Stands: Employ proper stands to hold the hot pen. Avoid laying it down on surfaces to prevent burns and fires.
Fire Safety Considerations
Fires can ignite quickly, so it’s vital to stay vigilant:
- Keep Water Nearby: Always have a container with water or a fire extinguisher within reach to handle any unexpected fires promptly.
- Know Your Tools: Familiarize yourself with your pyrography tool’s safety features and follow the manufacturer’s instructions closely.
Sorting Wood and Materials
Not all woods are created equal when it comes to burning. Certain types can emit harmful fumes.
- Avoid Toxic Woods: Stay clear of treated or manufactured woods, as they can release toxic chemicals when burned. Opt for untreated, natural woods.
- Test for Compatibility: If you’re unsure about a wood type, do a small test burn to gauge smoke production and fume safety.
Staying Focused and Present
Once you’re equipped with the right tools and safety measures, it’s pivotal to maintain focus:
- Limit Distractions: Keep distractions at bay, turning off devices if needed to maintain concentration while working.
- Take Breaks: If you feel tired or fatigued, take a moment to rest and clear your mind before continuing your project.
By integrating these safety considerations when using pyrography tools, you can successfully immerse yourself in this engaging craft while minimizing risks. With careful planning, protective measures, and a conscious approach to your workspace, pyrography can become a rewarding and safe artistic endeavor.
Inspiring Pyrography Projects for Beginners
Embarking on your pyrography journey can be incredibly rewarding, especially as it allows you to express creativity through woodburning. For beginners, selecting projects that are engaging yet manageable is key to building confidence and skills in this art form. Here are some inspiring pyrography projects that you can start with, all tailored for those who are just getting their feet wet in woodburning.
Simple Nature Scenes
Nature scenes are a fantastic way to practice basic pyrography techniques. Start with a simple sketch of trees, mountains, or rivers. They offer plenty of space for experimentation, allowing you to work with different shading techniques and line styles. You might consider:
- Sketching a sunset over the mountains.
- Creating a woodland landscape with various tree types.
- Depicting a serene lake surrounded by foliage.
These scenes can be scaled to fit your wood surface, making them versatile projects for any beginner.
Personalized Coasters
Designing personalized coasters is not only practical but also a great way to hone your pyrography skills. Coasters provide a small canvas perfect for experimenting with intricate designs. You can personalize them for family and friends or create a themed set for your own home. Consider these ideas:
- Initials or monograms.
- Fun quotes or sayings.
- Floral or geometric patterns.
This project helps you perfect controlled lines and shading techniques without overwhelming you, making it ideal for beginners.
Pictorial Plaques
Wooden plaques can serve as eye-catching decor while allowing you to explore more detailed designs. Start with a simple shape—like a heart or star—and add pictures or words that resonate with you. Some ideas to get you started include:
- A welcoming “Home Sweet Home” plaque.
- A personalized family name sign.
- A motivational quote surrounded by artistic elements.
Multiple elements will also encourage the use of various pyrography techniques, increasing your skill set.
Fun Animal Illustrations
Animal images can engage your creativity and allow for expressive designs. You can either freehand your drawings or use templates to trace. Beginners should consider these approachable animal designs:
- A simple owl perched on a branch.
- A playful puppy or kitten.
- Majestic birds in flight.
Practicing animal illustrations can enhance your skills in achieving texture and detail, an essential aspect of effective pyrography.
Custom Gift Tags
Gift tags are small, quick projects that let you practice while creating something useful. They come in handy for various occasions and allow for personal touches. You might want to try:
- Names and initials for personalizing gifts.
- Motivational words to uplift the gift receiver.
- Seasonal designs that reflect holidays like Christmas or birthdays.
These tags are easy to decorate and offer a perfect platform to refine your burning techniques in a manageable size.
Practice Boards
Creating a practice board is a unique way to experiment with different techniques, strokes, and styles. You can mark sections of your board and practice everything from shading to intricate patterns. This approach allows you to:
- Test various woodburning tips and settings.
- Experiment with different types of wood.
- Document your progress over time.
Having a dedicated practice board will enable you to become more familiar with your tools and processes, aiding your growth as a pyrographer.
By choosing any of these projects, beginners can start to build confidence and skill in the art of pyrography. With the right tools and a bit of creativity, you can turn simple ideas into beautiful pieces of art. Remember, the journey of learning is just as important as the finished product, so take your time and enjoy the process!
Caring for Your Pyrography Tools: Maintenance Tips
Maintaining your pyrography tools is essential to ensure their longevity and to keep your woodburning projects looking their best. Proper care enhances performance and helps you achieve precise and intricate designs. Here are some valuable maintenance tips for a variety of pyrography tools.
Cleaning Your Pyrography Pens
After each use, it’s crucial to clean your pyrography pens to prevent the buildup of resin and soot. A simple cleaning routine can greatly extend the life of your tools:
- Cool Down: Always allow the pen to cool down completely before cleaning it. This prevents burns and damage.
- Wipe Down: Use a soft cloth or paper towel to wipe the heated nib. Gently remove any residue without scratching the surface.
- Use Alcohol: For stubborn residue, a cotton swab dipped in isopropyl alcohol can be effective. This helps dissolve any leftover materials.
Proper Storage
Storing your pyrography tools correctly plays a significant role in preserving their quality:
- Temperature and Humidity: Store your tools in a cool, dry place. Excessive heat or humidity can warp materials and degrade performance.
- Tool Case: Consider investing in a dedicated tool case or holder for better organization. This prevents tools from knocking against each other and potentially causing damage.
- Keep Tips Safe: If you have interchangeable nibs, make sure to store them separately in a protective container. Avoid leaving tips exposed, as this can lead to dulling and chipping.
Regular Inspections
Routine maintenance should also include inspecting your tools regularly:
- Check for Damage: Look for cracks or deformities in the nib or handle. Do not use damaged tools, as they can cause improper burning and may pose safety risks.
- Test Heating: Periodically test your pyrography pen to ensure it heats evenly. An uneven heat can result in erratic burn patterns.
Nib Replacement
Eventually, the nibs will wear out and need replacement. Here’s how to manage nib replacement effectively:
- Quality Nibs: Always invest in high-quality nibs compatible with your pyrography pen model. Inferior nibs may cause more wear to your tools.
- Frequency of Use: How often you burn will dictate how frequently you need to replace your nibs. Build a routine to keep track of usage.
- Secure Fitting: When attaching a new nib, make sure it’s fitted securely. Loose nibs can detach during use, leading to accidents.
Proper Usage Techniques
The way you use your pyrography tools can have a significant impact on their lifespan:
- Angle and Pressure: Maintain a consistent angle while using your pen and apply pressure gently. Excessive pressure can cause nib damage.
- Temperature Control: Avoid setting the temperature higher than necessary. This can lead to excessive wear and burns on your woodwork.
Additional Care Tips
Here are a few more tips to ensure you’re getting the most out of your tools:
- Heat Stability: Let the pen heat up before starting your project. This allows for more consistent burning.
- Work in Segments: When working on larger pieces, take breaks. This not only helps prevent overheating but also maintains better precision.
- Document Your Settings: Keep notes on temperature settings and techniques that work best for a particular project. This tracking helps maintain consistency across multiple works.
By implementing these maintenance tips in your routine, you will prolong the life of your pyrography tools and enhance your overall woodburning experience. Caring for your tools ensures that your creativity flows smoothly, allowing you to produce beautiful artwork with ease and precision.
Conclusion
As we wrap up our exploration of essential pyrography tools for woodburning, it’s clear that embracing this art form requires not just creativity and passion but also the right equipment and knowledge. Each aspect we’ve discussed is critical in fostering a fulfilling woodburning experience.
Understanding essential pyrography tools is the first step towards your mastery. From quality woodburning pens, which feature varying temperature settings and interchangeable tips, to the selection of wood types that best suit your projects, every choice affects your end result. Investing in a reliable set of tools not only enhances your artistic expression but also ensures precision and control over your work. Remember, quality tools can significantly elevate your pyrography practice, allowing for intricate designs and detailed images that are both unique and captivating.
Mastering woodburning arts involves continual practice and experimentation with different techniques. Whether you’re exploring shading, outlining, or even sketching directly onto the wood, each technique offers its own challenges and rewards. By incorporating a variety of styles into your work, you not only expand your skill set but also develop a more personal style. Don’t be afraid to try new approaches; each burn is a step towards improvement.
As exhilarating as pyrography can be, safety is paramount. We discussed important considerations like the use of well-ventilated spaces, understanding the heat levels of your tools, and the necessity of protective equipment such as gloves and goggles. These precautions help prevent accidents and ensure your creative journey remains enjoyable. Respect for the tools you use and awareness of your surroundings will keep you safe while allowing you to focus on producing stunning artwork.
For beginners, finding inspiration can lead to a blossoming interest in woodburning projects. We covered a variety of beginner-friendly ideas, from simple coasters and bookmarks to personalized gift items. These projects not only build confidence but also offer opportunities to hone your skills. Experimenting with different patterns and designs will help you understand the nuances of pyrography and grow your artistic voice. Plus, completing these projects provides a sense of accomplishment that fuels your enthusiasm for future works.
One aspect often overlooked by novice artists is the importance of maintaining pyrography tools. Proper care extends the life of your equipment and ensures consistent performance during use. Regular cleaning, proper storage, and thoughtful handling will pay off in the long run. Frequent inspections of your tools will help you identify wear and tear, allowing for timely repairs or replacements. When your tools are in top condition, your art will benefit, and your overall experience will be greatly improved.
The world of pyrography is rich and diverse, offering endless possibilities for creativity and self-expression. By having the right tools, honing your techniques, prioritizing safety, finding inspiration in beginner projects, and maintaining your equipment, you set the stage for a fulfilling artistic journey. Whether you aim to create intricate works of art or simply enjoy the meditative process of woodburning, these guidelines can help you thrive in this exciting craft.
Every piece you create is an opportunity to explore your creativity and push the boundaries of your skills. Pyrography is more than just burning wood; it’s about storytelling through art. As you dive deeper into this captivating medium, remember that each burn reflects your unique perspective and artistic journey. Embrace the learning curve and enjoy the process. Your next project is waiting—go on and bring your visions to life with the essential tools and knowledge you’ve now gained. Explore, experiment, and leave your mark on the wood, as each creation speaks of your dedication to mastering the art of pyrography. Happy burning!