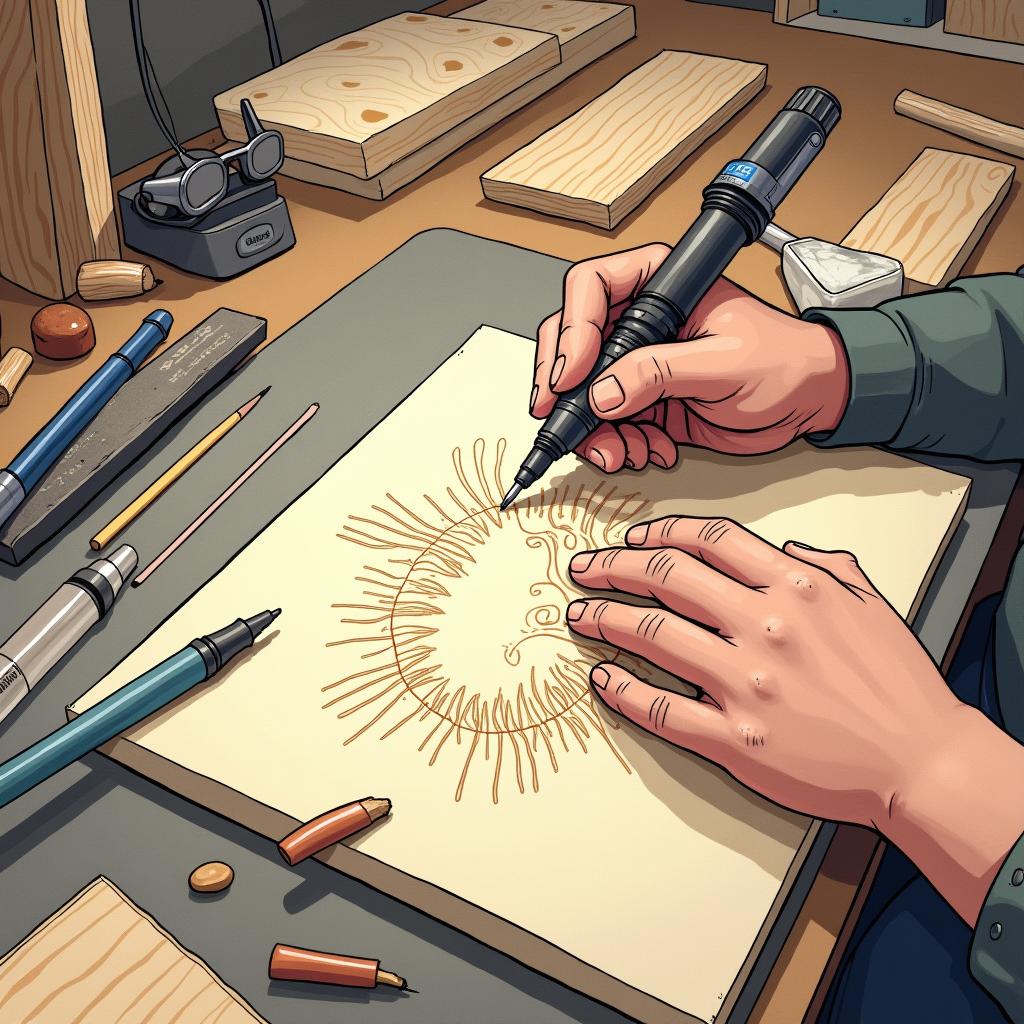
Best Tips for Achieving Smooth Lines in Pyrography
Achieving smooth lines in pyrography, the art of decorating wood or other materials with burn marks, can elevate your artwork significantly. Whether you are a novice or an experienced pyrographer, mastering smooth lines will enhance the overall quality and precision of your creations. Here are some effective tips to help you attain seamless lines in your pyrography projects.
Choose the Right Tools
The first step towards achieving smooth lines in pyrography is selecting the appropriate tools. Investing in high-quality pyrography pens with interchangeable tips can make a substantial difference. For smoother lines, consider using the following:
- Shader Tips: These tips allow you to create gradual changes in tone, perfect for achieving gentle curves and sleek lines.
- Writing Tips: Narrow tips are ideal for fine details; they offer precision in design, making it easier to create clean lines.
- Variable Temperature Control: A tool with adjustable heat levels helps you customize the temperature, which affects line sharpness. This flexibility is essential for smooth results.
Prepare Your Workspace
Creating a conducive workspace is vital. A clean, well-organized area lets you focus on your pyrography without distraction. Make sure your workspace includes:
- Proper Lighting: Adequate lighting is crucial. It helps you see your design more clearly and ensures you can spot any imperfections as you work.
- Steady Surface: Use a non-slip mat or a padded surface to keep the wood steady while you work. This minimizes unintentional movements that could ruin your lines.
Practice Your Technique
Like any other skill, producing smooth lines takes practice. Here are some strategies to improve your technique:
- Slow and Steady: Move your pyrography pen at a consistent, moderate pace. Rushing can result in uneven lines.
- Steady Grip: Hold the pen firmly yet comfortably. A relaxed grip allows for better control, which translates to smoother lines.
- Use Guiding Lines: Lightly sketch your design on the wood with a pencil before burning. This allows for cleaner execution without guesswork.
Master the Heat
Understanding how heat affects the wood and your pen tip is crucial. Here’s how to manage it effectively:
- Test the Temperature: Always test the pen’s heat on a scrap piece of wood before starting on your project. Adjust as necessary to achieve the desired darkness without burning.
- Keep the Pen Tip Clean: Regularly clean the pen tip to maintain consistent heat transfer. Build-up can create rough textures and smudges on your lines.
Utilize Different Techniques
Diversifying your technique can help you develop a unique style while perfecting smooth lines. Consider these approaches:
- Wood Grain Direction: Pay attention to the direction of the wood grain. Following the grain can yield smoother lines and reduce potential snags.
- Various Stroke Styles: Experiment with linear, circular, and looping strokes. Different styles can yield different effects and smoothness.
- Layering Techniques: For deeper shades, layer your burnings. Gradually build your shading with thin lines to maintain smoothness.
Evaluate and Adjust
As you work on your pyrography, regularly evaluate your progress. Take breaks to step back and assess your lines. Here’s how you can effectively gauge your work:
- Check Consistency: Look for even widths and seamless transitions between lines. This adds to the finished piece’s overall quality.
- Solicit Feedback: Don’t hesitate to ask fellow artists or friends for their views. Fresh eyes often bring invaluable insights.
Achieving smooth lines in pyrography is a skill that combines the right tools, preparation, technique, heat management, and self-evaluation. By incorporating these strategies into your practice, you’ll find that your pyrography work becomes more refined and visually appealing. The real beauty of pyrography lies in the journey of mastering your craft, so enjoy the process while you develop your style!
Essential Tools and Materials for Precision Pyrography
When diving into the world of pyrography, having the right tools and materials is essential for achieving precision in your artwork. Each tool has its unique purpose and contributes to the overall quality of your designs. Below, you’ll discover the must-have items for any pyrography enthusiast.
Pyrography Tool Pen
The heart of any pyrography setup is the pyrography tool pen, often referred to as a pyrography unit. When selecting a tool, consider the following:
- Variable Temperature Control: This feature allows you to adjust the heat, which is crucial for achieving different depths and tones in your work.
- Interchangeable Tips: Look for tools that provide a variety of tips. Different shapes allow for various styles, from fine lines to shading.
- Ergonomic Design: A comfortable grip is vital, especially during long sessions, so choose a tool that feels good in your hand.
Wood Selection
The type of wood you use can significantly affect the outcome of your pyrography. Here are some popular choices:
- Birch: This wood is easy to work with and has a fine grain that responds well to detail.
- Maple: Known for its light color, maple allows for vibrant contrast in your designs.
- Pine: A more accessible and affordable option, pine can produce beautiful results, though its resinous nature might require some extra care.
- Walnut: The rich, dark tones of walnut make it a favorite for artists seeking warmth in their projects.
Paper for Practice
Before committing your design to wood, practicing on paper can be incredibly beneficial. Use:
- Heavyweight Sketch Paper: This durable paper can handle heat to some extent, ideal for trial runs.
- Bristol Board: Smooth surfaces on bristol boards allow for easier practice without the texture of wood affecting your lines.
Finishing Supplies
After completing your pyrography piece, you’ll want to protect it to ensure longevity. Consider these finishing supplies:
- Sealants: A clear sealant can protect your artwork from moisture and damage. Look for options that do not alter the appearance of your design.
- Varnish: Instead of sealants, varnish adds an extra layer of protection while enhancing the wood’s natural beauty.
- Fine Sandpaper: For a smooth finish, lightly sand the piece before applying any sealants or varnish.
Safety Gear
While focusing on your craft, don’t neglect your safety. Equip yourself with:
- Dust Mask: This prevents inhalation of wood particles, especially when sanding or working with softer woods.
- Safety Glasses: Protect your eyes from any flying debris, particularly during preparation phases.
- Heat-Resistant Gloves: These come in handy when handling your pyrography tool and wood, especially during extended work sessions.
Other Useful Accessories
Aside from the primary tools, the following accessories can enhance your pyrography experience:
- Stencils: These can be incredibly helpful for beginners by providing outlines to follow.
- Graphite Pencils: Use these to sketch designs onto your wood surface before burning.
- Soft Cloth: After handling, a soft cloth is perfect for wiping down your tools and keeping your workspace clean.
To wrap it up, your choice of tools and materials will lay down the foundation for your pyrography success. By investing in quality equipment, you pave the way for greater precision and creativity in your projects. Whether you are a beginner or an experienced artist, understanding the essential tools will enhance your pyrography journey and ultimately lead to beautiful, intricate designs.
Techniques for Controlling Speed and Pressure in Woodburning
Woodburning, or pyrography, is an art form that relies heavily on the manipulation of speed and pressure to achieve stunning effects. Whether you’re a novice or an experienced artist, understanding how to control these two elements is vital for creating detailed and smooth lines. This article explores effective techniques to master speed and pressure in woodburning, which will significantly enhance your artwork.
Understanding the Basics of Speed
Speed in pyrography refers to how quickly you move the woodburning tool across the surface. Controlling speed is crucial for achieving various textures and line qualities. Here are some foundational techniques:
- Slow and Steady: For detailed work, reducing your speed allows for more precision.
- Quick Strokes: When shading or creating softer gradients, quicker strokes can help blend the burned areas smoothly.
- Consistent Motion: Maintaining a steady pace prevents uneven lines and enhances the overall appearance of your design.
Pressure Control Techniques
Pressure plays a pivotal role in determining the depth and intensity of your burn marks. Applying the right amount of pressure allows artists to create variations in line thickness and shading. Follow these tips:
- Light Touch: Start with a gentle touch to avoid deep burns; adjust as necessary.
- Gradual Increase: For darker lines, gradually increase pressure to control the burn depth.
- Comfortable Grip: Hold your tool in a manner that promotes control; a relaxed grip enables better pressure management.
Combining Speed and Pressure for Effect
Mastering both speed and pressure can lead to remarkable results. These elements work together to deliver distinct effects in your woodburning projects. Here are a few methods to effectively combine them:
- Varied Speed for Texture: By altering speed while maintaining pressure, you can create a textured appearance that adds depth to your work.
- Layering Technique: Use light pressure and slow speed for initial layers, then gradually increase pressure on top layers for a darker contrast.
- Practice Different Styles: Try various styles like cross-hatching or stippling by adjusting speed and pressure for unique outcomes.
Tool Selection and Usage
Choosing the right woodburning tool can also impact your ability to control speed and pressure. Here are a few insights:
- Tip Variety: Use different tips for various effects. For example, a fine tip allows for detailed lines, while a wider tip helps in shading.
- Temperature Settings: Adjust the heat as necessary. Lower temperatures often require slower speeds, while higher settings enable quicker work.
- Practice Tips: Don’t hesitate to practice on scrap wood to refine your techniques before working on your final piece.
Staying Relaxed and Focused
Maintaining focus and relaxation during your woodburning sessions is crucial for effective control. Here are some strategies to stay relaxed:
- Work in a Comfortable Environment: Ensure your workspace is well-lit and comfortable to keep your mind at ease.
- Take Breaks: Regular breaks can clear your mind and enhance your overall performance.
- Mindfulness Techniques: Engaging in mindful breathing or meditation before starting can improve your concentration.
Mastering speed and pressure in woodburning is an essential skill that comes with practice and experimentation. By employing these techniques and strategies, you can achieve stunning results in your pyrography art. Always remember, the key lies in patience and practice. Embrace mistakes as learning opportunities and enjoy the creative journey!
The Importance of Wood Selection in Producing Clean Lines
When diving into the world of pyrography, or wood-burning art, the selection of wood stands as one of the most fundamental elements in achieving clean, smooth lines. The type of wood you choose can influence not only the aesthetic quality of the finished piece but also the ease of creating fine details. This article delves into the paramount importance of wood selection and how it directly contributes to the artistic process of pyrography.
The texture, grain pattern, and density of the wood all play a pivotal role in how effectively you can achieve your desired artistry. Certain woods lend themselves better to producing clean, smooth lines, while others may pose challenges that could detract from your designs. Here’s a closer look at the key factors to consider when choosing wood for pyrography:
- Grain Pattern: Select wood with a fine, uniform grain. Tight, even grains facilitate a smoother burning process, enabling you to create intricate designs without interruption. Woods like birch, maple, and cherry are excellent choices due to their consistent grain.
- Wood Hardness: Softer woods allow for easier indentation but can splinter more readily, which could lead to jagged lines. Conversely, hardwoods are more challenging to burn through but usually provide a more stable surface for detailed work. Many artists find a balance between using partially soft woods like basswood for ease and hardwoods like oak for durability.
- Moisture Content: Freshly cut wood retains moisture, leading to unpredictable burning results. Always opt for seasoned wood, which has been dried appropriately. This process minimizes warping and ensures consistent burning behavior, enabling you to maintain control while creating clean, smooth lines.
- Surface Finish: Ideally, select wood with a smooth, unfinished surface. If the wood has pre-treatment, such as varnish or oil, it may impact how the pyrography tool interacts with the surface. A raw wood surface allows for better adhesion with designs.
Moreover, understanding the profile and behavior of different woods is essential for achieving your artistic aspirations. Some woods, for instance, contain resin, which could cause your burner to accumulate buildup, resulting in inconsistent lines. Here’s a breakdown of some common woods and their characteristics:
- Basswood: Known for its mild grain and softness, it’s the go-to choice for many pyrographers. It burns evenly and allows for detailed artwork with clean lines, making it beginner-friendly.
- Birch: Similar to basswood, birch features a fine grain and light color, which showcases burning contrasts beautifully. Its hardness provides a good balance, ensuring that it holds detail well.
- Maple: This hardwood is preferred for more advanced pyrographers. The tight grain structure allows for excellent detail but requires a skilled hand to manage its denser composition.
- Oak: As a hardwood, oak produces rich lines and textures but demands a more powerful pyrography tool to successfully manage its density.
When sketching your designs, consider using a light hand with a pencil on your wood surface. A minimal pencil line won’t interfere with the burning process. Pay attention to the type of burn you aim for; different woods absorb heat at varying rates, so adjusting your technique depending on your choice of wood is key.
If you’re seeking to expand your artistic range, consider mixing various types of wood in a single piece. This approach can offer exciting contrasts and unique textures, enhancing the overall design. Testing how different woods react to varying levels of heat can help refine your technique and skill set.
Understanding the importance of wood selection in pyrography is vital for artists aiming to achieve clean lines and compelling designs. By choosing the right type of wood and preparing it meticulously, you set the foundation for creating stunning pyrographic artwork. Embrace the journey of wood selection, and you’ll find it directly influences the beauty of your finished pieces.
Common Pitfalls in Pyrography and How to Avoid Them
Practicing pyrography can be an enjoyable and rewarding hobby. Yet, many enthusiasts encounter common pitfalls that can affect their creations and overall experience. By recognizing these challenges, you can take steps to avoid them. Understanding the most frequent mistakes in pyrography will set you on the right path toward creating beautiful, resilient artwork.
Choosing the Wrong Wood
The type of wood you select can greatly impact your pyrography results. Softwoods like pine may scorch easily and produce uneven burns, while hardwoods like maple and oak offer more control and smoother finishes. Here are tips for selecting the right wood:
- Opt for hardwoods for detailed work.
- Test your burning tool on a small piece of your chosen wood to see how it reacts.
- Avoid woods with a lot of knots, as they can lead to uneven burning.
Neglecting Temperature Control
Many beginners underestimate the importance of temperature settings on their pyrography tools. Using a tool that is too hot can scorch the wood, while an insufficient heat can result in faint, unclear lines.
- Always adjust your tool to a temperature suitable for your wood type.
- Practice on scrap wood to find the right temperature before working on your final piece.
- Familiarize yourself with the behavior of your tool at different heat levels.
Inadequate Practice
As with any art form, practice is essential to improving your skills. Many artists jump into complex designs without honing their techniques on basic patterns first. To build your expertise:
- Start with simpler shapes and designs.
- Focus on mastering line control and shading techniques before attempting intricate patterns.
- Continue practicing regularly to maintain and improve your skillset.
Ignoring Safety Precautions
Pyrography involves heat and potentially harmful fumes, making safety a priority. Failing to observe safety precautions can lead to accidents or health issues. Keep in mind:
- Work in a well-ventilated area to avoid inhaling wood particles and fumes.
- Always wear protective eyewear to shield your eyes from flying debris.
- Use heat-resistant gloves when handling your pyrography tool.
Not Planning Your Design
Jumping straight into a project without proper planning results in messy artwork and wasted time. Adequate planning leads to more polished and cohesive pieces. Here’s how to plan effectively:
- Sketch your design on paper before transferring it to the wood.
- Consider using carbon paper to trace your design directly onto the wood surface.
- Develop a color scheme if you plan on adding paint or stains after burning.
Forgetting to Keep Tools Clean
Carbon buildup on your pyrography tool can affect your burning quality. A clean tool helps achieve smoother lines and prevents unwanted marks on your work. To maintain your tools:
- Regularly wipe down your tip after long sessions.
- Use a soft cloth or brush to remove burnt debris and particles.
- Invest in a cleaning tool designed specifically for your pyrography tips if necessary.
Giving Up Too Soon
Many novice pyrographers become frustrated after a few failed attempts, causing them to abandon the craft altogether. Remember that mastering pyrography takes time and patience. If you find yourself facing challenges:
- Take breaks when feeling stuck or frustrated.
- Seek inspiration from experienced artists through online platforms or local workshops.
- Document your progress to remind yourself how far you’ve come.
By being aware of these common pitfalls and implementing solutions, you can enhance your pyrography skills significantly. Avoiding errors such as poor wood selection, inadequate temperature control, and a lack of planning will provide you with the tools needed to create stunning pieces of art. Each project not only serves as a learning experience but also as a step toward developing your unique style as an artist. Embrace the process, keep practicing, and enjoy the art of pyrography!
Conclusion
Achieving smooth lines in pyrography is an art form that intricately weaves skill, technique, and the right tools. As you embark on or continue your pyrography journey, the insights from this comprehensive exploration will undoubtedly elevate your woodburning skills. Mastering the craft isn’t just about practicing; it’s about understanding the nuances that lead to those perfect lines that make your artwork stand out.
First and foremost, having the appropriate tools is crucial when it comes to precision pyrography. High-quality pyrography pens and tips allow for a variety of line widths and textures, essential for creating fine details in your designs. The significance of selecting the right materials cannot be overstated; they play a pivotal role in how smoothly lines form on your chosen surface. Using the best wood, such as basswood or birch, ensures that you have a smooth canvas that can handle intricate burn techniques without splintering or charring excessively.
Controlling speed and pressure is another fundamental technique that dramatically influences the quality of your lines. As you work, being mindful of the speed at which you move your pyrography pen and adjusting the pressure applied is vital. A slower hand will yield smoother lines, while a firmer grip ensures deeper burns. This balance takes practice, but by experimenting with different movements, you’ll soon discover how to adjust your technique for the effects you want to achieve.
Wood selection is an often-overlooked factor but is equally important in the quest for clean lines. The grain and density of the wood can significantly impact your burns. Softer woods allow for easier manipulation and generally produce smoother lines, while harder woods might require more pressure and a careful approach. Understanding the type of wood you’re working with will help you anticipate how the material will respond to the burn, allowing you to adjust your technique accordingly.
Additionally, avoiding common pitfalls in pyrography can make a huge difference in your results. Many artists find themselves plagued by uneven lines, excessive smoke, or unwanted burns. By maintaining a clean pyrography tip and ensuring proper ventilation while working, you can reduce charring and get clearer results. Furthermore, don’t be afraid to pause and reassess your technique—stepping back to evaluate your work can provide clarity and insight that keeps your lines from becoming muddled or erratic.
Another aspect that enhances the smoothness of your lines is familiarity with different pyrographic techniques. Techniques such as shading, stippling, and cross-hatching can complement your primary line work, adding depth and dimension to your designs. Moreover, as you become more sophisticated in your approach, experimenting with heat settings on your pen can also lead to varied line qualities. Each adjustment you make contributes to your skill set, leading to more refined and professional-looking artwork.
Every pyrographer has their unique style, molded by personal preferences and experiences. What works for one artist might not resonate with another, and discovering what feels right is part of the exciting journey of pyrography. Seek inspiration from fellow artists, join workshops or forums, and share your work to receive constructive feedback. Engaging with the community can open your eyes to new techniques and ideas, further enhancing your ability to produce smooth lines.
Having the foundation of effective tools, an understanding of speed and pressure control, and wise wood selection sets the stage for creating splendid works of art. By consciously avoiding common pitfalls and refining your techniques, you’ll begin to witness tangible improvements in your pyrography. Each piece you create not only reflects your skill but also tells a story of how you’ve honed your craft over time.
As you cultivate these practices, remember that pyrography is not merely about the finished product; it’s about enjoying the process of creation. The thrill of watching your image come to life through heat and wood fibers should inspire and motivate you. So grab your tools, choose your wood, and ignite your creative passion. With dedication and mindful practice, those smooth lines you aspire to achieve are well within your reach.