Techniques for Creating Realistic Shading in Pyrography
Creating realistic shading in pyrography requires a blend of techniques that can enhance the depth and dimension of your woodburned artwork. Mastering these techniques will elevate your projects, making them more lifelike and visually engaging. Here are several methods to help you achieve that sought-after realism.
Understanding the Basics of Shading
Before diving into specific techniques, it’s essential to grasp the fundamentals of shading. Shading adds depth and definition to your work. In pyrography, this is achieved by varying the intensity and texture of the burned lines. Here are the key elements to consider:
- Light Source: Determine where your light source is coming from. This will help you understand where shadows should fall and where highlights will exist.
- Contrast: Using a range of tones—from light to dark—creates an impactful visual. Make sure you balance your contrasts effectively for a three-dimensional effect.
- Texture: Different surfaces reflect light differently. Smooth surfaces may require softer shading, while rough textures may need bolder strokes.
Techniques for Realistic Shading
1. Layering
Layering is a foundational technique in pyrography. Start with lighter burns and gradually build darker shades. This method allows for control over the final look and ensures your piece doesn’t become too dark too quickly. Keep the following in mind:
- Use a low-temperature setting on your pyrography tool to make gentle strokes.
- Allow each layer to cool before applying the next to avoid unintended blending.
2. Cross-Hatching
Cross-hatching involves applying parallel lines in one direction and then layering them with lines in another direction. This can create a variety of textures and depth. Here’s how to use this technique:
- Vary the distance between lines for different effects. Closer lines create darker shadows.
- Experiment with different angles to see how they affect the appearance of your shading.
3. Stippling
Stippling uses small dots or marks to create shading, providing a soft transition from light to dark areas. Here’s how to make the most of this technique:
- Spacing your dots makes it easier to control the level of shading.
- Use varying sizes of dots to achieve different tonal values.
4. Scumbling
Scumbling is a method where you create a series of small, circular, or scratch-like movements to create texture and shading. This can give your piece a unique, lively aspect. Try these tips:
- Keep your hand loose to maintain a varied flow of texture.
- Vary the pressure on the tool for both subtle and bold effects.
Using Tools Effectively
The choice of tip on your pyrography tool has a significant impact on shading quality. Each tip offers unique possibilities:
- Ball Tip: Ideal for stippling and creating rounded shapes.
- Flat Tip: Perfect for even strokes and layering techniques.
- Shader Tip: Designed for smooth transitions and blending.
Experimenting with different tips will help you find your preferred means of shading and let you get creative with your designs.
Practice and Observation
Realism in any art form grows from careful practice and keen observation. Take the time to study photographs or real-life objects, noting how light interacts with different surfaces. Practice replicating these effects by keeping a sketchbook or practice board at hand. This will enable you to hone your skills and refine your shading techniques over time.
By mastering these techniques, you’re well on your way to creating realistic shading in pyrography. From understanding the significance of light and texture to employing intricate methods like layering and stippling, each detail aids in bringing your woodburning art to life. Committing time to practice will yield improvements, so immerse yourself in the world of shading—you’ll be amazed at the depth you can achieve.
The Importance of Wood Grain in Enhancing Shading Effects
When it comes to pyrography, or wood burning art, the significance of wood grain cannot be overstated. The unique characteristics of each type of wood not only contribute to the overall aesthetic but also play a crucial role in enhancing shading effects. Understanding how wood grain interacts with the burning process will enable artists to exploit these features for more realistic and captivating artwork.
A pivotal aspect of pyrography is how different woods react to heat. Each wood type varies in density, porosity, and natural color, all of which affect how the shading appears. Softer woods like pine may scorch more easily, creating darker lines, while harder woods may provide a more subdued tone. This variation gives each piece of artwork a unique quality. Here’s a look at how specific wood traits enhance shading:
- Grain Patterns: The grain in wood can provide a natural texture that interacts well with the burn process. Intricate patterns may catch light differently, leading to unique shading effects. For instance, oak’s open grain texture can create striking contrast against fine details in a design.
- Color Development: Different woods produce varying shades when burned. Woods like cherry and walnut develop a rich, deep color, which can enhance depth in shadows. By choosing woods with color variations, artists can create a more dynamic range of tones.
- Burn Rate: Some woods burn quicker than others. This discrepancy means that artists must adjust their technique based on the wood in use. Knowing how quickly a wood burns can help artists anticipate the final appearance of shading effects, ensuring consistency in their work.
Another important factor is understanding the moisture content of wood. Freshly cut wood has high moisture levels and can produce unwanted sputters and uneven burns. A well-cured piece of wood, on the other hand, allows for smoother burn applications. This promotes even shading and cleaner detailing in finished pieces. To achieve the best results, always ensure your wood is properly seasoned and dry before starting your pyrography project.
Moreover, mastering the angles and pressure of the pyrography tool can amplify the effects of wood grain. When working with more porous woods, applying lighter pressure can yield softer shades, while applying more pressure on denser woods can create darker hues. Experimenting with different tool tips and techniques will allow artists to draw from the full potential of the wood grain.
Pay attention to the direction in which you burn. Aligning your strokes with the grain of the wood can lead to a more harmonious finish. This technique emphasizes natural patterns in the grain, allowing them to complement the design instead of competing against it. For artists, understanding this relationship fosters a more intentional approach to design and execution.
Things to consider during the shading process include:
- Tool Selection: Different tips on pyrography tools produce various effects. Flat tips create broader strokes suitable for shading, while pointed tips are ideal for fine details. Choosing the right tool for your shading needs can leverage the wood grain to maximum advantage.
- Shading Techniques: Techniques such as cross-hatching and stippling enhance the dimensionality of your artwork. By layering these techniques thoughtfully, artists can simulate textures and gradients that resonate well with the underlying wood grain.
- Test Samples: Before starting a significant piece, always test your technique on scrap wood. This practice helps you gauge how the wood reacts to heat, making it easier to predict the outcome of your design accurately.
The interplay between wood grain and shading in pyrography is profound. This relationship not only shapes the appearance of the final piece but also influences the artist’s technique and choice of materials. By understanding the unique characteristics of different woods, artists can create more realistic, eye-catching artwork that fully utilizes the beauty of wood and the art of pyrography. Adventurous artists continually explore how to maximize this synergy for innovative results and fresh inspiration. Experimentation leads to mastery, making the journey of developing your pyrography skills both rewarding and full of potential. Embrace the magic of wood grain and unlock your artistic vision.
Tools and Materials Essential for Effective Pyrography Shading
Creating stunning pyrography artwork requires not just talent and creativity but also the right tools and materials for effective shading. Mastering the subtle nuances of shading can transform a piece from simple to extraordinary. Here’s a comprehensive overview of the essential tools and materials that every pyrography artist should consider to achieve realistic shading.
Pyrography Pen
The pyrography pen is the artist’s primary tool. Choosing the right pen can greatly influence the quality of shading. Here are some factors to consider:
- Interchangeable Tips: Opt for pens that allow you to change tips. This versatility is crucial for achieving various shading techniques.
- Temperature Control: A temperature-controlled pen allows for more precision in your work. Different materials require different heat settings.
- Comfortable Grip: Since pyrography can be an extended activity, a pen with an ergonomic design is ideal for comfort.
Tips for Pyrography Pen
While the pen is your primary tool, the tips play a vital role in the final outcome. Here are some common types of tips that are essential for shading:
- Shader Tips: These tips have a flat or rounded edge, perfect for blending and shading.
- Ball Tips: Great for small, detailed shading areas, these tips allow for precision in tight spaces.
- Scallop Tips: Ideal for creating textures and patterns, these tips add dynamics to your shading.
Wood Selection
Your choice of wood significantly impacts the quality of shading you can achieve. Softer woods, such as pine and birch, allow for easier manipulation, while harder woods can provide depth but require more effort. Here’s what to look for:
- Grain Pattern: Select wood with a fine, even grain. This will not only help in achieving smoother shading but also enhance the aesthetic appeal.
- Thickness: Thicker pieces provide more depth for shading, allowing for more intricate designs.
Blending Tools
Blending tools are essential for creating smooth transitions between shades. Here are a few popular options:
- Sandpaper: Fine-grit sandpaper can help smooth out harsh lines, giving a more polished appearance to the artwork.
- Softer Brushes: Soft brushes can be used to gently blend the lighter areas with darker ones, creating a natural gradient.
Graphite Pencils
Before committing to burned lines, sketching your design with graphite pencils is a helpful technique. This is particularly beneficial when planning your shading techniques. Graphite allows you to easily adjust details—a crucial step for achieving realistic shading in pyrography.
Safety Gear
Safety is paramount in any artistic endeavor. Pyrography involves high heat, so taking precautions is essential:
- Protective Eyewear: Safety glasses protect your eyes from any flying debris.
- Gloves: Heat-resistant gloves protect your hands from burns, especially when adjusting your artwork.
- Ventilation: Working in a well-ventilated area helps to avoid inhaling fumes from the burning wood.
Finishing Products
After completing your project, finishing products help to protect and enhance your work. Here are some essential items:
- Wood Finish: Use an appropriate wood finish to add a glossy or matte touch to your piece.
- Sealer: A sealer protects the wood from moisture and keeps your design intact for years to come.
Equipping yourself with the right tools and materials is vital for effective pyrography shading. Understanding the importance of each component can lead to impressive artwork that captivates viewers. With practice and the right equipment, you can master the art of shading in pyrography.
Exploring Different Pyrography Styles and Their Shading Approaches
Pyrography, often referred to as wood burning, is an artistic technique that combines creativity with various shading styles to produce stunning visual effects. Artists utilize heat to create intricate designs, and shading plays a crucial role in enhancing the depth and realism of these pieces. Different pyrography styles come with distinct approaches to shading, allowing artists to express their unique visions. Understanding these styles can help aspiring pyrographers hone their skills and develop their individual techniques.
The Traditional Approach
In traditional pyrography, artists employ basic shading techniques to achieve depth and dimension. This style typically involves:
- Cross-Hatching: A classic method where lines are drawn closely together to create shadow and depth.
- Stippling: Using dots to build up shading gradually, allowing for a range of tones from light to dark.
- Gradation: Smooth transitions between light and dark areas, giving a softer, more natural look.
By mastering these techniques, artists can not only depict realistic elements but also showcase their mastery of the medium.
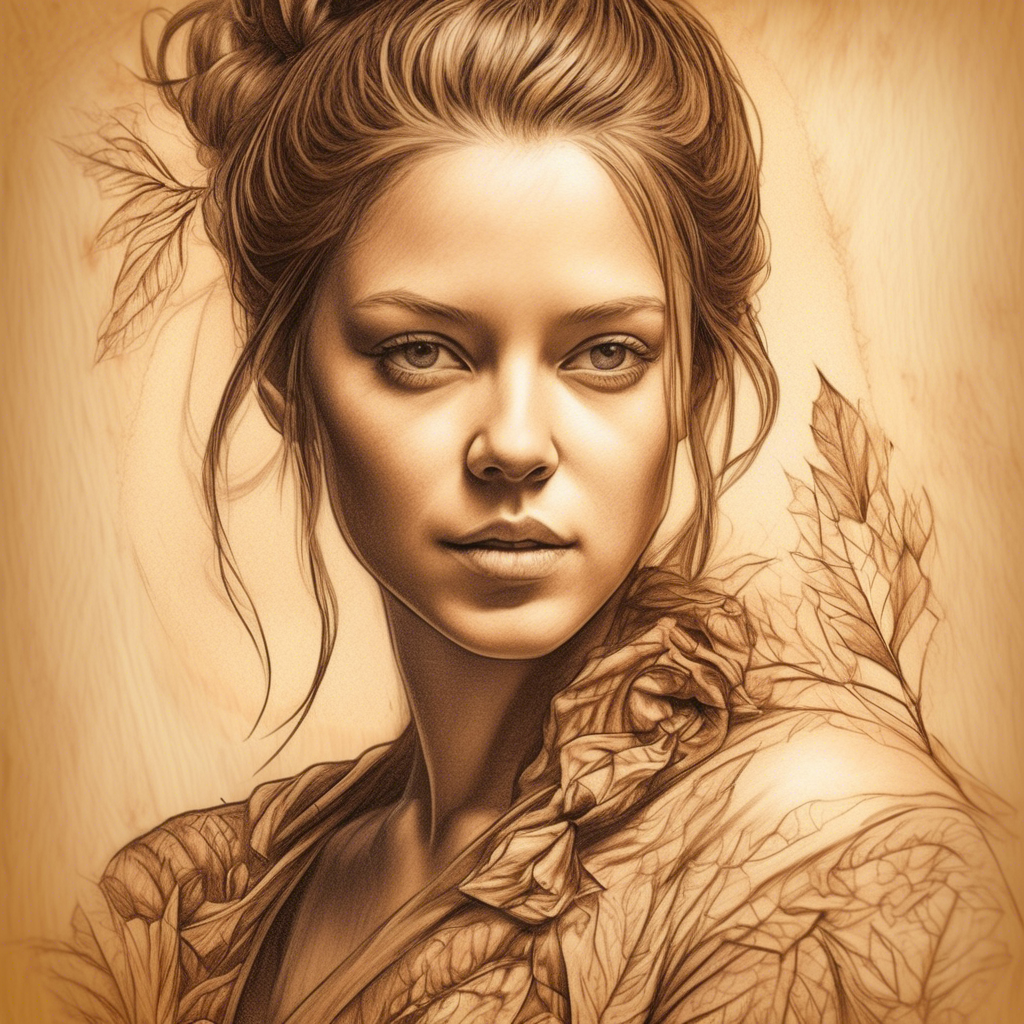
Realistic Portraiture
When it comes to creating lifelike portraits through pyrography, shading is paramount. Artists often utilize a combination of techniques to achieve realism. Key methods include:
- Layering: Building up tones in layers, allowing for control over darkness and depth.
- Burn Depth Variation: Altering burn depth helps in adding significant detail to facial features, such as eyes, lips, and hair.
- Texturing: Techniques like scumbling or feathering can create hair-like textures or skin textures that enhance the realism of the portrait.
Using these approaches, pyrographers can convey emotion and personality in their subjects, creating captivating artworks that captivate viewers.
Fantasy and Abstract Styles
Fantasy and abstract pyrography offers a different canvas for creative expression. Here, shading allows for unusual combinations of color and form. Some common techniques under this umbrella include:
- Blending: Softening edges between colors and tones to create dreamlike visuals.
- Symbolic Shading: Using shading not just for realism but to represent emotions or concepts, often diverging from traditional expectations.
- Bold Contrasts: Utilizing stark black and white with limited shading to create impactful imagery.
In these styles, artists often break the rules of traditional shading to develop a signature look that communicates their imagination.
Nature and Landscape Pyrography
Nature scenes require a unique approach to shading as they often portray complex landscapes. Here, a range of shading techniques helps to replicate the natural environment. Important methods include:
- Atmospheric Perspective: Using lighter shades in the background and darker in the foreground to create depth.
- Textured Shading: different textures, such as wood grain or stone, to mimic natural elements.
- Highlighting: Employing lighter burns strategically to emulate sunlight reflecting off surfaces.
Nature pyrographers often focus on capturing the essence of their surroundings, utilizing shading to convey light, weather conditions, and the mood of the scene.
Modern Trends in Pyrography
With the advent of new tools and materials, contemporary pyrography experiences innovative approaches to shading. Artists might explore:
- Mixed Media: other artistic forms, like painting or drawing, can complement shading techniques.
- Digital Influences: Using digital tools to plan shading before executing with traditional methods ensures precision.
- Laser-Pyrography Hybrid: Merging laser systems with manual techniques opens a new realm of precision in shading.
These modern trends allow artists to push boundaries and redefine the potential of pyrographic artwork.
Exploring different pyrography styles reveals a plethora of shading techniques, each contributing to the overall artistry of the pieces created. From traditional methods to innovative practices, the versatility of shading in pyrography continues to inspire and captivate both artists and audiences alike. Dive into these techniques, and you may find your own path within this unique art form.
Common Mistakes to Avoid When Shading in Pyrography
Shading in pyrography can elevate your artwork, transforming simple designs into striking and lifelike pieces. However, many beginners—and even seasoned artists—often fall into common traps that can detract from the quality of their work. By recognizing these pitfalls and learning how to avoid them, you can enhance your pyrographic skills and achieve stunning results.
Neglecting Quality of Wood
The choice of wood is critical for successful shading. Many artists opt for softwoods thinking they will be easier to work with, but these can burn unevenly and may not hold detailed shading well. Instead, consider using hardwoods like birch or maple. These woods provide a consistent surface that allows for even heating and better control, making it perfect for shading techniques.
Overlooking Tool Preparation
Your pyrography tool is your primary instrument, and its condition directly affects the outcome of your shading. Here are key points to remember regarding tool preparation:
- Clean Your Tip: Regularly clean the tip of your pyrography pen to prevent residue build-up, which can cause blotchy lines and uneven shading.
- Check the Temperature: Always test the temperature of your tool on a scrap piece of wood. The heat should be just right to create defined lines without excessive charring.
Using Constant Pressure
Applying the same amount of pressure throughout your shading can lead to flat and lifeless areas in your work. Varying your pressure will help create depth and dimension. Light pressure can produce soft, subtle shades, while heavier pressure can deliver darker, more pronounced tones.
Rushing the Process
Patience is key in pyrography, especially when it comes to shading. Many artists make the mistake of rushing through their shading, resulting in uneven tones and a lack of detail. Take your time to build up layers gradually, which will allow for more control over the shade and texture.
Ignoring the Direction of Grain
The grain of the wood can play a significant role in shading. Ignoring it may lead to inconsistent shading and an unintended finish. Always pay attention to the grain direction, allowing it to guide your strokes. Following the natural flow of the wood creates a more harmonious and aesthetically pleasing result.
Neglecting to Plan Your Design
Jumping into shading without a clear plan can turn your artwork into a chaotic mess. Before you start, sketch your design lightly and mark where you envision deeper shadows or lighter areas. This roadmap will guide you as you shade and will help you avoid making costly mistakes.
Using Inconsistent Heating Techniques
Diverse shading techniques such as stippling, feathering, and swirling require different heating approaches. Using the same technique uniformly can hinder the potential of your design. For a more dynamic look, practice various shading methods and learn when to switch between them.
Failing to Blend Properly
Just like with traditional drawing, blending is essential in pyrography. Beginners may overlook this vital step, leading to harsh lines rather than smooth transitions. To blend effectively, try using the side of the tip for soft transitions or a shading paintbrush to help merge edges.
Skipping the Finishing Touches
Don’t forget about the finishing touches. Many artists finish their shading and think they’re done, but applying a wood finish can enhance the depth of your artwork. A light coat of polyurethane, for instance, can bring out the richness of the wood grain and your shading work.
Mastering shading in pyrography takes practice and patience. By avoiding these common mistakes, you can elevate your artwork, creating beautiful, realistic burnt images that capture your artistic vision. So, take the time to refine your techniques, experiment with different methods, and pay close attention to detail. Your efforts will surely be reflected in the quality of your artistry.
Conclusion
Creating realistic shading in pyrography is a nuanced process that can dramatically enhance the overall quality of your artwork. Throughout this exploration, we’ve delved into various techniques that form the backbone of effective shading. Mastering these methods allows artists to mimic the natural variations found in light and shadow, adding depth to their designs. Essential techniques—such as layering, gradient blending, and stippling—help achieve a dynamic visual experience. Embracing these strategies not only improves your control over the final piece but also fosters a deeper connection with the medium.
An often-overlooked aspect in pyrography is the importance of wood grain. The type of wood you choose significantly affects how the shading appears. Different woods have unique textures and grain patterns that interact with the heat applied during pyrography. Softer woods, such as pine, allow for smoother gradients, while denser options like walnut can produce rich, dark tones. Understanding the characteristics of your chosen wood can help you adapt your shading techniques to best suit the material, resulting in a work of art that truly highlights the intricate beauty of both the wood and the pyrography itself.
Equipping yourself with the right tools and materials is vital for effective shading in pyrography. A high-quality pyrography pen with adjustable temperature settings lets you manipulate the intensity of your burn marks. Different tips and nibs allow for versatility, adapting to the various techniques required for realistic shading. Don’t forget to invest in good wood and protective gear, as both will enhance your experience and protect your work surface and hands. Taking the time to gather the right resources will ensure smoother sailing as you embark on your pyrographic journey.
As we explored the various pyrography styles, it became evident that their approaches to shading can vary wildly. Traditional styles may lean more heavily on intricate patterns and fine detail, while modern interpretations might favor a more abstract approach. Each style offers unique opportunities to experiment with shading techniques, presenting a wealth of possibilities for creative expression. Don’t shy away from mixing styles or infusing your individual flair into traditional practices, as this can lead to discovering an unexpected niche in your art.
This journey, however, is not without challenges. Common mistakes often plague beginner pyrographers, especially when it comes to shading. Overburning can result in harsh lines starkly contrasting with the softer elements of your piece, while underburning may leave areas that feel unfinished. Another common pitfall is inconsistency in pressure or speed, which can disrupt the uniformity needed for a cohesive final product. By being aware of these missteps and keeping a watchful eye during your creative process, you can make adjustments before it’s too late, thus ensuring your work retains a polished look.
Ultimately, developing realistic shading in pyrography requires patience and practice. Each technique, tool, and material offers an opportunity for growth and improvement. As you continue to experiment and hone your craft, don’t be discouraged by initial setbacks. Instead, approach each new piece as a learning experience that contributes to your overarching understanding of the art form. Gathering inspiration from existing works, observing how other artists tackle shading, and sharing insights with peers can also enhance your skillset.
Shading is not just a technique; it is the essence of visual storytelling within pyrography. It can evoke emotion, define space, and guide the viewer’s eye across your composition. By integrating the lessons learned about techniques, wood grain importance, essential tools, and the approaches of different styles, you can elevate your pyrography to remarkable levels. Just remember that every artist has their unique journey, and the path to developing your skill is as rewarding as the finished piece itself. Embrace experimentation, and let your creativity take flight as you create captivating works of art that resonate deeply with your audience.