Essential Pyrography Tips and Tricks for Beginners
Starting out in pyrography can be an exciting yet daunting venture. This art form combines creativity with a touch of craftsmanship, allowing artists to create stunning designs on various surfaces using a heated tool. Here are some essential tips and tricks that every beginner should know to embark on their pyrographic journey successfully.
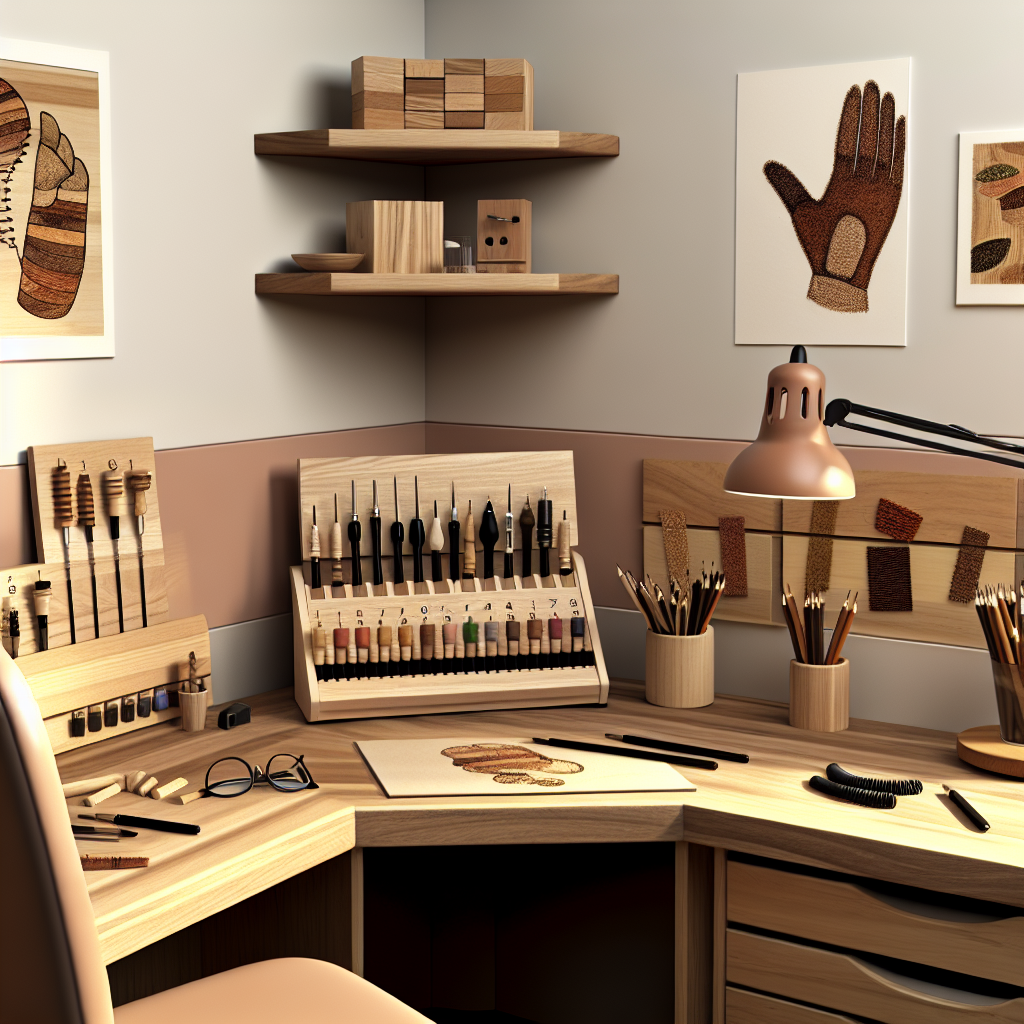
Choose the Right Equipment
Your pyrography experience begins with selecting the right tools. Investing in a quality pyrography pen is crucial. Choose a pen that offers adjustable temperature settings and interchangeable tips for different effects. Look for brands that are well-reviewed—this can make a significant difference in the ease of use and the quality of your work.
Understand Wood Types
Not all wood is created equal when it comes to pyrography. Here are some common wood types and their characteristics:
- Pine: Affordable and easy to burn, making it great for beginners.
- Basswood: Smooth and light-colored, ideal for detailed work.
- Birch: Offers a fine grain and a light finish, perfect for intricate designs.
- Oak: Durable but can be harder to work with due to its density.
Testing different woods can help determine what works best for your style.
Practice on Scrap Wood
Before diving into your actual project, practice on scrap pieces of wood. This lets you experiment with different techniques and settings without the pressure of ruining your main piece. Use this time to become comfortable with temperature control and mastering your pen strokes.
Learn to Control Temperature
Temperature control is a vital aspect of pyrography. Lower temperatures are ideal for light, fine lines, while higher temperatures can create deeper, more pronounced marks. Familiarize yourself with your tool’s temperature settings and practice adjusting as necessary. A good rule of thumb is to start at a lower temperature and increase it gradually until you achieve the desired effect.
Experiment with Different Techniques
There are a variety of pyrography techniques you can explore. Some popular methods include:
- Shading: Use circular motions with the tip at varying pressure to create depth.
- Cross-hatching: Overlay lines to build texture and shadows.
- Heat Embossing: Use a hot tool to create raised patterns or designs.
Each technique offers a unique aesthetic, adding richness to your overall designs.
Keep a Steady Hand
Stability is key in pyrography. Use both hands to steady yourself—one on the tool and the other on the surface. Consider creating a small work surface that allows you to rest your arms. This can minimize shakes and jitters when using the pyrography pen.
Maintain Your Tools
Regular maintenance extends the life of your pyrography tools. Ensure the tips are free from residue and burn marks. If they become damaged or overused, replace them promptly to preserve the quality of your work.
Use Reference Images
Having visual references can significantly improve your design quality. Find images that inspire you and transform them into your artwork. Study the details such as shading, direction of lines, and texture. This practice will enhance your skills and creativity over time.
Practice Patience
Pyrography is not a race. The magic happens when you take your time to refine and perfect your pieces. Rushing can lead to mistakes, such as overburning or misalignment in your design. Allow yourself to be present in each step, enjoying the artistic process.
Document Your Progress
Keep a record of your projects—what works and what doesn’t. This reflection allows you to see your improvement over time and provides valuable insights into your evolving style. Consider taking photos of each piece to track your artistic journey.
By following these essential tips and tricks, beginners can set themselves up for pyrographic success. With curiosity, practice, and a little patience, you’ll soon be creating beautiful pieces that showcase your skills and creativity. Enjoy the process, and let your passion for pyrography shine through in your work!
The Best Tools and Materials for Effective Pyrography
For anyone diving into the world of pyrography, having the right tools and materials can greatly influence the quality and ease of your projects. The process of burning images into wood or other materials requires precision, creativity, and the right equipment. Below, we’ll explore the best tools and materials that will enhance your pyrography experience.
Essential Pyrography Tools
Whether you are a beginner or a seasoned artist, here are some essential tools to consider:
- Pyrography Pen: The pyrography pen is your primary tool for burning designs. Look for a pen with adjustable temperature settings for better control over the burn depth and effects. Brands like Walnut Hollow and Razertip offer excellent options.
- Wood Burning Tips: Different tips create unique effects. Common tips include:
- Fine Point: Great for detailed work and thin lines.
- Ball Tip: Perfect for shading and creating soft, rounded designs.
- Spoon Shader: Ideal for larger areas of shading.
- Writing Tip: Best suited for lettering and finer details.
- Temperature Control Box: For advanced pyrographers, a temperature control box allows you to maintain consistent heat. This ensures that your burns are even and accurate throughout your project.
Types of Wood for Pyrography
Choosing the right type of wood is crucial for achieving the best results. Here are some popular choices:
- Basswood: Often recommended for beginners, basswood burns smoothly and offers a nice contrast.
- Birch: Provides a fine, even grain, making it ideal for detailed work.
- Pine: Readily available and inexpensive, pine can add unique textures to your artwork.
- Mahogany: Known for its rich color, mahogany allows for deep, dramatic burns.
Additional Materials
Beyond wood, there are various materials you can use in pyrography:
- Leather: Pyrography on leather can create stunning designs that can be used for clothing, accessories, and home decor.
- Cardboard: A good material for practicing your techniques before moving on to more expensive pieces.
- Paper and Canvas: While less common, these materials can be treated for pyrography and allow for artistic flexibility.
Protective Gear
Safety should be your top priority, especially when handling tools that produce heat:
- Protective Eye Wear: Shield your eyes from flying debris, especially if you’re working with wood.
- Dust Mask: Burning wood can produce fine particles; a dust mask can help protect your lungs.
- Heat-Resistant Gloves: These can protect your hands from accidental burns, ensuring you work safely.
Maintaining Your Tools
To ensure your pyrography tools last, proper maintenance is essential:
- Clean the Tips: After each use, clean your burning tips to remove charred residue, ensuring optimal performance.
- Store Properly: Keep your tools organized in a case or holder to prevent damage.
- Regularly Check Wires: Inspect the wires of the pyrography pen for any signs of wear and tear to prevent accidents.
Experimenting and Exploring
Pyrography is an art form that thrives on creativity. Don’t hesitate to experiment with different materials, techniques, and styles. Engaging with other artists through forums or social media can provide inspiration and valuable insights into the craft.
By equipping yourself with the right tools and materials, you set the stage for creating beautiful pyrographic art. The combination of suitable woods, effective burning pens, and essential safety gear will not only help you develop your skills but also ensure that each project is enjoyable and rewarding. Dive into this rewarding craft, and let your creativity shine!
Techniques to Enhance Your Pyrography Artistry
Pyrography, the art of decorating wood or other materials with burn marks, offers a unique medium that combines creativity with craftsmanship. Whether you’re a seasoned pyrography artist or just starting, mastering certain techniques can take your artistry to the next level. Here are some essential techniques to enhance your pyrography skills, helping you create stunning, professional-quality pieces.
1. Choose the Right Wood
The type of wood you work with has a significant impact on your final piece. Choose softer woods like pine or cedar for beginners. They burn easily and allow for smoother strokes. However, consider harder woods like birch or walnut for advanced projects, which provide rich textures and vibrant contrasts.
2. Invest in Quality Tools
A good pyrography tool is an artist’s best friend. Opt for a tool with adjustable temperature settings and interchangeable tips. This versatility allows you to experiment with various techniques, from detailed line work to shading.
Essential Pyrography Tips:
- Standard Tip: Great for outlines and general shapes.
- Shader Tip: Useful for creating gradients and softer lines.
- Round Tip: Ideal for fine details and intricate designs.
3. Master Temperature Control
Understanding temperature control is crucial. Different woods react differently to heat, and maintaining an appropriate temperature helps achieve the desired effect. Practice on scrap wood to test the burn before applying it to your main piece. Set your tool to a low temperature for light burns and increase gradually for darker tones.
4. Practice Techniques
Focus on a variety of burning techniques to expand your artistic range:
- Line Work: Sharp, precise lines add structure to your designs.
- Shading: Use a shading tip to create depth, enhancing the textural quality of your work.
- Stippling: Dots and small strokes can create captivating patterns and textures.
- Blending: Soft transitions add a lifelike quality to your piece.
5. Develop Your Design Skills
Before you start burning, sketch your design onto the wood lightly. This foundation helps guide your work and allows for adjustments. Consider using graphite transfer paper to easily reproduce intricate designs. An additional tip is to keep your designs simple to avoid overwhelming yourself in early projects.
6. Experiment with Mixed Media
Pyrography isn’t just about burning; let your creativity soar by incorporating different materials. Combine wood burning with paint, charcoal, or inks to add color and dimension. Just ensure that any mediums used are compatible with the wood surface to achieve desired results.
7. Protect Your Art
Once your piece is complete, consider applying a finish to protect it from environmental factors. Seal your artwork with a clear varnish or wax to maintain its vibrancy and extend its longevity. Make sure the finish is appropriate for the type of wood and any additional mediums used.
8. Join a Community
Engaging with other artists can inspire and elevate your skills. Look for local pyrography groups or online forums where you can share your work, get advice, and learn new techniques from others. Collaboration often opens creative doors you never expected.
9. Attend Workshops
Hands-on experience is invaluable. Participating in workshops allows you to learn new techniques directly from seasoned artists. They provide not only instruction but also inspiration by exposing you to different styles and methods.
10. Never Stop Learning
The world of pyrography is vast, and there’s always something new to explore. Keep an open mind and continually seek out new techniques, styles, and materials. Watch tutorial videos, read books, or take online courses to enhance your knowledge base.
By incorporating these techniques into your pyrography practice, you’ll find that your artistry will flourish. Each piece you create can tell a story, and with dedication and creativity, you can share your vision with the world. So grab your tools and get started on your pyrography journey!
Common Mistakes in Pyrography and How to Avoid Them
In the world of pyrography, even seasoned artists can stumble into common pitfalls that may hinder their creativity and skill development. Recognizing these mistakes and learning how to avoid them can drastically improve your pyrography work. Here’s a detailed exploration of frequent errors made in pyrography and effective strategies to prevent them.
Choosing the Wrong Wood
One of the most significant mistakes any pyrographer can make is selecting the wrong type of wood. Not all woods burn the same way. Some may produce too much smoke, while others might not hold detail well. To avoid this:
- Opt for woods like birch, maple, or basswood that have a fine, consistent grain, making them ideal for pyrography.
- Avoid hardwoods with a lot of resin, like pine, as they can produce uneven results and excess smoke.
Neglecting Proper Tool Maintenance
Another common oversight is not maintaining pyrography tools. Dirty or damaged tips can result in poor-quality burning. To keep your tools in prime condition:
- Regularly clean the tips after each use to remove soot and resin buildup.
- Inspect the tips for damage and replace them when necessary to ensure even burning and precision.
Ignoring Temperature Settings
Using the wrong temperature can lead to frustrations in pyrography. Too hot can burn your design, while too cool can leave an ineffective mark. Here’s how to manage temperatures effectively:
- Test the temperature on a scrap piece of wood before starting your actual project.
- Familiarize yourself with your pyrography tool’s temperature control settings to achieve the best results for different woods.
Overlooking Design Planning
Jumping straight into a project without a clear plan can result in unwanted errors or a lack of coherence in your artwork. To avoid this, take time to:
- Create sketches or outlines on paper before transferring designs onto wood.
- Consider using carbon paper to trace designs onto the wood for more precise placements.
Not Practicing Different Techniques
Another common mistake is not experimenting with various techniques, such as shading, texturing, or different burning styles. To enhance your skills:
- Dedicate time to practice different pyrography methods and learn how they can create depth in your work.
- Take workshops or follow online tutorials to broaden your technique repertoire.
Inadequate Lighting and Workspace
An uninspired workspace or poor lighting can greatly impact your focus and artistry. It’s essential to create an optimal environment by:
- Ensuring that your workspace is well-lit, preferably with natural light or adjustable lamps.
- Organizing your tools and materials to minimize distractions and clutter.
Ignoring Safety Precautions
Safety should never be an afterthought in pyrography. The process involves heat and potentially harmful fumes. To prioritize safety:
- Work in a well-ventilated area to reduce exposure to smoke and ground wood particles.
- Use gloves and goggles to protect your hands and eyes from burns and debris.
Being Overly Critical
Many artists fall into the trap of being overly critical of their work. Perfectionism can stifle creativity and progress. To combat this:
- Remind yourself that learning is a process, and even established artists continue to evolve.
- Celebrate small victories and improvements rather than fixating on perceived flaws.
By being mindful of these common mistakes and adopting proactive strategies, you can elevate your pyrography skills. Every artist makes errors; the growth comes from recognizing and learning from them. With patience and practice, you’ll find your unique style and voice within this beautiful art form.
Creative Project Ideas to Elevate Your Pyrography Skills
Exploring creative projects can significantly enhance your pyrography skills and broaden your artistic horizons. Engaging in hands-on artistic endeavors not only boosts your technical abilities but also helps you develop a unique style. Here are several creative project ideas that can take your pyrography to the next level.
1. Customized Wooden Coasters
Start with a set of unfinished wooden coasters. These provide an excellent canvas for intricate designs. You can create custom patterns, meaningful quotes, or even images that reflect your personality. Coasters are practical items that make great gifts while showcasing your artistic flair.
2. Wall Art Pieces
Transform sections of wood into stunning wall art. Use large panels to create landscapes, animals, or abstract designs. Pyrography lends a unique warmth to any wall, making your home feel more inviting. Experiment with different wood types for varying textures and colors.
3. Engraved Photo Frames
Add a personal touch to your photography by crafting pyrography frames. Choose simple designs or intricate patterns that complement the photos. This project not only showcases your artistic skills but also turns ordinary frames into extraordinary keepsakes.
4. Pyrography Jewelry
Craft unique pieces of jewelry by using thin slices of wood. You can create pendants, earrings, or bracelets. Incorporate your favorite symbols or quotes to make them distinctive. Pyrography jewelry is not just beautiful but also a great conversation starter.
5. Decorative Signage
Use your pyrography skills to create decorative signs for your home, garden, or business. Craft inspirational quotes, family names, or directional signs. Not only do these projects enhance your technical skills, but they also add a personal touch to your surroundings.
6. Customized Wooden Boxes
Design unique wooden boxes with pyrography for storing anything from jewelry to keepsakes. Each box can be personalized with designs that are meaningful to you or the person receiving it. Incorporate patterns, motifs, and even names to make it truly one-of-a-kind.
7. Pyrography on Gourd Art
If you’re feeling adventurous, try your hand at burning designs onto gourds. The curved surface offers a unique challenge and can yield stunning results. Create decorative pieces, vases, or whimsical sculptures that are perfect for display or gifting.
8. Functional Kitchen Items
Transform ordinary kitchen utensils into works of art. Use pyrography to decorate wooden spatulas, cutting boards, or spoons. These functional items not only serve a purpose but also enhance the aesthetic of your kitchen.
9. Storytelling Boards
Create a storytelling board featuring a narrative of your choice. Illustrate scenes or characters in a sequential manner. These boards can be educational tools for kids, or even a fun way of sharing family stories during gatherings.
10. Seasonal Decor
Design seasonal decorations such as ornaments for the holidays or themed displays for different seasons. Pyrography on wood can give each seasonal decor a rustic charm, making them perfect for family traditions and celebrations.
Each of these projects not only enhances your pyrography skills but also encourages you to think creatively. Don’t be afraid to make mistakes; they are part of the learning process. Remember that pyrography is an art form that combines patience, skill, and passion. Take your time, enjoy the process, and let your creativity shine as you explore these project ideas. Make sure to share your work with others, as community feedback can provide valuable insights and inspiration.
Whether you’re creating practical items or beautiful art pieces, these projects allow you to deepen your practice in pyrography. So grab your tools and let your imagination soar!
Conclusion
With a solid foundation set through essential tips and tricks, you are now armed to embark on your pyrographic journey. Starting with the basics, understanding the key principles will make all the difference. Embracing meticulous planning in your designs, from sketching to understanding the grain patterns of your wood, creates a harmonious flow in your art. Remember, patience is your ally. Take your time to cultivate your skills, and you’ll notice tangible improvements in your techniques.
Equipping yourself with the best tools and materials can significantly influence the quality of your work. Investing in a high-quality pyrography pen, coupled with various tips for different effects, opens new avenues for creativity in your projects. Consider experimenting with various types of wood, as each type delivers a unique texture and finish to your art. Choosing woods like basswood or birch tends to offer smoother surfaces, while others may lend themselves to more character. The right materials not only enhance your creations but also provide a more profound satisfaction in crafting something uniquely yours.
As you dive deeper into your pyrography artistry, utilizing advanced techniques can elevate your work from basic designs to stunning masterpieces. Techniques such as shading, stippling, and line work bring depth to your pieces. Practice fluid control of your pen to create varying line thicknesses and different shading effects. Layering also contributes significantly to the visual appeal, allowing you to define forms and highlights in your artwork. Experimenting with different textures like wood burning versus wood etching can further refine your skills, giving you a broader repertoire for your artistic expression.
Beware of common mistakes that many beginners make. Recognizing these pitfalls can save you frustration and help you avoid potential mishaps. For example, burning too hot can easily lead to charred marks that ruin the piece. Ensuring your workspace is set up correctly can also prevent accidents, most notably maintaining a clear area to avoid scratches or smudges on your work. Properly adjusting the temperature of your pyrography pen and consistently testing on scrap wood before committing to your masterpiece will lead to better outcomes. Additionally, staying present in your craft, focusing on each movement without rushing through the process, is crucial for developing your unique style.
Unleashing your creativity opens up a world of possibilities as you practice and refine your pyrography skills. Consider exploring different project ideas that challenge you to think outside the box. Crafting personalized gifts, home décor, or even intricate wall hangings can add a distinctive touch to your surroundings. You may also find joy in collaborating on communal art projects or engaging with others at workshops. These experiences not only inspire but can also provide invaluable feedback to help you grow as an artist.
As you absorb these tips and incorporate them into your work, remember that pyrography is more than a skill; it’s an expression of your creativity. So don’t be afraid to push boundaries and explore various designs, techniques, and materials. Join online communities or local clubs where you can share your progress, exchange ideas, and grow alongside fellow pyrography enthusiasts. Constructive criticism from peers can offer fresh perspectives and help you discover new approaches that you may not have considered.
Cultivating your pyrography skills is a journey filled with learning opportunities and endless creativity. The more you practice, the more proficient you’ll become, leading to a profound connection with your work. Enjoy the delightful process of trial and error as you witness your artistry flourish. Above all, remember that every artist develops their unique style over time, so embrace your evolution and have fun along the way.
Engage fully in the world of pyrography, and let your passion illuminate your pieces. By internalizing these tips and applying the techniques discussed, you’ll be well on your way to creating stunning wooden artworks that speak volumes about your unique vision and dedication. Get ready to transform your ideas into reality, one burn at a time!